
Table of Contents
- 1.1 - Thanks and Praise to id Software
- 1.2 - New Version Notes by Tris
- 1.3 - How to Use This Guide
2.0 - Description of the Level Editors
- 2.1 - Classic Editors: Mapedit and FloEdit
- 2.2 - Modern Editors: ChaosEdit, EisenEdit, HWE, VSWolfTools 2, WDC, WLEdit
- 2.3 - SDL and ECWolf: What Changes?
- 2.4 - I Keep Getting "Runtime Error 200" When I Run Mapedit; Why?
- 2.5 - Differences Between Wolf3D and Spear of Destiny
- 2.6 - Editing Spear of Destiny Additional Missions 2 & 3
- 3.1 - Setting Up Your Working Directory
- 3.2 - Study the Originals First
- 3.3 - Learning From Original Levels: Studying Design Intent in the Editor
- 3.4 - Planning on Paper
4.0 - Designing New Levels: MAP Mode
- 4.1 - Getting Started: First Steps in the Editor
- 4.2 - The Map Grid: Size and Boundaries
- 4.3 - Walls
- 4.31 - A Starting Approach: Hollowing Out from Solid
- 4.32 - Texture Consistency and Style
- 4.33 - Varying Textures Within the Same Family
- 4.34 - Texture Clashing: What to Avoid
- 4.35 - Texture Clashing at Corners: The Perpendicular Rule
- 4.36 - Using Textures as Visual Clues for the Player
- 4.37 - Frequency and Spacing of Accent Textures
- 4.38 - Number of Texture Families Per Level
- 4.39 - Signed Walls, Portraits, and Symbols: Placement Rules
- 4.310 - Special Wall Types: Landscape, Elevator, Fake Elevator
- 4.4 - Floor Codes
- 4.41 - The Three Approaches to Floor Code Assignment
- 4.42 - Floor Codes and Sound Propagation
- 4.43 - Cascading Alert Chains: Advanced Floor Code Strategy
- 4.44 - The Deaf Guard Floor Code (006a)
- 4.45 - The Secret Elevator Floor Code (006b)
- 4.46 - Floor Codes in Secret Rooms
- 4.47 - Changing Floor Codes Without a Door
- 4.48 - What Happens When You Mess Up
- 4.49 - Mapedit Floor Code Tools and Keyboard Shortcuts
- 4.5 - Doors
- 4.51 - Door Limits and Placement Rules
- 4.52 - The Phantom Door Slot (PDS) Bug
- 4.53 - Locked Doors and Key Placement
- 4.54 - Warning: Enemies Can Open Locked Doors
- 4.55 - Tactical Door Placement: Delaying Guard Arrival
- 4.6 - Secret Doors (Pushwalls)
- 4.61 - The 2-or-3-Square Movement Problem
- 4.62 - Chain Pushwall Markers: Handling a Stuck Wall
- 4.63 - Guards in Secret Rooms
- 4.64 - Don't Put Objects in a Pushwall's Path
- 4.65 - Avoid Placing Pushwalls Adjacent to Decorated Portrait Walls
- 4.66 - Essential Items Behind Pushwalls: When It Works and When It Doesn't
- 4.67 - Two-Direction Pushwall Secrets
- 4.68 - Pushwall Puzzles and Advanced Techniques
- 4.69 - Marking Pushwalls for the Player
- 4.610 - Hiding Enemies Behind Pushwalls
- 4.611 - The Pushwall Side-View Graphics Glitch
- 4.612 - The Dead Guard Trick
- 4.7 - Elevators
- 4.71 - Orientation: Horizontal vs. Vertical
- 4.72 - Elevator Wall Types Explained
- 4.73 - The Single-Thickness Elevator Wall Warning
- 4.8 - Secret Elevators
- 4.81 - Floor Code 006b and Secret Level Placement
- 4.82 - Secret Floor Rules by Episode (Wolf3D and SoD)
- 4.83 - Secret Levels Should Feel Different
- 4.84 - Level Numbers That Must Not Have Standard Elevators Without Coding
- 4.85 - A Note on Ratios: Boss and Secret Levels Don't Show End-of-Level Stats
- 4.9 - Ceiling Colors
- 4.91 - Why Ceiling Color Matters
- 4.92 - Ceiling Color and Wall Texture Compatibility Guide
- 4.93 - Special Effect: The Light Blue Ceiling and the Sky Illusion
- 4.94 - Ceiling Color Reference Charts
5.0 - Setting, Theme, and Atmosphere
- 5.1 - Planning Your Theme Before You Build
- 5.2 - Room Structure: Squares, Rectangles, Corners, T-Junctions, Intersections
- 5.3 - What Defines a Room?
- 5.4 - Symmetry in Level Design
- 5.5 - Realistic Area Design: Kitchens, Guard Posts, Barracks, Toilets, Meeting Rooms
- 5.6 - Matching Guard Types to Their Environment
- 5.7 - Balancing Realism with Fun
- 5.8 - Variation Across a Level Set: Episode Layout Archetypes
- 5.9 - Room Size and Shape Variation
- 5.10 - Area Type and Layout: Sewers, Prisons, Castles, Offices
- 5.11 - Mazes: Why They Usually Don't Work, and When They Do
- 5.12 - Outdoor Areas and the Landscape Wall
- 5.13 - Starting Areas: First Impressions
- 5.14 - Playing With the Player's Emotions
- 5.15 - Using Symbolism Subliminally
6.0 - Designing New Levels: OBJECT Mode
- 6.1 - Overview: Statics, Actors, and Invisible Objects
- 6.2 - Static Object Limits and Screen Clutter
- 6.3 - Furniture and Decoration
- 6.31 - Decoration Philosophy: Less Is More
- 6.32 - Matching Decorations to Room Theme
- 6.33 - Symmetrical Object Placement
- 6.34 - Portraits and Symbols: What Goes in Front and What Doesn't
- 6.35 - Decoration in Niches and Alcoves
- 6.36 - Plants in Front of Banners
- 6.37 - Table Placement: Give the Nazis Room to Sit
- 6.38 - Color Scheme Considerations for Decorative Objects
- 6.39 - Using Objects to Affect Gameplay and Movement
- 6.310 - Pillars: A Double-Edged Tool
- 6.311 - Objects That Belong in Alcoves: Stoves, Kitchen Utensils, and Structured Objects
- 6.312 - Universal vs. Context-Specific Static Objects
- 6.313 - Underused Objects Worth Revisiting: The Bucket and Others
- 6.314 - Keeping Empty Levels Functional
- 6.4 - Guards
- 6.41 - Guard Types and Their Behavior
- 6.42 - Moving (Patrolling) Guards
- 6.43 - Stationary Guards
- 6.44 - The Deaf Guard Attribute in Practice
- 6.45 - Using Deaf Guards to Block Alarmed Guard Movement
- 6.46 - A Key Mechanic: Alarmed Guards Cannot Pass Unalarmed Ones
- 6.47 - Dogs: Special Rules and Common Underuse
- 6.48 - Guard Collision and Path Freezing
- 6.49 - Guards Moving Through Doors and Across Floor Codes
- 6.410 - Advanced Guard Choreography: How Guards Really Move
- 6.411 - Using Geometry to Herd and Control Guards
- 6.412 - The Drip-Feed Technique: Controlling the Rate of Guard Arrival
- 6.413 - Patrolling Guards on Level Loops
- 6.5 - Difficulty Settings
- 6.51 - The Four Difficulty Levels Explained
- 6.52 - Three Core Difficulty Tools: Ammo, Health, and Mutants
- 6.53 - A Practical Formula for Difficulty Scaling
- 6.54 - The 50/20/30 Rule
- 6.55 - Using Guard Types and Dogs to Self-Balance Difficulty Across Skills
- 6.56 - Weapon Distribution as a Difficulty Tool
- 6.6 - Enemy Placement: Design and Tactics
- 6.61 - Preventing Player Camping
- 6.62 - Ambushes, Traps, and Surprise Encounters
- 6.63 - The Machine Gun Bait Trick
- 6.64 - Making Enemies Attack From Awkward Positions
- 6.65 - Forcing Player Movement Through Ammo Restriction
- 6.66 - Using Floor Codes for Unconnected-Room Ambushes
- 6.67 - The Wired Doors Technique
- 6.68 - Dogs at the End of Climactic Battles
- 6.69 - The Lunch Line: A Creative Guard Arrangement
- 6.610 - Guard Balance Across Skill Levels
- 6.611 - Enemy Placement as Emotional Design
- 6.7 - Bosses
- 6.71 - Boss Behavior, Orientation, and the Frozen Boss Problem
- 6.72 - Designing the Boss Arena
- 6.73 - Bodyguards and Boss Level Structure
- 6.74 - Episode Endings: Key-Drop Bosses vs. Death-Cam Bosses
- 6.75 - The Pac-Man Ghost and Invincible Guards
- 6.76 - No More Than One Boss Per Level: The Rule and Its Exceptions
- 6.8 - Ammo and Weapons
- 6.81 - Weapon Distribution Styles
- 6.82 - Weapon Pacing Across an Episode
- 6.83 - Ammo Placement: Clusters, Scarcity, and Challenge
- 6.84 - Timing: Large Ammo Before the Fight, Health After
- 6.85 - Chaingun Rarity as a Design Choice
- 6.9 - Food and Health Packets
- 6.91 - Placement by Context: Kitchens, Dog Areas, and Secret Caches
- 6.92 - Health Balance: How Much Is Too Much?
- 6.93 - Health Starvation as a Design Tool
- 6.10 - Treasure
- 6.101 - Where to Place What: Crowns, Chests, and Crosses
- 6.102 - Treasure Behind Columns: Enticing the Player
- 6.103 - Showing the Player What They Can't Reach Yet
- 6.104 - Limiting the Number of Secrets to Avoid Fatigue
- 6.11 - Keys
- 6.111 - The Four Key Placement Strategies
- 6.112 - Keys and Secret Passages: The Shortcut Approach
- 6.113 - If the Key Is Behind a Pushwall, the Door Should Be Too
- 6.12 - Other Objects: Turning Points, Start Positions, Endgame Triggers
- 6.121 - Actor Limits in Full: Guards, Dead Guards, Bosses, Projectiles, and the 148/149 Rule
- 6.122 - Endgame Trigger Placement and the Near-Limit Crash Risk
- 7.1 - Holo-Walls: How They Work and Their Limitations
- 7.2 - The Guard-in-Wall Ambush Trick
- 7.3 - Penetrable Objects via Moving Guards
- 7.4 - The Elevator Ambush: Fake Elevator with a Pushwall Behind It
- 7.5 - The Wax Figure / Disguised Guard Trick
- 7.6 - The Armed Wall / Gauntlet Trick
- 7.7 - The All-Night Wall Texture Trick
- 7.8 - Déjà-Vu Levels
- 7.9 - Making Secrets Interesting and Challenging
- 7.91 - Giving the Player Cues
- 7.92 - Pushwalls That Punish: Consequences for Wrong Choices
- 7.93 - The Pushwall Sequence Puzzle
- 7.10 - Rearranging Level Order Without Changing the EXE
8.0 - Other Tips and Strategies
- 8.1 - Number of Objects in View
- 8.2 - Narrow vs. Wide Passages
- 8.3 - Avoiding Over-Design
- 8.4 - Make Every Room Unique: Navigation and Orientation
- 8.5 - Level Completability: Can It Be Beaten With a Pistol and 8 Bullets?
- 8.6 - Every Level Must Have at Least One Enemy, One Secret, and One Treasure
- 8.7 - What Makes a Map a Masterpiece?
- 9.1 - Why and How to Playtest
- 9.2 - Using Debug Mode and Cheat Codes
- 9.3 - Command Line Parameters
- 9.4 - Using No-Clip to Check Guard Paths
- 9.5 - Common Problems and Solutions
- 9.51 - Keeping Unused Levels Functional
10.0 - Mappers' Block: Staying Creative
- 10.1 - When You're Stuck: Strategies to Get Going Again
- 10.2 - Using Music, Maps, Shapes, and Other Games as Inspiration
- 10.3 - Walking Away and Coming Back Fresh
- 10.4 - Building One Room at a Time
11.0 - Graphics, Sound, and Code: Things You Should Know
- 11.1 - Graphics Editing
- 11.2 - Sound Editing
- 11.3 - Balancing Code and Graphics Mods with Level Design
APPENDIX A - Level Data Quick Reference
- A-1 - Wolfenstein Level Limits: Guards, Dead Guards, Bosses, Hitler, Projectiles, Objects, Doors
- A-2 - Treasure / Ammo / Health Calculations
- A-3 - A Note on Ratios: What Counts and What Doesn't
APPENDIX B - Ceiling Color Reference
- B-1 - Wolfenstein Ceiling Color Chart
- B-2 - Spear of Destiny Ceiling Color Chart
APPENDIX C - Troubleshooting / Strange Effects Reference
APPENDIX D - Mapedit Keyboard Shortcuts Reference
The Wolfenstein 3D Level Design Bible 2026
Tips on Designing Good Levels for Wolfenstein 3D & Spear of Destiny
The basis for this guide was written by Brian J. "Blazkowicz" Rowan © Copyright 1994-1999. Expanded and updated 2026 by Tris. With thanks to Warren Buss, Martin Krysiak, JudgeXYZ, Dark_wizzie, Jordan Trudgett, serpens, Ian Franken, Gary Ragland, Brian Lowe, Ringman, Dean, Gerolf, AreyeP, Tricob, Barry Christian, Matthew, Poet, Kuki, Dunkelschwamm, Ella Guro, Executor, Military, and one anonymous contributor whose observations on static objects were too good to leave out.
1.0 - Introduction to Wolfenstein Level Editing
Hello to all you Wolf-3D fans and hackers! This file is a bunch of tips put together about successfully creating a good Wolfenstein or Spear of Destiny level, using the map editor of your choice. What I've learned over the years is that you can't just create a decent level by selecting a wall type and dragging your mouse across the screen. Of course, your view of "decent" depends on what you like, but I tend to like the realistic design that the original Wolf3D levels seemed to have. This document will show you some of the best ways to make those kinds of levels.
Over time I've seen plenty of Wolfenstein levels. I have a collection of well over 800 levels created by various authors. A few of them were good - but only a few. The rest contained either a ridiculous number of pushwalls (100+), were random maps, or were simple modifications of the original Wolfenstein levels. All of these last types of levels are, in my humble opinion, "Wolfenstein junk". I think that if you want to make levels, you should want the people who will play them to get the same sense of enjoyment out of them as we all have from the original id Software levels. To do this, you have to attack the level creation process with a certain diligence that involves a thorough knowledge of all of the original 60 levels.
It may help if you work on your levels in the same place and atmospheric conditions, if possible, that you originally played Wolfenstein in. I've found that helps me immensely at times. Also, if you want to make high quality levels, take a look at what id Software has done with theirs. Mimic their designs. Choose the same combinations of wall textures and ceiling colors. In the end, you ought to come out with a pretty decent level. Just remember that good levels are not made only by the amount of German soldiers they contain - they're made by graphic appearance and playability as well.
This guide was originally written with MapEdit in mind as the editor of choice. The expanded 2026 version covers modern editors as well. Most principles apply regardless of which editor you use.
1.1 - Thanks and Praise to id Software
Before we start, I must give thanks to id Software, Inc., for creating this great game, and to Apogee for distributing it, because without them there wouldn't BE any Wolfenstein, or, obviously, any map editors. Oh, yes, and please be aware that my use of the term "hackers" refers to people who enjoy looking into games and programs to see what makes them work - not "crackers", who are the people who infiltrate networks and lock people out and cause general chaos.
1.2 - New Version Notes by Tris
This guide began as B.J. Rowan's definitive map design tips document, first published in 1994 and last updated in 1999. It remains one of the finest and most thorough pieces of Wolf3D mapping documentation ever written, and it serves as the backbone of this expanded version. Everything Rowan wrote has been preserved, clarified where needed, and built upon.
Alongside Rowan's original text, this guide incorporates the mapping tips document by Warren Buss, member of the Mapedit team, whose technical breakdown of floor codes, guard behavior, elevator design, and debugging tools fills in a number of gaps that the original guide left open.
The third major source is a collection of forum posts compiled over many years from the Wolf3D community. These posts represent some of the deepest, most practical, and most hard-won mapping knowledge this community has produced. The contributors whose ideas, advice, and techniques have been folded into this guide are:
Martin Krysiak, JudgeXYZ, Dark_wizzie, Jordan Trudgett, serpens, Ian Franken, Gary Ragland, Brian Lowe, Ringman, Dean, Gerolf, AreyeP, Tricob, Barry Christian, Matthew, Poet, Kuki, Dunkelschwamm, Ella Guro, Executor, Thomas, and Military.
There is also one anonymous contributor whose observations on static object usage were too good to leave out.
All of these people gave their time and knowledge to this community freely. This guide is, in no small part, theirs.
A few notes on this version: the guide has been expanded to cover modern editors and the SDL/ECWolf environment where relevant. The core advice, however, applies equally to DOS Wolf3D, Spear of Destiny, and their modern equivalents. Where something is specific to one platform, it is noted as such.
1.3 - How to Use This Guide
This guide is structured to take you from setup all the way through to playtesting, with reference appendices at the back. If you're a complete beginner, read it front to back. If you're an experienced mapper looking for specific advice, use the table of contents to jump to whatever section is relevant.
The MAP mode sections (Section 4) cover everything you place in the first plane of the editor - walls, floor codes, doors, pushwalls, elevators, and ceiling colors. The OBJECT mode sections (Section 6) cover everything in the second plane - decorations, guards, weapons, health, treasure, keys, and special objects. Sections 5 and 7 through 10 cover design philosophy, advanced techniques, and the creative process. The appendices at the back are quick-reference material you'll want to keep handy while working in the editor.
One more thing before we begin. There is a rule I'd ask you to keep in mind throughout: always make sure your level can be beaten on Death Incarnate starting with nothing but a pistol and eight bullets. If you can't beat it under those conditions, it isn't finished yet.
2.0 - Description of the Level Editors
There have been several editors for Wolfenstein 3D over the years, from the original DOS-based Mapedit all the way through to modern Windows and cross-platform tools. Here is an overview of what's available.
2.1 - Classic Editors: Mapedit and FloEdit
Mapedit, by Bill Kirby, with modifications by Dave Huntoon, Bryan Baker, Matt Gruson, and Warren Buss, is the original editor for Wolfenstein. It first debuted in 1992 and was the tool of choice for most mappers for many years. Its current version is 8.4, and it runs on DOS.
One particularly nice feature of Mapedit is that it can save individual floor files which can be read into any level. This is useful when you want to distribute just a few floors to a friend who also has a copy of the editor. Take note that versions 7.0 and higher of Mapedit do not support the shareware version of Wolfenstein.
FloEdit, by Florian Stöhr, is a much more complete tool. It can handle levels, sprites, walls, VGAGRAPH images, and even digital sounds. It's essentially Mapedit built into a Windows interface, and it can edit both Wolfenstein and Spear. It runs on Windows 95/98. If you're using the classic editors, FloEdit is the one to go with for its versatility.
2.2 - Modern Editors: ChaosEdit, EisenEdit, HWE, VSWolfTools 2, WDC, WLEdit
The Wolf3D community has produced several modern editors that are considerably more powerful than their predecessors. Each takes a different approach to the editing workflow, so it is worth understanding what each one offers before committing to one for your project.
ChaosEdit, made by Chaos Software, was initially released in May 2002 and updated continuously for several years. It is a popular choice for editing original mapsets - powerful yet still relatively approachable for new modders. Its standout feature is a 3D preview mode that lets you walk through your level in real time rather than viewing it from above, which is enormously useful for checking how areas look before playtesting. ChaosEdit can edit maps, art, sounds, music, and VGA data. The current version, v1.27, runs relatively stable though not without occasional issues, and the editor has not been updated since 2007. One important note: ChaosEdit has no undo button, so save frequently and be careful with the flood-fill tool. Also, I've found that using ChaosEdit on laptops often causes corrupted GAMEMAPS files!
EisenEdit, developed by Linuxwolf, takes a distinctive approach - it is written in OpenGL and runs from within the Wolf4SDL engine itself, using the game's actual VSWAP file to display real sprites and wall textures directly on the map screen. This gives you a highly detailed, accurate overhead view alongside a semi-playable live 3D preview with WASD controls. EisenEdit includes pathfinding functionality that can draw the shortest route between two tiles while accounting for keys and locked doors, which is a genuinely useful design tool. It supports many advanced modding features and runs on modern Windows. Currently it only edits 64x64 map sizes. It is open source under GPLv3 and was originally developed for use in Team Raycast games.
HWE (Havoc's Wolf3D Editor), released initially in April 2011 and last updated in March 2019, takes a familiar MapEdit-style approach while running natively on Windows and adding a number of enhancements. These include zooming and an expanded grid size of up to 180x180. In addition to Wolf3D and Spear of Destiny, HWE also supports Blake Stone, Corridor 7, Super 3D Noah's Ark, and Operation: Body Count. To load game files, click File → Open Project and select your game folder.
VSWolfTools 2, made by Vincent and last updated in February 2020, handles graphics editing, map making, sound and music editing all in one package. Like HWE it supports maps up to 180x180. Notably, it runs smoothly on 64-bit machines - something older editors, most notably FloEdit, do not manage reliably.
WDC (Wolf3D Data Compiler), made by Adam Biser and first released in 2003, has received countless updates since and has gradually overtaken both FloEdit and ChaosEdit as the go-to multi-editor for serious Wolf3D modding. It covers the full package - sounds, music, maps, graphics, and VGA - in a single tool. Setup is slightly more involved: you need to specify a Base Data Folder pointing to your game files and a separate Output Folder for your mod's compiled output. Use File → Compile All to save your work. WDC has a small editing screen, which some people find limiting, but its depth of capability makes it the strongest choice for heavily modded projects.
WLEdit, released in October 2022, is a multi-purpose editor supporting Wolf3D, Spear of Destiny, Blake Stone, MacenWolf, Corridor 7, Operation Body Count, and Super Noah's Ark 3D - both shareware and registered versions. It covers graphics, sound and music, VGA assets, and maps, and includes a 3D map editor with real-time preview. To get started, use the Browse button followed by Load Files.
The choice of editor is largely a matter of personal preference and project scope. Pick one and stick with it - trying to switch mid-project creates unnecessary confusion. If you are editing original, unmodded Wolf3D or Spear, ChaosEdit remains a solid recommendation for its ease of use and 3D preview. If you want the deepest feature set and are working on a heavily modded project, WDC's capabilities are hard to beat. If you are working on a project that benefits from seeing real game graphics in the editor itself, EisenEdit's approach is worth exploring.
2.3 - SDL and ECWolf: What Changes?
WOLF4SDL (SDL stands for Simple DirectMedia Layer, a software library for modern hardware) is essentially a non-DOS port of Wolfenstein 3D for modern operating systems. Running Wolf3D through SDL removes the need for DOSBox and solves most of the memory and limit constraints that affect the DOS version. On a properly coded SDL build, the limits on guards, objects, and doors are effectively lifted, and many of the crashes and glitches described elsewhere in this guide simply do not apply.
ECWolf, although also based on wolf4SDL, is a more advanced Wolf3D source port that supports the UWMF (Universal Wolfenstein Map Format) in addition to the classic binary map format. It offers capabilities far beyond the original engine, including per-tile skill level assignment, multiple objects on the same tile, and much more. As of writing, full editor support for UWMF is still developing, but it is the direction serious modding is heading.
A few things worth noting for SDL and ECWolf mappers specifically:
- The boss orientation rules that apply on DOS (Fake Hitler, Gretel, and Giftmacher face north; all others face south) do not apply in SDL or ECWolf versions.
- The pushwall always moves exactly 2 squares in SDL, eliminating the 2-or-3-square ambiguity that affects DOS.
- The visible object limit that causes sprites to disappear on DOS still applies in properly coded SDL builds, albeit with higher limits - though it is still good practice to avoid over-stuffing rooms.
If you are mapping for vanilla DOS Wolf3D, everything in this guide applies to you in full. If you are mapping for SDL or ECWolf, the hard limits are relaxed, but the design principles remain just as valid. Good level design is good level design regardless of the engine.
2.4 - I Keep Getting "Runtime Error 200" When I Run Mapedit; Why?
Mapedit was apparently written and compiled in Pascal 7. Programs compiled this way tend to kick off "Runtime Error 200" when run on a P6-based computer of approximately 200 MHz or faster. This problem exists in Mapedit versions 8.1 and higher. There is a small EXE patching utility available that fixes this - search for BRuntimePatch.zip and it should sort the problem out.
2.5 - Differences Between Wolf3D and Spear of Destiny
Wolfenstein 3D came first. May of 1992 was its first release, and updated versions followed quickly. Wolfenstein has been distributed four different ways over the years: as shareware by Apogee, then in retail by id themselves, then by GT Software on CD-ROM, and finally by Activision, who bundle it with the full version of Spear of Destiny.
Wolfenstein's last and latest version is 1.4g, which unfortunately has the debug mode disabled at the request of Apogee. If you buy a retail version you'll likely get version 1.4c instead, which has debug mode enabled.
There are several differences between Wolf3D and Spear worth knowing about as a mapper:
Spear's VSWAP file has additional graphics to suit the game's different theme. The maphead file layout is different: Wolf3D has 60 levels divided into 6 episodes, while Spear has 21 levels in one episode. Spear also has 10 additional wall textures compared to Wolf3D.
Wolf3D has 6 bosses: Hans Grosse, Dr. Schabbs, Adolf Hitler, Otto Giftmacher, Gretel Grosse, and General Fettgesicht. Spear has 5: Trans Grosse, Barnacle Wilhelm, the Ubermutant, the Death Knight, and the Angel of Death.
The decorative object list differs between the two games, and there are some changes to how certain mechanics behave. These are covered in the relevant sections throughout this guide.
Wolfenstein's last and latest version is 1.4g. The debug mode in 1.4g has been disabled at Apogee's request, but retail versions typically include 1.4c, which has it enabled.
Moreover, earlier versions of Wolfenstein use MAPTEMP instead of GAMEMAPS files.
2.6 - Editing Spear of Destiny Additional Missions 2 & 3
A while back, FormGen produced two new 21-level missions for Spear of Destiny, sold separately or together as a CD-ROM package. These include new graphics, sounds, and levels. Mapedit versions 8.0 and above include definition files for these episodes, and editing them is essentially identical to editing the original Spear. One personal note: the graphics in these missions are rather cartoony and amateurish. Unless you can do custom graphics well, it's generally better not to attempt it at all.
3.1 - Setting Up Your Working Directory
Before you touch the editor, set up your working environment properly. Create a new directory - call it something like "Custom Wolf" or whatever suits your project - and copy your entire Wolf3D or Spear directory into it. This copy is your working directory. The original remains untouched as your backup.
This matters because the map editor will overwrite your GAMEMAPS and MAPHEAD files when you save. If you work directly in your game directory and something goes wrong, you lose the original levels. Always work in a copy.
Once you have your working directory set up, install your editor of choice into it or point the editor at it. Every edit you make from this point forward happens in the copy, not the original.
3.2 - Study the Originals First
Before you design a single room, play the original levels. Play all of them if you can. At minimum, finish the first two episodes of Wolf3D. If you want to make levels that feel authentic, you have to know what authentic feels like from the inside.
Pay attention to room sizes. Pay attention to guard placement. Notice how the key rooms are hidden, how the elevator is guarded, how treasure is tucked away. Notice which wall textures appear in which episodes and how the ceiling colors are chosen to match. None of this was accidental. Tom Hall and John Romero made deliberate decisions on every level, and understanding those decisions is the foundation of good Wolf3D level design.
3.3 - Learning From Original Levels: Studying Design Intent in the Editor
Playing the original levels is the first step. Opening them in the editor is the second. When you find an area you liked or found memorable while playing - a room that made you anxious, a guard placement that surprised you, a secret that felt satisfying to find - open that level in the editor and find that exact spot. Look at it from above. Ask yourself: why does this work?
Look at where the guards are placed relative to the doors. Look at how floor codes are assigned. Look at where the turning points are on patrolling guards and how their paths relate to room geometry. Notice how secrets are marked - or not marked - and what the reward is. Notice how the player is funneled through the level without it feeling forced.
Take Episode 3, Level 8 as an example. The level begins in a small closed room with no visible doors. Walk around it and you immediately discover the starting wall is a pushwall - and it opens into a massive swastika-shaped room. The guards are all placed at the tips of the swastika, invisible when you first enter, but converging on you from all four directions when you fire. The emotional arc - confusion, then anxiety, then chaos - is entirely deliberate. You can only understand that by looking at it in the editor. So look.
3.4 - Planning on Paper
Get out a large sheet of graph paper. Draw your level. It sounds old-fashioned, but it works. Sketching the layout in advance forces you to think about where rooms are in relation to each other, where the key and elevator are, how the player will be routed through the level, and where the most interesting combat moments will happen. You end up with far fewer dead ends, disconnected floor codes, and pushwall nightmares than if you just start dragging walls around in the editor.
That said, you don't have to stick rigidly to the plan once you start building. Some of the best moments in a level happen by accident - a room that plays better than you expected, a guard path that creates an unexpectedly good ambush. If something turns out better than what you planned, keep it. But having a plan gives you a skeleton to deviate from, which is much better than having nothing at all.
Some mappers find it helpful to start from a concept rather than a layout. What is this level? A prison block? A weapons storage facility? An officers' club? A sewer system? Once you know what the level is, the rooms that belong in it start to become obvious. A prison block has cells off a central corridor. A weapons storage area has barrels, crates, and guards at their posts. An officers' club has wood paneling, chandeliers, and the kind of decorations that suggest wealth. Write down what rooms your level needs before you start drawing them.
Others find inspiration elsewhere entirely - from road maps, building floor plans, shapes, music, other games, or even films. One approach that works well is to start the level in the editor, let the music play, and before the game fades in, close your eyes and picture the kind of environment that music suggests. Build that room. Then, before you open the door to the next non-existent room, imagine what would logically come next. The map can grow one room at a time that way, and it often produces more organic, interesting results than top-down planning alone.
Whatever your method, write your ideas down whenever they come to you, even if it's just a scrap of paper. Inspiration is unreliable. A folder of notes is not.
4.0 - Designing New Levels: MAP Mode
When you first start your editor, you'll see the contents of the existing map file's first level on the screen. If you plan to start a new level, clear the floor. In Mapedit, press C on your keyboard and confirm with Y. The entire level screen will fill with whatever tile you have assigned to the left mouse button. I usually prefer to assign a wall type to the left mouse button before clearing, not a floor code. The outside rim of the map will always be gray stone regardless of what you selected, establishing the required boundaries. After clearing, assign the wall type you had on the left button to the right mouse button as well. That way, when you're putting down walls before you lay floor codes, you can use the right mouse button as a backspace key if you place something wrong.
I always design the walls of a room first, then put in the doors, and then the floor codes. You may prefer a different order, but I find it easier to erase and redesign walls using the backspace method before the floor codes are in place.
4.1 - Getting Started: First Steps in the Editor
The first thing I always place is the entrance to the level and the Player Start Position - the little green arrow by default. You can have B.J. start out in a dead elevator (one whose switch doesn't work) or just in front of a Level Entrance wall type. Wolf3D always uses the latter; Spear always uses the former. If you put the player inside a dead elevator, make sure you use the Fake Elevator or Elevator Rails wall type, not the standard Elevator wall - otherwise the player can just spin around, throw the switch, and finish the level immediately. I've seen that happen more than once.
One critical thing to remember: always place a start position marker, and place only one. If you forget it entirely, the display will be garbled when you enter the level and you won't be able to move. If you place more than one, the game will pick one arbitrarily and ignore the other, so don't count on two start positions doing anything useful.
4.2 - The Map Grid: Size and Boundaries
Every Wolfenstein level occupies a 64x64 tile grid, for a total of 4096 tiles. The actual playable area is 62x62 - the outermost ring of tiles must always be solid wall to establish the level's boundaries. This is non-negotiable. If any tile on the perimeter is not a wall, the game will crash on DOS. Well, to be precise, only in the shareware version is this not true; in the shareware version and v1.1 version you can basically have the map warping around (Wolf4SDL has some auto wall drawing at the borders as a security). But for argument's sake, in all other versions, leave the outermost ring intact. Two layers of perimeter wall are even better and help prevent the flashing screen border bug discussed in Section 9.5.
The playable area is generous. Most well-designed levels don't come close to filling the full 62x62 space, and that's fine. A tightly designed smaller level is almost always more satisfying than a large, sprawling one that pads its size with empty corridors. Some designers like to leave a little space somewhere on the map for a title or their name - this is a nice touch if you can manage it.
4.3 - Walls
4.31 - A Starting Approach: Hollowing Out from Solid
One approach worth considering, especially when you have a strong sense of the textures you want to use, is to start by flooding the entire map with a single wall type and then hollowing out rooms from the solid mass. This forces you to think about walls first and space second, which naturally produces more architecturally coherent results. It also means you're less likely to end up with orphaned wall tiles or gaps in your perimeter by accident.
4.32 - Texture Consistency and Style
I get a little annoyed at levels that have wall graphics all mixed up - a Wood / Iron Cross stuck in the middle of a Grey Brick wall, or a Grey Stone in the middle of a Blue Stone wall. It might seem cool in the editor, but in the game it looks ridiculous and unrealistic. You never see that kind of thing in the original Wolf maps.
Try to give each stretch of wall, or each series of rooms ideally, its own unique texture. Only mix textures that are meant to be mixed - like Grey Stone and Grey Stone / Banner. The only way I'd say you can connect totally different wall types and have it look anywhere near decent is if you recess the different wall type one square into the wall, breaking the transition with a corner rather than a flat seam.
Also, it looks a bit silly to make an entire wall nothing but Hitler pictures or some other single decoration, especially if the wall is more than four blocks long.
Try not to use too many discrete wall textures in a single level. There is such a thing as too much variance. I suggest letting various areas of the level use different textures rather than just various rooms. A series of wood-paneled rooms could represent an office area, while another sector might be all red brick. As a general rule, try not to use more than four or five different texture styles on a level. Of course, that doesn't mean individual textures like Blue wall / swastika - a texture style is the entire Blue wall set, including Blue wall, Blue wall / swastika, and Blue wall / skull.
If you want to design a level of the same quality as id Software's, look at the original level whose slot you're about to replace. Keep in mind what wall textures were used for the most part, and what style most rooms were. Then give your level a subtle similarity to the original and I guarantee you'll be satisfied with the results.
4.33 - Varying Textures Within the Same Family
One technique that elevates a level without adding complexity is randomly alternating between variants of the same texture family. Gray Stone 1 and Gray Stone 2, for instance, look similar enough that mixing them within a room gives the walls a natural, slightly irregular feel rather than a flat, repeating tile look. The same applies to Blue Stone, Cobblestone, Brown Marble, and others that come in multiple versions. Textures like the Multicolor brick and Grey Stone with Less Slime work well as accents sprinkled in at intervals. It's a small thing, but players who take the time to look at the walls will appreciate it, even if they can't articulate why.
4.34 - Texture Clashing: What to Avoid
You should never place two walls side by side with clashing textures in a well-designed level. If you have two rooms using different texture families that share a wall, use a door to hide the transition. The door frame will cover the seam and the clash will never be visible in the game.
The only time clashing textures are acceptable in a well-designed level is when the designer has deliberately chosen not to use a door to cover them. In that case, make absolutely sure the clashing walls meet corner-to-corner rather than side-by-side. A perpendicular meeting - where one wall's texture ends and the other begins at a corner - is far less visually jarring than a flat side-by-side clash that the player sees straight on.
4.35 - Texture Clashing at Corners: The Perpendicular Rule
To expand on the above: when two different texture families must meet without a door between them, orient them so the transition happens at a corner. The player approaching from either direction will see only one texture on the wall in front of them, and the other texture will be on the perpendicular wall to their side. Their eye naturally reads these as two different surfaces rather than one inconsistent wall. It is not a perfect solution, but it is far better than having them meet flat.
4.36 - Using Textures as Visual Clues for the Player
Textures can do more than look good - they can communicate. Various decorated textures can be used to flag important locations to an observant player. A secret passage hidden behind a distinctive wall panel, a key room approached through a corridor of increasingly formal textures, a danger area preceded by warning symbols on the walls - all of these use texture as a language.
Tom Hall used green and brown barrels in Episode 6, Level 3 as color-coded clues to show the paths to the keys and the elevator. You can achieve a similar effect with wall decorations. It works so well that placing a secret to the side of a decorated wall has practically become a convention - which means you need to use it carefully. If you use it too consistently, players will check every decorated wall automatically and the system loses its meaning. Reserve it for moments where you want to genuinely reward an observant player, and occasionally place a decoration that leads to nothing interesting, just to keep them honest.
4.37 - Frequency and Spacing of Accent Textures
When placing accent textures - decorated walls, portrait panels, banner walls - in long hallways or large rooms, spacing matters. Having anything less than three tiles between accents generally looks cluttered, especially in long hallways. That said, rules are meant to be broken when the desired effect warrants it. The key is to be deliberate. Random placement of decorated walls looks bad. Considered placement, even if unconventional, almost always reads as intentional.
4.38 - Number of Texture Families Per Level
As a general rule, try not to exceed four or five distinct texture families in a single level. Using only one family throughout a level - all gray stone, all red brick - can work well for thematic levels like sewers or cave systems, but risks becoming monotonous in larger or more varied levels. Conversely, pulling from too much of the texture library in a single 64x64 space creates visual noise that undermines any sense of coherent setting.
A useful structural approach is to think of the level's paths - the route to the silver key, the route to the gold key, the route to the elevator - as natural segments, and assign a different texture group to each segment. This gives the level visual variety while maintaining internal coherence within each area.
4.39 - Signed Walls, Portraits, and Symbols: Placement Rules
The placement of decorative wall textures - Hitler portraits, eagle alcoves, swastika banners, stained glass panels - deserves careful thought.
Symmetry is key here. It is hard to justify placing a swastika banner on one side of a doorway and an eagle alcove immediately across from it. If you're going to decorate a doorway, decorate both sides with the same motif. This works particularly well when the doorway is three tiles wide - two flanking decorations and the door itself.
Large square rooms and alcoves housing keys or artifacts are ideal for portrait and symbol placement. Single-block walls placed so all four sides are visible - suggesting a pillar or support block with an ornate design - can look good if not overused.
Be careful about what you place in front of a portrait or symbol. Objects like beds, baskets, and wells are generally acceptable in front of decorated walls. Larger objects like suits of armor and spear racks in front of a Hitler portrait are a no - Adolf would not have approved of something blocking his image. And don't place plants or large static objects directly in front of wall decorations unless you specifically want them partially obscured.
One more thing: don't randomly place decorated walls around a room. A decorated wall placed without reason looks like an accident. Placed with purpose - to mark an entrance, flank a key room, or reward an observant explorer - it becomes part of the level's visual language.
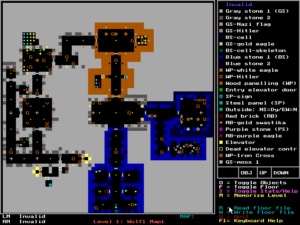
4.4 - Floor Codes
Floor codes are the most difficult Wolf3D mapping concept to understand fully, and misunderstanding them is the root cause of more bugs and broken levels than almost anything else. Let's go through them carefully.
Floor codes are, at their most basic, the interior of rooms. When you place a floor code tile, there will be open space in the game at that location. But their more important function is sound propagation: every guard standing on the same floor code anywhere on the level will hear a gunshot fired on that code and become alerted, as long as they are not deaf. This is true regardless of how many walls and doors separate them from where the shot was fired.
Every single room must be completely filled with a floor code. Not most of it - all of it. The consequences of failing to fill a room properly, or mixing floor codes haphazardly within a room, are unpredictable and usually severe. Some of the effects include: certain sound effects going missing, pushwalls refusing to slide all the way open, stationary guards becoming living statues that won't fight, moving guards behaving erratically, and doors becoming invisible.
4.41 - The Three Approaches to Floor Code Assignment
There are three broad strategies for assigning floor codes, and each produces a different kind of gameplay.
Strategy 1: One floor code for the entire level. This has the singular effect of alerting every guard on the floor the moment the first shot is fired. This can produce some exciting firefights, but the action tends to fizzle out quickly - either the player is overwhelmed immediately or clears everything in a chaotic rush, leaving empty rooms with nothing left to discover. It also creates control problems: guards may wander through locked doors the player hasn't opened yet, alert areas that shouldn't be alerted, or block pushwalls. Use this approach with great caution and only if you understand its consequences.
Strategy 2: A unique floor code for each individual room. This is the most controlled approach. Guards in the next room are completely unaware of what is happening in the current room unless a door between them is opened. It is predictable and safe, but it tends to produce monotonous gameplay - the player simply clears one room, opens a door, clears the next room, and so on, with no surprises.
Strategy 3: Unique codes assigned to contiguous groups of rooms. This is the most interesting and most commonly recommended approach, and it is what the best original Wolf3D levels use. You assign one floor code to a series of connected rooms - say, three rooms and a hallway - and a different code to the next cluster. A shot fired in any room within a cluster alerts all guards in that entire cluster, but does not alert the next cluster until a door between them is opened. This gives you controlled bursts of action with natural breaks between them.
Within Strategy 3 there is additional creative space. You can assign the same floor code to two areas of the level that are otherwise unconnected - separated by walls, different corridors, locked doors. A shot fired in the starting area can silently alert a room deep in the level, and those guards will begin making their way toward the player through doors and corridors long before the player ever reaches them. The player might turn a corner and encounter a guard they never heard bark a warning, with no idea how he got there. This is one of the most effective tools for creating unpredictable, replayable levels. Use it deliberately and sparingly, and it will make your levels feel alive in a way that static guard placement never can.
4.42 - Floor Codes and Sound Propagation
It is worth being explicit about how sound propagation actually works in Wolf3D, because there is a nuance that trips up many mappers.
When a door opens between two rooms with different floor codes, those two floor codes become effectively linked for the duration of the door's open state. A shot fired on one code while the connecting door is open will alert guards on the other code. This means that a patrolling guard who opens a door into a room with a different floor code can, if a shot is fired at that moment, bring guards in that second room into the fight even though they are on a different code. This chain can propagate further if those newly alerted guards open more doors.
This is not necessarily a problem - it can be a feature. A guard whose patrol path takes him through a door at an inopportune moment can dramatically change the character of a fight. But it means you need to think carefully about patrol paths near doors between different floor code zones.
The knife, by the way, is not silent. Using the knife to attack a guard counts as a gunshot and alerts every guard on the same floor code. There is no way to eliminate enemies without making some kind of noise.
4.43 - Cascading Alert Chains: Advanced Floor Code Strategy
A more sophisticated application of floor code theory is to deliberately construct cascading alert chains. Assign floor code A to the level's starting area and also to a room deep in the level packed with SS troopers and mutants. When the player fires their first shot, those distant guards become alerted and begin navigating toward the player through doors and corridors. Meanwhile, assign floor code B to a mid-level area. If an alerted guard from code A opens a door into code B territory while a shot is being fired, code B guards also become alerted and join the pursuit.
This can produce fights that are genuinely different each time the level is played, because the exact moment a patrolling guard crosses a floor code boundary relative to the player's actions is never quite the same twice. It is difficult to design well because it requires predicting the behavior of multiple converging systems, but when it works it produces some of the most exciting and unpredictable gameplay Wolf3D is capable of.
One important thing to understand when building chains like this: an alarmed guard cannot pass by an unalarmed one. If a deaf or unalarmed guard is standing in a corridor between an alerted guard and the player, the alerted guard will be blocked. You can use this deliberately - place deaf guards as choke points that regulate the flow of alerted guards into an area, removing them from the equation one by one as the player advances. When the player kills a deaf guard and moves past his position, the alerted guards behind him will suddenly have a clear path. The timing of this can create some very dramatic moments.
4.44 - The Deaf Guard Floor Code (006a)
There is one floor code that behaves differently from all the others. Floor code 006a is the Deaf Guard code - in Mapedit it appears as a gray X. Placing this code on the same tile as a stationary guard gives that guard two special properties.
First, he will not respond to the sound of gunfire. No matter how many shots are fired on any floor code anywhere on the level, a guard standing on code 006a will not react unless he can actually see the player.
Second, his eyesight is dramatically increased. He can see for one tile in all eight directions around him, including directly behind. He can even see through the corners of wall cubes that meet only at their corners - through the diagonal crack, so to speak. This means he can sometimes spot the player through what appears to be solid wall, which can be genuinely startling.
Deaf guards are excellent for placing directly behind doors, where they will wait in ambush and react only when the player opens the door and comes into view. They are also essential in secret rooms, where a guard on the wrong floor code would become a living statue unable to fight back. The deaf guard code solves both problems.
A few critical rules:
Never place the deaf guard floor code directly in front of or behind a door. When the game runs, the door will not be visible - there will be a blank space the player cannot cross. Some people call this the invisible forcefield effect. It is fine if you meant to create it, but it will catch you by surprise if you didn't.
Never cluster too many deaf guards adjacent to each other. One or more of them will become paralyzed - sitting there unresponsive until shot. This is the same effect you get when a guard is placed on the wrong floor code in a secret room. Two dozen deaf guards packed into a key room all standing next to each other and making no reaction when the player walks in looks extremely stupid. I know this from experience. As a side note, this will not occur when the guards are diagonally adjacent; only vertically or horizontally. Also, SDL versions have various deaf floor fixes that address this issue.
The deaf guard floor code cannot be assigned to a moving guard. Do not bother trying.
4.45 - The Secret Elevator Floor Code (006b)
Floor code 006b is the secret elevator code. When the player operates an elevator switch while standing on this code, they are transported to the secret level rather than the next regular level. This code is normally placed only inside the elevator leading to the secret floor. However, it can also be used as a perfectly normal floor code anywhere else on the level if you want to - it has no special effect outside of an elevator.
More on this in Section 4.8.
4.46 - Floor Codes in Secret Rooms
The floor code in a secret room - one accessed by a pushwall - must be the same as the floor code in the room from which the player entered. This is not optional.
Making it different will not always crash the game, but it creates a serious problem: guards placed in the secret room will not respond to the player at all unless shot and hit directly. They become blind and deaf - stone statues. The original Wolfenstein and Spear maps generally do not place guards in the first room of a secret area for this reason, but as a designer you are not required to follow that rule. What you are required to follow is the floor code matching rule.
If you want to have guards in a secret area who are not deaf but also don't hear you shooting up the Nazis outside, put a regular door between the secret room and the room beyond it and give that further room its own unique floor code. Guards placed in that room will be isolated from the outside floor code and won't respond to shots fired there.
One more thing about guards in secret rooms: if a guard in a secret room is not deaf, he will hear you firing outside and may move to block the pushwall before you can open it. Always make guards in secret rooms deaf, or put them in a room behind a regular door, to prevent this.
4.47 - Changing Floor Codes Without a Door
Doors act as switches between floor codes. When a player moves from a room with one floor code to a room with a different floor code through a door, the transition is handled correctly and everything works as expected.
If you change floor codes between two areas without separating them with a door, guards in the new area will appear to be in a trance when the player enters - they won't fight until shot at directly. This can be an interesting effect in certain situations. Walking up to what appears to be a Super Guard standing completely still can be genuinely unsettling, and the moment the player fires and the statue suddenly erupts into motion is memorable. But in most cases this is an accidental bug, not an intentional feature. Make sure your floor code boundaries always coincide with door placement.
4.48 - What Happens When You Mess Up
Don't ever put a tile or two of one floor code inside a room that uses a different floor code. The results are very strange. The last time I accidentally did this, not only did the ceiling change color as I went in and out of rooms, but at the end of the level my treasure ratio was 109%. If you want to mess with your players' minds and generally be thought of as a lousy level designer, go ahead. Otherwise, keep your floor codes clean.
4.49 - Mapedit Floor Code Tools and Keyboard Shortcuts
Mapedit has several keyboard shortcuts that make floor code work considerably faster and less error-prone. These are worth memorizing.
Press O to remove static objects from view and F to display floor codes. Your map will light up showing every floor code assignment across the entire level. This view is invaluable for catching mismatches and verifying that your code assignments make sense.
Press Alt+S to toggle the statistics display. This shows you how many tiles of each floor code you have placed, which is useful for catching accidental duplicate usage between rooms that should have different codes.
To flood-fill a room with the currently selected floor code, position your cursor anywhere on the floor within that room and press Z. This changes all floor code tiles in the connected area to the selected code while leaving any deaf guard codes in place.
Press Alt+Z to fill both the regular floor tiles and any deaf guard code tiles in the room.
Press Ctrl+Z to fill the floor tiles and also extend into any adjacent secret areas.
These shortcuts dramatically reduce the risk of accidental mismatches and make it much faster to recode areas when you redesign rooms.
4.5 - Doors
4.51 - Door Limits and Placement Rules
You can have a maximum of 63 doors on one level, not including pushwalls. Any more than that will cause Wolf3D to display an error - "64+ doors on level!" - after the Get Psyched screen. On some versions this limit is counted as 64 including stuck doors, even if Mapedit doesn't count them in its display, so be careful if you're working close to the limit.
A door must always have a wall on each side of it. You cannot place a door without solid wall tiles flanking it on both ends. Some editors will prevent this automatically; others will let you do it and produce undefined behavior.
You cannot place two doors directly adjacent to each other without at least one square of wall between them. Something weird will happen if you do. Trust me on this one.
4.52 - The Phantom Door Slot (PDS) Bug
If one side of a vertical door is connected to a square that is adjacent to a horizontal door, the door frame will replace that square instead of the wall type that was assigned to it. This so-called phantom door slot will only be visible when you have part of both doors in view at once.
One way to avoid this is to place the two doors so that they share the problematic square - each door uses it as part of its own frame. The phantom door slot effect will not always occur; it depends on the orientation of the doors relative to each other. It is one of those bugs that you will encounter once, look extremely confused, and then never forget.
4.53 - Locked Doors and Key Placement
There are essentially four ways to use keys to structure a level's progression.
The first is to require no keys at all before the level can be finished. This is valid but rarely interesting.
The second is to require only one key. Simple, clean, and effective for shorter levels.
The third - and the one the original Wolfenstein designers most commonly used - is to make one key necessary to open the door to the room containing the other key, which in turn opens the path to the elevator. The player must find one key, which gates them to the second key, which gates the exit. This creates a natural sense of escalating access and progress.
The fourth is to make both keys equally difficult to obtain and put the elevator behind doors requiring both silver and gold keys. This is the most complex arrangement and works well for longer levels where you want to give the player a genuine sense of having to earn the exit.
Personally I've used all four at different times. The third approach tends to feel most natural because it mirrors what id Software did in their best levels.
4.54 - Warning: Enemies Can Open Locked Doors
This is something many mappers don't realize until it ruins a level: a guard standing behind a locked door who is on the same floor code as the player - and who hears gunfire - will open that locked door without hesitation to get to the player. He does not need a key. The door's locking mechanism only applies to the player.
The practical consequence is this: if you have a locked door leading to a room full of guards, and those guards share a floor code with any area the player will be fighting in, they will come through that door the moment a shot is fired. Your careful lock-and-key structure falls apart entirely.
The solution is to assign the room behind the locked door a unique floor code that is not shared with any area the player will be in before they obtain the key. The guards will remain inactive until the player opens the door themselves.
4.55 - Tactical Door Placement: Delaying Guard Arrival
Door placement is not only a structural decision - it is a pacing tool. Where you put doors relative to alerted guards' positions determines how quickly those guards arrive at the player's location.
If you place a room's entrance in the direction opposite to where the player will be when the fight starts, alerted guards from that room will have to travel through the level to reach the player. This gives the player time to deal with immediate threats before the second wave arrives. The player might clear the first room, move deeper into the level, and then encounter guards who were alerted at the start finally catching up from behind.
You can also use this deliberately to create a welcoming committee. Alerted guards navigating toward the player will often pile up behind a closed door, and when the player eventually opens that door from the other side, they walk into a room full of guards who are already in attack mode rather than standing around waiting. The difference in intensity is noticeable.
4.6 - Secret Doors (Pushwalls)
4.61 - The 2-or-3-Square Movement Problem
If you have looked at the original Wolfenstein maps, particularly Episode 6, you may have noticed that some secret doors are only expected to slide back two squares. If they slid any further they would block the passage beyond. The problem is that a pushwall with three or more empty squares behind it will move either two or three squares - and it is impossible to predict which. The same pushwall may move two squares in one playthrough and three in the next, even under identical conditions.
This is a bug in the engine that was never fixed. It exists in Spear of Destiny as well, though not in spin-off sequels like Blake Stone or Corridor 7. On SDL the pushwall always moves exactly three squares, eliminating the ambiguity entirely.
The practical rule is: always design your secret areas so the player can access them whether the pushwall moves two squares or three. Never place anything in the third square behind a pushwall that the player needs to reach if the wall only moves two. Never design a passage that requires exactly three squares of clearance to navigate. Assume the worst case and build accordingly.
If you absolutely need a pushwall to stop at a specific distance, you can place a chain of pushwall object codes in the space behind the wall. A pushwall will stop when it hits another pushwall object code, allowing you to control its travel. This is a useful technique for narrow passages where a full three-square travel would block a critical path.
4.62 - Chain Pushwall Markers: Handling a Stuck Wall
There is another pushwall problem worth knowing about: guards can block a pushwall in motion. If a guard is alerted and moves into the path of a sliding pushwall, the wall will stop against him. You will hear two notes for each press of the space bar - a distinctive sound that indicates the wall is blocked rather than simply absent.
The guard can be coaxed away from the wall if the player moves far enough to change the guard's navigation target. Once the guard moves, pressing the wall again will slide it further. However, it may only move part of the way before stopping again.
If you want to guard against this in your level design, place additional pushwall object codes in the space behind the wall's intended travel path. This creates a chain - if the wall stops short, the player can simply push it again and it will continue sliding until it hits the next obstacle. This only really works for secret and boss levels since repeated pushwall movement makes achieving 100% secrets difficult.
4.63 - Guards in Secret Rooms
As covered in Section 4.46, guards placed in secret rooms present a specific challenge. The short version: the floor code in the secret room must match the room it was entered from, guards must be deaf or placed behind a regular door to prevent them from blocking the pushwall, and the original games avoid placing guards in the first room of a secret chain for good reason.
If you want guards in a secret area who will fight normally, put a regular door between the secret entrance room and the room where the guards are. Give that inner room its own floor code. The guards will be isolated from outside sound, the pushwall will open freely, and the guards will react normally when the player opens the inner door.
4.64 - Don't Put Objects in a Pushwall's Path
Don't place static objects in the path a pushwall will travel through. When a pushwall slides through a square occupied by a static object, the result looks wrong - as if the wall is crushing or passing through the object. The one exception where this can work aesthetically is if you use a wall with an opening in it, like a vent or grate texture, suggesting the object is simply on the other side of a passable surface. For everything else, keep the pushwall's travel path clear.
It is also worth noting that a pushwall will not slide over a dead body. If there is a corpse in its path, the wall stops.
4.65 - Avoid Placing Pushwalls Adjacent to Decorated Portrait Walls
A pushwall placed immediately next to a decorated portrait wall - a Hitler picture, an eagle alcove - creates a visual problem in the game. Because the portrait texture is visible from all four sides of a wall tile, the player can see the image from directions that don't make sense once the pushwall moves. It breaks the illusion that the portrait is painted on the outside surface of a wall. The picture seems to hover in space rather than sit on a surface.
If you want a pushwall near a portrait wall, leave at least one tile of regular wall between them.
4.66 - Essential Items Behind Pushwalls: When It Works and When It Doesn't
Putting items that are essential for completing the level - keys, primarily - behind pushwalls is a design choice that can work or can frustrate players enormously, depending on how it is handled.
It works when it is made obvious. A single wall tile flanked by two columns, with one of the columns partially hiding a key that the player can see through the gap - that is acceptable. The player understands that something is accessible here and that the wall between the columns is likely pushable. The signal is clear enough that the player feels clever for noticing it rather than cheated for missing it.
It does not work when the essential item is hidden deep inside a pushwall maze with no hint that it exists. Players who don't systematically check every wall on the level will simply not find it, and they will be stuck with no idea why.
The safest rule is: if a player absolutely needs something to finish the level and it is behind a pushwall, make it obvious. If it is an optional reward - extra treasure, a chaingun, a 1-up - it can be as hidden as you like.
4.67 - Two-Direction Pushwall Secrets
An interesting advanced technique is creating a secret area that requires the player to push a wall from two different directions to navigate through it. The first push opens a passage; but to proceed further, the player must push another wall from the other side. This can create a genuine puzzle feeling within the engine's limitations, and it rewards players who think laterally rather than just pressing every wall they see.
4.68 - Pushwall Puzzles and Advanced Techniques
The most sophisticated application of pushwalls is the sequence puzzle. This involves a grid of small rooms connected by pushwalls where the player must push through them in a specific order. Pushing any single wall out of sequence makes it impossible to reach the goal, because the incorrectly pushed wall ends up blocking the correct path somewhere ahead.
For this type of puzzle to be fair, it must give the player a way to understand what the correct sequence is. One effective method is to design the area so that every room pushed into correctly reveals something consistent - a pile of bones, a specific decoration - while rooms pushed into incorrectly are empty. If the player ever pushes through and finds an empty room, they know they have made a mistake. The puzzle becomes about reading the environment rather than trial and error.
This is a difficult technique to execute well, and most attempts fall flat. The ones that work do so because the designer thought carefully about how the player will interpret each state of the puzzle from inside it, not just how it looks on the map.
4.69 - Marking Pushwalls for the Player
Systematically pressing space on every wall in a level to find all secrets is tedious and unrewarding. The original Wolf3D levels generally found ways to hint at secret locations without making them completely obvious, and the best community levels follow this principle. Here are several techniques for marking pushwalls in ways that feel natural.
Placing a pushwall behind a wall decoration is the most common and reliable method. It makes logical sense - the player learns to check decorated walls, and the designer honors that expectation.
Grimy or damaged walls with one clean wall among them suggest the clean wall has been recently used. A layout skeleton pointing toward a wall looks like it is indicating something. A small empty room with only a single long path leading to it suggests there is something worth finding there. A space between two static objects at the right width is a visual suggestion of a passage. A room that seems too small for its position in the level - that has more wall than makes architectural sense - hints that something is behind it.
Ringman's advice is particularly worth keeping: if you don't mark a pushwall at all, make sure whatever is behind it is genuinely extraordinary. Unmarked pushwalls that lead to nothing much are the most frustrating experience in Wolf3D level design. If you're going to make the player find something on their own without any hint, reward them properly - a room full of crowns, a chaingun, a 1-up, a room with a unique design or textures not found anywhere else in the level.
4.610 - Hiding Enemies Behind Pushwalls
There is a useful side benefit to hiding guards behind pushwalls that is easy to overlook. In a large, non-linear level where the player might wander around in circles, it is possible for them to accidentally kill every guard on the level through random fighting - and be rewarded with 100% kills as a side effect of getting lost. Hiding at least one or two guards behind a pushwall, even just a difficulty-1 guard, prevents this. The player cannot achieve 100% kills without finding the secret, and finding the secret becomes the only way to get full credit for the level.
4.611 - The Pushwall Side-View Graphics Glitch
When a pushwall is in motion, it produces a graphical glitch if the player can observe it from any angle other than directly behind it. The moving wall's side faces will display garbage graphics. On DOS this is a consistent problem; on SDL it is less visible.
The practical implication is to design your level so that a pushwall's travel path is not observable from the sides while it is moving. This usually means ensuring that the player must be directly behind the pushwall to activate it, and that the travel corridor is not visible from adjacent rooms or corridors. This is especially worth keeping in mind for players who are new to Wolf3D and won't know to expect the glitch - for them it can look like a serious error.
4.612 - The Dead Guard Trick
A dead guard - placed in the editor as an initially deceased enemy rather than killed during play - has a unique property: it blocks a pushwall but not the player. The player can walk over a dead guard freely, but a sliding pushwall will stop when it hits one.
This enables a family of techniques for controlling how and from which direction a pushwall can be used. By placing a dead guard on one side of a pushwall, you can prevent the player from pushing the wall from that direction. Combined with regular wall blocks, other pushwalls, doors, or additional dead guards, this can create situations where the pushwall can only be activated from one specific direction, or where activating it from the wrong side locks the player into a room permanently.
This last application - locking the player in - is a powerful but double-edged design tool. Used well, it creates a dramatic one-way commitment: the player pushes a wall, enters an area, and the entrance seals behind them. They are committed to whatever lies ahead. Used carelessly, it just traps the player unfairly.
4.7 - Elevators
4.71 - Orientation: Horizontal vs. Vertical
Designing elevators is trickier than it first appears, especially if you want to stray from the standard one-tile square elevator car. The elevator wall type is one of the only wall types in Wolf3D that looks completely different depending on whether it is aligned north/south or east/west.
When aligned east/west - horizontally - the elevator switch is on the wall directly in front of the player as they enter, with elevator rails visible on the left and right walls. This is the orientation used in all of id Software's original levels. It is the most intuitive for the player because the control is immediately visible upon entry.
When aligned north/south - vertically - the switch ends up on the left or right walls as the player enters, and the rails appear on the wall directly ahead. This is perfectly functional but requires more care to set up correctly, and players accustomed to the standard orientation may take a moment to find the switch.
If you want to orient your elevator vertically and only have the switch on one side, you will need to use a different wall type - Steel works well - on the side without the switch. You cannot put rails on the side of a vertical elevator.
All of id Software's original levels use east/west elevator orientation exclusively. There is a good reason for this: when you're in a hurry you want the control directly in front of you, not hidden to the side.
4.72 - Elevator Wall Types Explained
There are several elevator-related wall types in Mapedit that deserve clarification because they can cause confusion.
The standard Elevator wall type shows the switch on its east and west sides and the rails on its north and south sides. This is the type you will use most often.
The Elevator Rails wall type looks identical to the standard Elevator in the game. The difference is that at least in version 1.4, the switch on the Elevator Rails wall cannot be operated. It is essentially a decorative version.
The Fake Elevator wall type shows the elevator switch in the upward position - already thrown - on its east and west sides. It is non-functional and cannot be used to end the level. You have probably seen this type in the original game levels. The curious thing about the Fake Elevator is that its north and south sides are completely blank - just dark gray. This is wasted texture space that you can fill with any graphic you like if you edit the VSWAP file.
If you are making a level for Spear, you have access to an additional Elevator Wall type that displays a normal elevator wall when aligned either way. This is very useful for vertical elevators and worth extracting from Spear and replacing one of Wolf3D's walls with if you're making a Wolf3D level that needs vertical elevators.
4.73 - The Single-Thickness Elevator Wall Warning
If you place an elevator wall with only a single tile of thickness - that is, with nothing behind it - the elevator switch will be accessible and operable from both sides. The player can use the switch from outside the elevator as well as inside.
If you don't want this - and you almost certainly don't - put a second layer of wall behind the elevator, or place some other object outside the elevator that prevents the player from getting close enough to the outer face of the switch to activate it.
4.8 - Secret Elevators
4.81 - Floor Code 006b and Secret Level Placement
Secret elevators work exactly like normal elevators with one exception: the floor code inside the elevator must be 006b - in Mapedit, the small round dark green code near the beginning of the list. When the player operates the switch while standing on this code, they are sent to the secret level rather than the next regular level.
Do not use code 006b anywhere except inside the secret elevator. Do not use it in any other elevator on the level, including the elevator on the secret level itself. If you use 006b in the secret level's elevator, the player cannot complete the episode - the game will keep sending them back to the secret level.
4.82 - Secret Floor Rules by Episode (Wolf3D and SoD)
Secret elevators must be placed on specific levels in both Wolf3D and Spear of Destiny. The game is hardcoded to return the player to a specific floor after completing the secret level, based on where the secret elevator was in the original game. If you place a secret elevator on the wrong level, the player will be returned to the wrong floor after completing the secret level - potentially skipping levels or looping incorrectly.
In Wolf3D, the secret elevator must be on the following floors for each episode:
- Episode 1: Floor 1
- Episode 2: Floor 1
- Episode 3: Floor 7
- Episode 4: Floor 3
- Episode 5: Floor 5
- Episode 6: Floor 3
Floor 10 is always the secret floor in Wolf3D.
In Spear of Destiny, the secret elevator must be on Floor 4 (leading to secret level 19) and Floor 12 (leading to secret level 20). Floors 19 and 20 are the two secret floors.
If you put a secret elevator in the secret level itself, it will behave as an ordinary elevator.
4.83 - Secret Levels Should Feel Different
A secret level should not just be another regular level with a 006b elevator. It should feel like something the player sought out and earned - a distinct experience that justifies the effort of finding it. The original Wolf3D secret levels understood this: the Episode 1 secret level had purple walls and blue officers, Episode 3 had Pac-Man ghosts instead of Nazis, Episode 6 had a swastika maze and recurring Hans Grosses. None of them felt like a standard level.
Your secret levels should have something unique about them - unusual textures, an unexpected theme, a different structural approach, a puzzle element. They don't need to be elaborate. A secret level that is compact, distinctive, and memorable does its job better than one that is large and generic.
4.84 - Level Numbers That Must Not Have Standard Elevators Without Coding
Do not place a standard elevator on Level 9 of Wolf3D or Level 18 of Spear of Destiny without modifying the source code. In both cases the game treats these as the last level before the secret floor, and placing a standard elevator there will cause unexpected behavior in level progression. This is a consequence of the hardcoded level routing described in Section 4.82.
4.85 - A Note on Ratios: Boss and Secret Levels Don't Show End-of-Level Stats
The kill, treasure, and secret ratios that appear at the end of each level do not display on boss levels or secret levels. The player is awarded 15,000 bonus points simply for reaching and completing a secret level, regardless of their performance. This is worth knowing as a designer: if you want to incentivize exploration and completionism, do it on regular levels. Boss and secret levels are about the experience, not the score.
4.9 - Ceiling Colors
4.91 - Why Ceiling Color Matters
Consider ceiling colors. I know this might sound a little ridiculous, but it really is a good idea to think about the ceiling color of a level before you start planning which wall textures to use. Some wall types look really awful with certain ceiling colors; others look really good together. id Software chose ceiling colors deliberately to match the textures they planned to use. Episode 4, Level 6 has a blue ceiling and primarily blue stone walls. That was not an accident.
The ceiling color also affects the overall feel of the level in a more diffuse way. A brighter ceiling color gives the impression of more ambient light throughout the level. A darker ceiling makes everything feel more oppressive. This is essentially the only way to affect lighting in Wolfenstein without access to the source code, so use it consciously.
Unless you have access to the source code to change ceiling colors, you are working with whatever colors are assigned to each floor by default. Plan your textures around those colors, not the other way around.
4.92 - Ceiling Color and Wall Texture Compatibility Guide
Here are some general observations about which ceiling colors work with which wall textures, based on experience across a lot of levels:
- Dark Gray works with almost any wall type, especially gray stone, gray brick, and gray stone with slime. It looks particularly odd with brown walls - brown weave, brown stone, brown marble. On the other hand, all the shareware textures look fine with dark gray because the shareware game uses dark gray ceilings throughout.
- Purple looks good basically only with purple walls. Anything else looks wrong.
- Mustard Yellow works best with gray stone with slime. Regular gray stone is also good. Surprisingly nice with red brick and wood. Most people dislike this color, but it has its place.
- Light Blue is one of the most versatile colors. It works well with gray stone, gray stone with slime, and is at its absolute best with blue stone or plain blue walls.
- Dark Blue / Medium Blue pairs best with blue stone. Not bad with wood or red brick.
- Dark Red is most commonly paired with red brick or gray stone. Acceptable with gray brick. Looks wrong with blue walls.
- Dark Brown is best with brown walls - especially wood. Fine with red brick. Works with almost anything, but blue walls look particularly bad against it.
- Light Brown is a perfect match with the brown weave texture used on Episode 5, Level 6. A little strange with wood, but not bad with gray stone or red brick.
- Cyan matches perfectly with steel. Gives the whole level a brighter, more lit-up impression. Looks especially good with gray brick, stone, and blue walls.
4.93 - Special Effect: The Light Blue Ceiling and the Sky Illusion
The light blue ceiling used in Episode 2, Levels 5 and 10 has an unusual quality: it creates the impression that the ceiling has been lifted away from the walls, like the level exists inside a sphere rather than a box. The walls seem to float against a background rather than connect to a ceiling overhead.
If you are using the light blue ceiling and want to preserve this effect, use only floor lamps rather than ceiling lights or chandeliers in those levels. Ceiling lights visually anchor the ceiling to the room and destroy the illusion. Floor lamps allow it to persist.
4.94 - Ceiling Color Reference Charts
The complete ceiling color charts for both Wolf3D and Spear of Destiny can be found in Appendix B.
5.0 - Setting, Theme, and Atmosphere
5.1 - Planning Your Theme Before You Build
Try to be creative about your level designs, but not creative to the point of abstraction. Wolfenstein is a game about a realistic Nazi castle or military installation, and the levels that work best are the ones that feel like they could plausibly exist within that context - even if they bend the rules a little for the sake of gameplay.
Before you place a single wall, ask yourself: what is this level? What is the purpose of this installation? Is it a basement, a weapons storage facility, a prison block, a security bunker, an officers' club? Is it early in the episode, where the architecture might be rougher and more functional, or late in the episode, where things start to look more prestigious and official? Once you know what the level is, the decisions that follow - which textures to use, what rooms to include, where to put guards, how to decorate - start to make themselves.
Write it down. Seriously. Get a piece of paper and write: this level is a prison block. It has a central guard corridor with cells off to the sides, a small guard post near the entrance with a weapon and some ammo, a kitchen area somewhere in the middle where food is lying around, and a locked evidence room near the back where the keys and some treasure are kept. Now you have a plan. Now you have rooms that make sense in relation to each other. Now when a player walks through the level, it feels like somewhere rather than a random collection of spaces.
One of the most common mistakes in Wolf3D level design is building levels with no discernible purpose. The rooms don't relate to each other. The textures are chosen arbitrarily. The guards are distributed by quantity rather than placement logic. The result feels like a level rather than a place, and that distinction - however subtle - is what separates a forgettable add-on from one people come back to.
5.2 - Room Structure: Squares, Rectangles, Corners, T-Junctions, Intersections
Every room in a Wolf3D level is built from a small set of fundamental constructs. Understanding them makes it easier to design rooms that are readable, navigable, and interesting.
The five basic constructs are:
The square - an empty space shaped like a square. The simplest room form. Easy to navigate, easy to defend, easy to decorate symmetrically.
The rectangle - like the square but longer in one direction. The most common room shape in the original Wolf3D levels. Works well as a hallway connecting two areas or as a medium-sized room.
The corner - leads the player in two different directions. Creates visual mystery because the player cannot see what is around the bend. One of the most useful constructs for pacing because it allows you to hide what comes next.
The T-junction - leads in three different directions. Presents the player with a choice. Creates the basic branching structure of non-linear level design.
The intersection - leads in four different directions. The most complex single construct. Used sparingly, it creates genuine navigational challenge and a sense of a large, interconnected space.
Most rooms in Wolf3D levels are built from a single construct or a combination of two. The first six rooms in Episode 1, Level 1, for example, are all built from single constructs. The complexity of a level comes not from the individual rooms but from how they are arranged and connected.
Room size is determined by how many tiles the construct occupies. The smallest square is a single tile; the next is four tiles; the next is nine. Most rooms in the original levels are somewhere in the middle range - large enough to feel like a real space, small enough to keep the action focused. Very large rooms tend to look wrong in Wolf3D because the aliasing effect becomes visible at distance and the detail starts to break down. Avoid rooms that take up more than roughly a quarter of the playable map area.
5.3 - What Defines a Room?
This might sound like a philosophical question, but it has practical implications for floor code assignment and level design.
The most useful working definition is this: a room is an area with a specific floor code that is enclosed by walls and accessible through doors. Under this definition, a room cannot be entered or exited without opening a door, every room is always adjacent to another room, and any two areas you can travel between share a boundary.
In practice, Wolf3D levels bend this definition regularly. Corridors and rooms can share a floor code even when they are architecturally distinct. Areas separated by static objects rather than walls can feel like separate rooms even though they are technically one open space. Pushwall secret areas are a strange hybrid - they are technically part of the room they connect to, sharing its floor code, but they feel like a separate space once the wall moves.
The important practical rule is simpler than any definition: every distinct navigable space must be completely filled with a floor code, and that floor code must be consistent throughout the space. Whether you choose to think of it as one room or several is a design decision. Whether every tile in that space has the correct matching floor code is not optional.
5.4 - Symmetry in Level Design
The original Wolf3D levels make heavy use of symmetry, and for good reason. Human beings find symmetry easier to process visually and spatially. A symmetrical room is easier to understand at a glance - the player can see one half and immediately understand the other. A symmetrical level layout is easier to navigate because landmarks repeat predictably.
The simplest symmetrical model in Wolf3D is the plain rectangular room. It is symmetrical along four axes: horizontal, vertical, and both diagonals through the center. Use this as a starting framework.
The method is straightforward. Start with the rectangle. Then make incremental changes while maintaining symmetry - if you add a column at the top of the room, add one at the bottom. If you add a floor lamp in the upper left corner, add three more in the remaining corners. Build the room by mirroring every addition.
Once the basic symmetrical structure is in place, you can start breaking it deliberately. Not every addition needs to be mirrored across all four axes - in fact, strict four-way symmetry in a large room can feel lifeless and artificial. The goal is to use symmetry as a foundation and then introduce controlled asymmetries that add character without creating visual confusion. A room that is roughly symmetrical with one intentional exception feels considered and interesting. A room that is entirely asymmetrical with no guiding principle feels random.
Symmetry is more appropriate for formal, constructed spaces - castle halls, officer areas, ceremonial rooms. It is less appropriate for organic spaces like caves, sewers, and tunnel systems, where irregular shapes feel more natural and realistic. Use your judgment based on the theme of the area.
5.5 - Realistic Area Design: Kitchens, Guard Posts, Barracks, Toilets, Meeting Rooms
One of the most effective ways to make a level feel like a real place is to design rooms that have a logical function and then furnish them accordingly. Here is a basic breakdown of how to approach several common room types.
Kitchens should have tables, pots, utensils, and food items. Chicken meals make sense in a kitchen; they make considerably less sense scattered in a hallway. If you want the player to find food, give them a kitchen to find it in. A small room with a table, two chairs, some cooking utensils, and a couple of meals looks like somewhere someone actually works.
Guard posts should have ammo, perhaps a weapon on the floor, a table for the guard to sit at. SS guards make more sense at a guard post than tan guards - they are the higher-ranking security force. Give the post a door and assign it a floor code that makes sense for the guard's role in the level.
Barracks have beds, tables, and personal effects. This is where the regular soldiers sleep. Wooden textures suit a barracks well. There's no reason for treasure here unless you want to suggest the soldiers have some personal valuables.
Meeting rooms are for officers. Tables with chairs, centered in the room with space around them - Nazis need room to sit. Floor lamps or chandeliers. Perhaps a portrait of Hitler on the wall. This is an area of relative prestige, so the decoration should reflect that.
Storage areas have barrels, crates, and racks. Gray stone textures make sense for a utilitarian storage space. Ammo fits naturally here - this is where they keep the supplies.
Toilets and washrooms are small, functional, and slightly grimy. Small baskets work well here. The textures should be lighter or more utilitarian than the rest of the level.
The point is not to simulate a real building with perfect accuracy - that is impossible with Wolf3D's limited object set. The point is to suggest function through the combination of texture, objects, and guard placement so the player's imagination fills in the gaps. A room with a table, a couple of chairs, some utensils, and a guard who looks like he was eating when the player walked in feels like a break room even though it is technically just a bunch of sprites on a 64x64 grid.
5.6 - Matching Guard Types to Their Environment
One thing that bothers me in a lot of levels is the wrong type of guard in the wrong environment. The guard types in Wolf3D carry implicit rank and status, and mixing them without thought breaks the sense of realism.
Tan guards are basic security - the lowest rank. They belong in prisons, lower levels of a castle, utility areas, and anywhere the security presence is routine rather than elite.
SS guards (blue) are a step up. They are the professional security force, more dangerous and more deliberate. They belong in important areas - near keys, guarding significant rooms, at formal checkpoints.
Officers (white) are high-ranking. They would not be caught dead in a sewer system alongside grunt soldiers. If you have a dark, grimy, slime-covered sewer level, filling it with white officers is jarring - officers wear white, and they would not wade through muck on a routine patrol. Officers belong in the more prestigious areas of a level set - the upper floors, the administrative areas, the officers' club.
Mutants are a different category entirely. They are threats rather than soldiers, and they belong in areas that suggest horror or danger - laboratories, execution rooms, areas where something has clearly gone wrong. Mixing mutants with regular guard patrols in the same room feels wrong because one implies routine security and the other implies something has broken down.
Dogs are not ranked in the same way, but they have their own logic. Dogs belong where dogs would logically be - kennels, perimeter patrol areas, anywhere that suggests the building has animal security. A pack of dogs in a formal meeting room is absurd. Dogs in a courtyard or a lower-level patrol corridor makes complete sense.
The practical rule is to think about what each guard type represents and place them where they would plausibly be found in a real Nazi installation. You do not have to be rigidly literal about this - a boss in a sewer is fine because a boss has all the firepower to be wherever he wants. But a corridor full of white officers in a slime-filled dungeon is the kind of thing that makes a level feel carelessly designed.
5.7 - Balancing Realism with Fun
There is a tension at the heart of Wolf3D level design that every mapper eventually has to make peace with: the game is not realistic, but it works because it feels real within its own context. B.J. Blazkowicz can absorb gunshots and survive on chicken dinners. He carries a minigun. He gets nine lives. None of this is realistic. And yet the original levels feel grounded and believable in a way that many custom levels do not.
The reason is that id Software struck a specific balance between the logic of the world and the demands of the game. Rooms make sense as rooms. Guard placement makes sense as guard placement. Treasure is where treasure would plausibly be. The gameplay - the guns, the health, the lives - sits on top of this logical foundation and makes it fun. When that foundation is absent, the gameplay floats free and the experience feels arbitrary.
Your job as a designer is to build the foundation first and let the gameplay sit on top of it. Design rooms that make sense as rooms. Place guards where guards would logically be. Then, within that framework, make the gameplay as interesting as you can - surprising encounters, satisfying secrets, good pacing, meaningful choices. The realism is not the goal; it is the container that makes everything else feel worth doing.
That said, some of the best Wolf3D levels break their own rules in exactly the right ways. Episode 4, Level 5 does not make much logical sense as a space and is endlessly repetitive, yet it is one of the most beloved levels in the game. Episode 6, Level 10 has recurring Hans Grosses everywhere, which makes no narrative sense whatsoever, and it is arguably the greatest secret level ever made. Episode 3, Level 10 has Pac-Man ghosts. These work because they embrace their own absurdity with commitment and deliver something genuinely fun and memorable. The lesson is not that realism is dispensable - it is that when you break the rules, break them for a reason and break them completely.
Every level should also have a fun element, no matter how grim its setting. A level set entirely in execution rooms and torture chambers can have one room that is slightly unexpected, a little lighter in tone, a small joke or reference that rewards the player for paying attention. It breaks the tension just enough to make the grim parts feel more affecting by contrast. Games are primarily about fun. Don't forget that, even when the subject matter is dark.
5.8 - Variation Across a Level Set: Episode Layout Archetypes
If you are designing a full episode or multi-level set rather than individual floors, consistency across levels is just as important as variety within them. Each episode of the original Wolf3D had a distinct architectural identity that evolved as the player progressed.
Episode 1 used a lot of long, brightly lit hallways with the gray stone textures of a large prison castle. Episode 2 was mazier and more complex in its layout. Episode 3 had many smaller interconnected rooms. As the episodes progressed, the settings became more prestigious - from utilitarian lower levels to the more formal, heavily decorated areas where officers and high command would be found.
This progression makes narrative sense: you start at the bottom of the castle and work your way up through increasingly important areas. The textures, guard types, and room styles all reinforce this. By the time you reach Episode 6, you are in Hitler's bunker and everything is correspondingly formal and dangerous.
When designing your own set, think about this arc. What does the player's journey look like from a spatial and atmospheric perspective? Starting in a grimy basement and working toward increasingly ornate and well-defended areas is a natural progression. Mixing gray sewer levels with marble palace levels at random, with no narrative logic connecting them, makes the set feel incoherent even if the individual levels are well designed.
5.9 - Room Size and Shape Variation
Plain rectangular rooms and straight hallways get boring after a while. Try using strangely shaped rooms every so often to liven things up. An L-shaped room, a room with a column cluster in the center, a T-junction that opens into a larger space - any of these creates a sense of variety that keeps the player from feeling like they are walking through identical boxes.
That said, avoid changing things up too drastically within a single level. If most of your level consists of medium-sized rooms and corridors and then you suddenly introduce a room that takes up a third of the map, it will feel jarring rather than exciting. Variation should be gradual and consistent with the level's theme. Cave and sewer areas benefit from more irregular shapes because organic spaces naturally vary. Castle and office areas should be more geometrically regular because they are man-made structures.
Nooks and crannies are essential to good level design even in predominantly regular layouts. A small recess in a corridor where a guard can hide is far more interesting than a guard standing in the open. A narrow side passage leading to a small room with some treasure rewards the exploratory player without disrupting the flow of the level for everyone else. These small irregularities make a level feel lived-in and detailed rather than schematic.
Non-linear connectivity also adds greatly to a level's replay value. If most of your rooms are interconnected through multiple doors and passages, giving the player choices about where to go and allowing them to loop back through territory they have already visited, the level becomes less predictable. The player cannot simply clear rooms sequentially and always know what comes next. Each playthrough can unfold differently depending on which direction they go first. Be careful not to make this so complex that it becomes a maze - the goal is to give the player options, not to confuse them.
5.10 - Area Type and Layout: Sewers, Prisons, Castles, Offices
Different area types have natural structural conventions that reflect their real-world counterparts. Following these conventions makes your levels feel coherent; breaking them requires a good reason.
Sewer areas should be primarily long tunnels. The architecture is functional and utilitarian - narrow passages, occasional junctions, low decoration. Gray stone with slime is the obvious texture choice. Guards here are likely lower-ranking unless there is a specific reason for a high-ranking presence.
Prison areas are classically organized as a central corridor with cells off to the sides. Each cell is a small room separated from the corridor by a door. The corridor is the main patrol route; the cells are where the prisoners - and possibly hidden treasure or secrets - are kept. Guards in a prison block make natural sense on patrol.
Castle areas typically consist of smaller interconnected rooms with some kind of central hallway or hub that connects most of them. The architecture can be more varied and interesting than a sewer or prison - rooms of different sizes, some more formal than others, occasional large ceremonial spaces.
Office and administrative areas are the most formal environments in a Wolf3D set. Long corridors with many doors, formal meeting rooms, officer quarters. These areas call for more prestigious textures - wood paneling, marble, decorated walls - and more senior guards. Treasure makes more sense here than in a sewer.
These are conventions, not rules. The most interesting levels often take a familiar area type and introduce unexpected elements - a formal marble room in the middle of a sewer level that suggests something important is hidden here, or a grimy, damaged section within an otherwise pristine office area that hints at something having gone wrong. The conventions exist to be used and occasionally subverted, not to constrain creativity.
5.11 - Mazes: Why They Usually Don't Work, and When They Do
The maze is one of the most tempting structures for a beginning mapper. It's easy to build - just a network of one-tile corridors branching in various directions - and on paper it seems like it should be challenging and interesting. In practice, mazes in Wolf3D almost always produce frustration rather than engagement.
The reason is that Wolf3D is fundamentally a fast-paced action game. The player wants to move, fight, discover, and progress. A maze slows all of this to a crawl. Navigation in first person without a map is genuinely difficult, and when nothing interesting is happening - no fights, no discoveries, just identical corridors branching in confusing directions - the experience becomes tedious rather than challenging. Calling it a chore pretty much sums it up.
There is also a structural problem: mazes in Wolf3D tend to look the same everywhere within them. The same wall texture, the same ceiling, the same width corridor. The player has no landmarks to orient themselves and no variation to hold their interest. Running in circles for five minutes in an identical gray tunnel is not fun by any reasonable definition.
This doesn't mean you can never use maze-like elements. A short maze section - a few corridors of deliberate complexity - used as a transition between two more interesting areas can work well. A maze that leads to a secret area, where the maze itself is a kind of barrier protecting the reward, is reasonable. A maze that has some variation in it - wider corridors alternating with narrow ones, occasional small rooms, guard placement that creates pressure - can be passable if brief.
What doesn't work is a level that is mostly or entirely maze. If three-quarters of your level is undifferentiated corridor branching, your players will either give up or cheat their way through it, and either way they will not enjoy the experience.
If you do include a maze section, signal it to the player before they enter it. A change in texture, a sign, a visual shift of some kind that tells the player: things are about to get more complex. This gives them a chance to save their game and mentally prepare rather than being ambushed by sudden disorientation.
5.12 - Outdoor Areas and the Landscape Wall
The landscape wall is a special texture that creates the impression of an outdoor view. On its north and south sides it shows a daytime sky; on its east and west sides it shows a nighttime sky. This means you need to make a choice: is your level set during the day or the night? Pick one orientation and apply it consistently across the entire level. Mixing day and night views on the same level - because some landscape walls are oriented one way and others the opposite way - looks absurd and breaks immersion entirely. The player will think they have had a stroke.
Id Software made this decision at the episode level, not the floor level. Here is how they handled it:
- Episode 1: Day
- Episode 2: Night
- Episode 3: Landscape wall not used
- Episode 4: Day
- Episode 5: Landscape wall not used
- Episode 6: Night
If you're replacing a level in a specific episode, consider matching the day/night orientation of the other levels in that episode for consistency.
The landscape wall should never be flush with the regular walls around it. When a landscape wall is placed at the same depth as the surrounding walls, the regular walls appear to have no depth - they look like flat cutouts rather than solid structures. Always recess the landscape wall at least one tile back from the surrounding walls, with columns or other blocking objects in front of it to prevent the player from getting too close. When a player can reach or touch a landscape wall, the illusion breaks completely - they bump into what is supposed to be open sky.
There are several approaches to creating the outdoor effect well. The simplest is to place the landscape wall directly behind a blocking object with one or two tiles of space between them. A slightly more elaborate approach creates a narrow outdoor area with the landscape wall at the back, a blocking object in front, and a gap of a few tiles that gives the impression of depth. The wider the gap between the inner walls and the outer landscape wall, the more convincing the outdoor scene feels, but each additional tile requires more vigilance about the visual result from all angles.
Do not use landscape walls as the walls of a room - having a room where half the walls show daytime and half show nighttime is completely wrong. The only conceivable reason to do this is if your level is specifically themed around lunacy, and even then it is pathetic. I've played a level that did this. The designer probably thought it was creative. It was not.
5.13 - Starting Areas: First Impressions
The first thing a player sees when they enter a level sets their expectations for everything that follows. A well-designed starting area tells the player what kind of level this is, gives them time to orient themselves before combat begins, and ideally communicates something about the overall setting.
There are several established approaches to starting areas, each with different implications.
The Level Entrance wall - a flat elevator-door style wall behind the player - is the simplest and most common approach. It takes up only one tile, is instantly readable, and puts the player in whatever room you have designed without preamble. The downside is that it can make every level feel like it starts the same way.
The dead elevator - B.J. starts inside a non-functional elevator and must open the door to access the level - is Spear of Destiny's default approach. It gives a brief moment of transition between levels and can be used to create a sense of arrival. A variation on this is starting in front of a dead elevator - which gives you the opportunity to hide an item or secret inside the elevator that observant players will check before moving on.
The outdoor starting area - columns or other blocking objects behind the player with a landscape wall beyond, suggesting B.J. has just entered from outside - creates a strong sense of place. Some designers use a truck-rear sprite in a narrow passage to suggest B.J. is exiting a vehicle, which is an effective piece of environmental storytelling. This approach works best for the first level of a set.
The dead guard start - typically used for prison escape scenarios, with a dead guard already lying at B.J.'s feet - communicates a specific narrative situation instantly. B.J. has already dealt with one guard; now he needs to deal with the rest.
Starting in combat - guards close enough that the player is under immediate pressure from the moment the level begins - is a legitimate and sometimes thrilling choice. The baptism by fire in Episode 6, Level 7 or Spear of Destiny, Level 2 is memorable precisely because there is no grace period. This approach requires that the player have a way out of the situation - cover, a retreat path, a weapon nearby - or it is simply punishing rather than exciting.
Whatever approach you choose, keep the starting area relatively small and contained. Players are orienting themselves and getting their bearings. A massive room with many exits as the first thing they see creates navigational anxiety before the experience has even begun. A clear, readable space with a defined direction of travel gives the player confidence and momentum.
For consistency across a set, consider keeping the starting approach the same within an episode while varying it between episodes. The first level of each episode can have a more distinctive opening - an outdoor scene, a dramatic combat start, something memorable - while the subsequent levels use the flat elevator wall for efficiency. This way the transitions between levels feel smooth while the start of each episode still feels like an event.
5.14 - Playing With the Player's Emotions
Good enemy placement is not just about difficulty - it is about emotional effect. Think of a level as an emotional arc. The player should move through different states - confidence, anxiety, relief, surprise, tension, satisfaction - and the design of the level should create and control those transitions.
Studying a specific level in the editor helps illustrate this. Episode 3, Level 8 is an excellent example. The player starts in a small, closed room with no visible exits. There is a sign ahead. There are no doors. The player explores in confusion for a few seconds before discovering that the wall in front of them is a pushwall. When they push it, a massive swastika-shaped room is revealed. The guards are all placed at the tips of the swastika, invisible when you first enter, but converging from all four directions the moment a shot is fired. The emotional progression - confusion, discovery, brief awe at the swastika shape, then sudden overwhelming chaos - is entirely deliberate.
The principle is: give the player an out. Whatever emotional situation you put them in, make sure there is a way through it. A room that provokes anxiety is good design. A room that provokes anxiety with no reasonable escape is just punishment. Similarly, making the player feel safe for a period and then suddenly pulling that safety away - a room that seems clear until a patrolling guard comes through a door from an unexpected direction, or a corridor that has been quiet all level suddenly filling with dogs - is one of the most effective tools in the designer's kit.
Monotony is the opposite of emotional engagement. If every room plays out the same way, the player stops feeling anything and starts going through the motions. Vary the intensity. Follow a difficult fight with a quieter, more exploratory section. Let the player feel accomplished before challenging them again. The original Wolf3D levels understood this pacing intuitively - there were hard rooms and easy rooms, tense corridors and open spaces - and that rhythm is a large part of what made them enjoyable to play repeatedly.
5.15 - Using Symbolism Subliminally
Wolf3D's thematic setting gives you a powerful tool that most game designers never have access to: real-world symbols that carry genuine psychological weight. A Hitler portrait next to a locked door creates a specific kind of anxiety. The player asks themselves: what is behind this door? Is this a boss room? Is this a trap? The symbol does the work without any mechanics at all.
Swastika-shaped rooms are another effective tool. The winding, disorienting pattern of a swastika layout tends to make players feel slightly uneasy even when they cannot articulate why. The shape is so strongly associated with threat and authority that it affects the player's emotional state just by being there.
The key to using symbolism effectively is restraint and variation. If every door has a Hitler portrait next to it, the signal loses its meaning and becomes wallpaper. Use the strongest symbols for your most important moments - a key room, a boss chamber, a trap. Use them sparingly enough that when the player sees one, they still feel the intended effect. Then, once the player has started to recognize the pattern, subvert it. Put a boss somewhere unexpected. Hide a guard in what looks like a safe, decorative room. The moment the player starts to feel confident that they understand your design language is the moment to change it.
Dogs used in conjunction with fast enemies like officers create a specific kind of adrenaline that slower enemies alone cannot produce. An officer is dangerous because he moves quickly and dodges. A dog is dangerous because he moves unpredictably and is hard to hit. Together, in a room where the player has limited space and limited ammo, they create genuine panic. Use this combination deliberately and save it for moments where you want the player's heart rate to spike.
6.0 - Designing New Levels: OBJECT Mode
After you have got your walls, doors, and floor codes in place, you are ready to populate the level with objects. In Mapedit and most modern editors, objects occupy the second plane of the map - the same tile can hold a floor code and an object simultaneously, though it cannot hold two objects. Everything you place in object mode falls into one of three broad categories: statics, actors, and invisibles.
Statics are everything that sits on the floor and doesn't move - ceiling lamps, tables, barrels, plants, treasure, weapons, health items, and decorative objects of all kinds. They have a hard limit of 399 per level on DOS.
Actors are the Nazis themselves - guards, dogs, officers, mutants, and bosses. They have a hard limit of 149 per level on DOS. This number includes initially dead guards, the endgame running hero at the end of Episodes 1 and 5, and any bosses on the level. It also includes projectiles fired during play, which is covered in more detail in Section 6.121.
Invisibles are objects that have no visual presence in the game but perform specific functions: turning points that direct the paths of moving guards, start position markers that place the player at the beginning of a level, and endgame triggers that initiate the victory sequence at the end of Episodes 1 and 5.
Some designers prefer to build all their walls and floor codes before thinking about objects at all. My preference is to design a portion of the level, populate it fully, test it, fix whatever is wrong, and then continue. Working in complete sections means you can catch problems early before they compound, and you get a sense of how the level actually plays while you are still designing it rather than discovering fundamental issues at the end.
6.1 - Overview: Statics, Actors, and Invisible Objects
A level without static objects looks like a working demo for a crusty old raycasting engine. Just walls is a no-no. The statics are what make a level feel inhabited - they are the furniture, the evidence of human activity, the visual texture that tells the player what kind of place this is.
Actors are what make a level challenging and memorable. Without enemies, you do not have much of a level. The way enemies are placed, what type they are, how they are oriented, whether they are stationary or patrolling, whether they are deaf or reactive - all of these decisions together determine how your level actually plays.
Invisible objects are easy to overlook but critical. Forgetting a start position marker means the player will be stuck inside a wall at the start of the level and unable to move. Misplacing an endgame trigger means the victory camera will behave strangely or clip through walls. Forgetting turning points on a patrolling guard means the guard will walk in one direction until he hits a wall and stay there. Each invisible object is small, but each one matters.
6.2 - Static Object Limits and Screen Clutter
The hard limit of 399 static objects per level applies on DOS. This number is easily reached if you are generous with decoration. I typically find that static objects are the first thing I run out of space for, because I like to place a lot of them.
There is a performance consequence to watch for even before you hit the hard limit. If you get approximately 50 (in DOS) or more objects - including guards - visible in the player's view at once, the screen will not be able to refresh fast enough and some of them will start disappearing or becoming invisible. This was amended in SDL and increased to 250, however. This can happen easily in a room stuffed with vines, a barrel maze, or any large room with many objects placed densely. When guards that are shooting at you start becoming invisible it is genuinely alarming - the player cannot see who is hitting them. Yes, this problem exists in the original Wolf3D maps on Episode 4, Levels 8 and 10. It is still worth trying to avoid.
The practical rule is to limit how many objects can be simultaneously in the player's field of view. Use walls to partition large rooms into smaller visual areas. Use smaller rooms rather than one large one if you want high object density. If you have built a boss encounter with a lot of ammo and health piled up around the room, be aware that if the player backs up far enough to put all those objects between themselves and the boss, the boss may start flickering in and out of visibility.
There is also a consequence to reaching the exact 399 object limit: guards will not drop ammo when killed until the player picks something up and reduces the static count below 399. This is not necessarily a catastrophe - the player will pick things up naturally during play - but it means the first few guard kills in a fully loaded level will yield nothing. Keep the initial static count sufficiently below 399 if consistent ammo drops are important to your level's balance.
On SDL, the 399 limit and the visibility clutter issue do not apply to the same degree, though the underlying principle of not over-stuffing rooms remains good design practice regardless.
6.3 - Furniture and Decoration
6.31 - Decoration Philosophy: Less Is More
Adding static sprites is really important. Without them your level looks empty and lifeless. But there is such a thing as too many - a room with an object on every available tile is visually overwhelming, does not look realistic, and risks the visibility clutter described in Section 6.2.
The guiding principle is purposeful placement. Every object in a room should be there for a reason - either it contributes to the room's visual identity, communicates something to the player, affects movement, or serves as cover. An object placed just to fill space adds clutter without adding meaning. An object placed deliberately adds character.
A room without ceiling lights looks wrong to me for some reason I cannot fully explain. It just does. Always put at least one light source in a room - a ceiling lamp, a floor lamp, a chandelier - unless the room is supposed to feel deliberately dark and gloomy, like a dungeon or an abandoned tunnel. Darkness should be intentional, not accidental.
Do not litter a room with too much of the same object. Ten barrels, ten plants, ten of anything in the same room crosses from decoration into absurdity.
6.32 - Matching Decorations to Room Theme
The first question to ask when decorating a room is: what kind of place is this, and what would you expect to find here?
A high-ranking area - an officers' meeting room, a command center - should have green plants, tables, pillars, chandeliers, and the kind of decorations that suggest status and expense. The Nazis in charge of this space would have made it comfortable and impressive.
A dungeon area should have skeletons, blood, cages, bones, and puddles. Things that communicate this is not a nice place to be.
A storage area should have barrels and crates. A kitchen should have tables, utensils, and food. A kennel should have dogs and food bowls. A guard post should have ammo and a weapon.
The worst decorating mistake is mixing incongruous themes within the same room - blood and bones in one corner, a dining table with chairs and a floor lamp in another. This does not suggest anything coherent. It just looks like the designer ran out of ideas and placed objects at random. Commit to the theme of each room and decorate accordingly.
A slime-covered wall with hanging skeletons and broken bodies is not a natural companion to a table with chairs, a bed, a floor lamp, and a bookcase. You should at least attempt to make the theme of each room consistent from one end to the other. Besides, who wants to exhaust all possible themes in the first five rooms? Leave yourself room to develop the level's atmosphere as the player progresses.
6.33 - Symmetrical Object Placement
Just as symmetry in room geometry is appealing and readable, symmetrical object placement within rooms has a strong visual effect. If you put a column at the top of a room, put one at the bottom. If you put a floor lamp in the upper left corner, put three more in the remaining corners. If you put a plant on the left side of a doorway, put one on the right.
This is not a rule to be applied mechanically to every object in every room - that produces a sterile, over-designed look. Think of it as a default that you deviate from when you have a reason to. A room that is perfectly symmetrical with one deliberate exception feels considered and interesting. Start with the symmetrical layout, then break it where it makes sense.
Symmetry is more appropriate for formal, constructed spaces - castle halls, officer areas - and less so for organic spaces like caves and sewers.
6.34 - Portraits and Symbols: What Goes in Front and What Doesn't
Refer to Section 4.39 for the general rules on portrait and symbol placement. A few additional notes here on what you place in front of them.
Objects like beds, baskets, and wells in front of a decorated wall are generally acceptable. Larger objects - suits of armor, spear racks - in front of a Hitler portrait are not. The portrait is the focal point; the object should not obscure or compete with it. A large object directly in front of a portrait suggests either that someone is trying to hide the portrait, or that the designer was not paying attention. Neither is a good look.
By the same principle, do not place plants or large decorative objects directly in front of a wall decoration unless obscuring it is specifically your intention. And do not place a portrait immediately next to a pushwall - the portrait's texture is visible from all four sides of its tile, and when the pushwall moves it reveals the portrait floating disconnected from any wall surface. It breaks the illusion badly.
6.35 - Decoration in Niches and Alcoves
One of the most effective decoration techniques is placing objects in wall niches - small recesses created by offsetting one wall tile relative to its neighbors. A decoration at the back of a niche, with a plant in front of it, has a completely different quality from the same decoration placed flat against a wall. It suggests depth and intentionality. It looks like something was placed there deliberately rather than set down in a corridor.
A series of niches along a long hallway - each one containing a decoration and perhaps a plant - looks considerably more interesting than the same hallway with decorations simply placed against the wall. And you can put a guard in one of those niches to surprise the player, which is excellent.
Some objects look distinctly wrong when placed in the open and much better when positioned in alcoves. A stove with a pipe or chimney looks strange floating in the middle of a room - the pipe connects to nothing. Put it in an alcove or against a wall and it reads correctly. The same applies to hanging kitchen utensils, which have no shadows beneath them and look odd when freestanding. These objects belong against walls or inside recesses.
6.36 - Plants in Front of Banners
A green plant placed directly in front of a swastika banner or flag - with the plant either immediately in front or one tile away - looks excellent. The contrast between the organic shape of the plant and the geometric, formal banner creates a visual combination that appears both natural and deliberate. This technique works with most banner and flag wall types and is worth using in formal areas of the level. It gives the impression that someone has decorated the space with a small amount of care.
6.37 - Table Placement: Give the Nazis Room to Sit
Tables with chairs should be centered in a room, or at least placed at least one tile away from any surrounding walls. The Nazis sitting around a table need room to push their chairs back and stand up - a table jammed into a corner does not look like a real dining arrangement. It looks like someone threw a table in a corner.
Bare tables without chairs look good when set inside a single tile niche in a wall, perhaps with a piece of treasure or food in front of them. This suggests a counter or workspace rather than a dining arrangement.
A row of tables along one side of a room creates a natural counter or serving line. You can block off the back side of the tables from the front side and put guards and kitchen objects behind them, with an opening that suggests a serving window. This kind of environmental storytelling - a lunch counter with a guard on each side - costs very little in object count but does a lot for the feeling that real life was happening in this space before B.J. arrived.
6.38 - Color Scheme Considerations for Decorative Objects
The color of your decorative objects interacts with the ceiling color and wall textures in ways that are easy to overlook. Brown plants on a level with dark brown walls and ceiling will blend into the background - the plants and the guards will both be brownish and the whole level will look dull. Switching to green plants on that same level brings in a contrasting color and makes the visual landscape more interesting and easier to read. Conversely, on a level where the dominant tones are gray and blue, brown plants provide a warm contrast that green plants would not.
Think of decoration colors as part of the overall color composition of the level. The ceiling color, the dominant wall texture, the guard sprites, and the decorative objects all contribute to a color palette. If everything in the palette is the same temperature and value, the level looks flat. Introducing at least one contrasting element - a warm color against cool walls, a bright object in a dark room - creates visual life.
6.39 - Using Objects to Affect Gameplay and Movement
Static objects are not merely decorative. A barrel placed in a corridor forces both the player and enemies to navigate around it. A row of tables creates a barrier that can be used as cover. A maze of barrels can completely change the dynamics of a room.
The key thing to understand is that blocking objects affect enemy movement as well as the player's. A guard navigating toward the player will be slowed or redirected by blocking objects in the path. This can work in the player's favor - a barrel that an enemy has to go around gives the player an extra second to line up a shot. It can also work against the player - a table that slows a retreat creates danger rather than cover.
This means that object placement has strategic implications that go beyond aesthetics. Thinking about how guards will navigate through a room before placing objects in it is part of good level design. A room with thoughtfully placed objects that affect both the player's movement and the enemies' navigation is considerably more interesting than a room where everything is decorative and the combat plays out in open space.
Be aware that a moving guard who walks through a blocking object will make that object transparent to the player as well - the object can be walked through from that point on. This is a bug, but it is also a technique that can be used deliberately, as covered in Section 7.3.
6.310 - Pillars: A Double-Edged Tool
Pillars deserve special attention because they affect gameplay more profoundly than most static objects. A pillar provides cover - for the player against enemy fire, but also for enemies against the player's fire. A room with pillars is a room where enemies can duck behind cover, and where the player cannot simply stand in a doorway and pick them off cleanly.
This cuts both ways. Pillars in a boss arena give the player somewhere to retreat to while dealing with the boss's firepower. But if the player needs to make a fast retreat and a pillar is in the way, it becomes an obstacle rather than an asset. If the boss has bodyguards who can shelter behind pillars, the fight becomes considerably more complex.
Pillars also affect patrolling guard paths. Guards navigating toward the player will try to go around pillars, which can funnel them into predictable routes. A room where pillars are positioned to create a single navigable channel is one where the player can control the flow of enemies far more easily than in an open room.
Think about pillar placement in terms of what kind of encounter you want to create. Pillars that give the player clear advantages are good for difficult fights where you want to be fair. Pillars that create ambiguity - where either side can use them for cover - are good for encounters where you want genuine tactical challenge.
6.311 - Objects That Belong in Alcoves: Stoves, Kitchen Utensils, and Structured Objects
Several static objects look wrong or physically implausible when placed in the open center of a room. The stove has a pipe that is supposed to connect to a wall or ceiling - floating in the middle of a room it looks like it was dropped there by accident. The rack of hanging kitchen utensils has no shadows beneath the hanging items and looks strange without a wall behind it to anchor it visually.
Both of these objects should be placed against walls, in corners, or inside alcoves. Against a wall the stove reads as a kitchen fixture. In an alcove with a wall behind it the utensil rack reads as a mounted installation. In the open neither of them makes sense.
The general principle is: if an object is designed to connect to or rest against a fixed surface, place it against a fixed surface. Floating objects break realism even in a game that is not particularly realistic.
6.312 - Universal vs. Context-Specific Static Objects
Some static objects work in almost any context. The table with chairs, for example, is generic enough that it reads naturally as a dining arrangement in a lowly guard barracks or an officers' mess with equal plausibility. The plain bed works in both a prisoner cell and an officers' sleeping quarters. These universal objects are useful precisely because they do not commit you strongly to a specific kind of space.
Other objects are highly context-specific. The spear rack is pure decoration and only belongs in formal, regal areas - it would look wrong in a sewer or a utility room. The hanging kitchen utensils belong in a kitchen. The ornate chandelier belongs in a prestigious space, not a basement. Skulls and bones belong in areas that are supposed to feel threatening or grim, not in an office.
Being clear about which objects are universal and which are specific helps you make faster decoration decisions. The universal objects can fill in anywhere; the specific ones should only appear where they make sense.
6.313 - Underused Objects Worth Revisiting: The Bucket and Others
The bucket is probably the most underused static object in Wolf3D. It is small, neutral in appearance, and versatile in application. It works as a cleaning bucket near a mop or well. It works as a water bowl for dogs. It works, in the right context, as a chamber pot in a toilet area. It looks excellent in a janitor's closet alongside a sink, some brown barrels, and a puddle on the floor. There are more uses for it than most designers ever explore. Next time you are decorating a level, find somewhere the bucket fits.
Other underused objects include the attack dogs, which many designers place rarely or not at all - more on them in Section 6.47 - and various food items that tend to get thrown down anywhere rather than placed in specific contextual locations.
On the opposite end, some objects are dramatically overused in certain contexts. Blood puddles and skeletons are vivid and powerful when used sparingly in grim or horrifying areas. When they appear in every room regardless of context they lose their meaning and become wallpaper. Use them where they matter.
6.314 - Keeping Empty Levels Functional
If you are designing a set that does not use all the available level slots - say, a 20-level set in a 60-level engine - do not leave the unused levels completely empty. An empty level with no wall borders and no start position marker will cause any demo that starts on that level to crash the game. Always keep at least the required border walls and a start position in every level slot you are not using, even if there is nothing else in it.
6.4 - Guards
6.41 - Guard Types and Their Behavior
There are several distinct guard types in Wolf3D, each with different speed, damage, hit points, and behavioral characteristics.
Tan guards (basic SA soldiers) are the slowest and least dangerous. They are most common in the early episodes and lower areas of a level set. They react to gunshots within their floor code and will come after the player when alerted, but they are relatively easy to deal with.
SS guards (blue uniforms) are more durable - typically requiring three or more shots depending on distance - and somewhat faster. They are the professional security force and belong in more important areas of the level.
Officers (white uniforms) are significantly faster than either of the above, will swerve to make the player miss, and are generally more intelligent in their behavior. They are dangerous in confined spaces where the player cannot back off quickly. They belong in the more elite areas of your level set.
Mutants are the most dangerous non-boss enemy. They move silently and fire more quickly than any other guard type. In a tight space with limited cover and a pistol, a mutant is a genuine threat. They belong in areas associated with horror or experimentation rather than with normal military activity.
Dogs always move and can never be stationary. They move faster than any human guard and are small targets. They are most dangerous when combined with other enemies because they distract the player's aim and force them to split their attention. They cannot open doors.
Bosses are always stationary in terms of their initial placement - they do not patrol - but will move toward the player aggressively once alerted. They have enormous hit points and powerful attacks. In DOS Wolf3D, bosses face in a fixed initial direction: Fake Hitler, Gretel Grosse, and Otto Giftmacher face north initially, while all other bosses face south. A player approaching from behind an unalerted boss will sometimes not trigger a response. This does not apply in SDL or ECWolf.
Note that dogs cannot be deaf. Bosses, while technically always deaf in the sense that they do not respond to gunfire, should still be placed on a normal floor code rather than on the deaf guard code - placing them on the deaf code serves no purpose and can create unexpected behavior.
6.42 - Moving (Patrolling) Guards
Placing moving guards requires more planning than placing stationary ones, but it pays off significantly in gameplay quality. A level that uses patrolling guards feels alive in a way that a level full of stationary guards never can - the player can never be fully certain of an enemy's position, and the same room will play differently depending on timing.
You control the path of a moving guard using turning point objects. You do not need to place a turning point at every tile the guard will walk on - only where you want the guard to change direction. Place the turning point where the turn should happen and it will redirect the guard accordingly.
Several rules apply to moving guards that you must follow to avoid breaking their behavior.
- Do not put dogs and other guard types on the same patrol path. Dogs move faster than human guards and will inevitably catch up to and collide with them. When two moving entities collide, both freeze. The chain reaction of frozen guards stacking up behind the first collision point is one of the most common and ugly bugs in custom Wolf3D levels.
- Do not use intersecting patrol paths unless the timing is perfectly synchronized - and since the timing shifts every time the level is played, perfect synchronization is essentially impossible. Guards on intersecting paths will eventually collide and freeze.
- Do not try to move more than one guard up and down a one-tile-wide hallway unless their spacing is managed extremely carefully. In a narrow hall there is no room to pass, so any collision freezes everything.
- Do not place a moving guard starting position immediately in front of a door it is supposed to open. This causes the door to behave incorrectly. The guard needs at least one empty tile in front of it before a door.
- Do not start a moving guard facing an outside wall. This generates an error when the level runs.
- Do not try to make a moving guard deaf. It does not work and the deaf guard code should not be placed on a moving guard's tile.
- When guards move through a door into a room with a different floor code, they can act as unintentional sound propagators - if a door is open when a shot is fired, guards in the newly connected room may also be alerted. This can be used intentionally for dramatic effect or avoided through careful floor code design, but it is worth being aware of.
Moving guards can provide great variety within a single room if their patrol path creates genuine unpredictability. A guard patrolling a loop through multiple rooms will be in a different position every time the player enters - sometimes visible immediately, sometimes out of sight, sometimes coming through a door just as the player fires at someone else. This is one of the most powerful tools for making a level feel different on repeated playthroughs.
6.43 - Stationary Guards
Stationary guards are simpler to place and manage than patrolling ones. They stand facing a fixed direction and respond when they see the player or hear a shot on their floor code. A special attribute - the deaf guard floor code - can be applied to stationary guards, as covered in Sections 4.44 and 6.44.
One useful technique with stationary guards: the initial direction they face affects whether they will see the player immediately upon entering a room. A guard facing away from the door is an ambush waiting to happen - the player enters, the guard does not react until the player is in his line of sight or fires a shot. A guard facing the door is a challenge the player must deal with immediately. Choosing facing direction deliberately is part of guard placement craft.
6.44 - The Deaf Guard Attribute in Practice
The deaf guard floor code (006a) placed on a stationary guard's tile gives that guard two properties: immunity to sound and dramatically enhanced vision. He sees in all eight directions and can spot the player through wall corners. He will not react to any gunfire anywhere on the level until the player enters his visual range.
This makes deaf guards excellent for:
Door ambushes. A deaf guard placed just inside a room behind a door will not react to anything the player does on the other side of that door. The moment the player opens the door and steps into visual range, the guard reacts - and he does so without a vocal warning first in many cases, which makes the encounter more surprising than a hearing guard who shouts before the player even sees him.
Secret room guards. As covered in Section 4.46, guards in secret rooms need to be deaf to prevent them from hearing the player shooting outside and potentially blocking the pushwall. The deaf guard code is the clean solution to this problem.
Creating choke points. As covered in the next section, deaf guards can be used to block the path of alerted guards and regulate the flow of enemies into an area.
Remember the clustering rule: too many deaf guards adjacent to each other will cause some of them to become paralyzed and unresponsive. Keep some spacing between deaf guards.
6.45 - Using Deaf Guards to Block Alarmed Guard Movement
One of the more sophisticated uses of the deaf guard attribute is as a traffic control mechanism for alerted enemies.
When a guard is alerted and pursuing the player, they navigate through the level trying to reach the player's position. If a deaf guard is standing in their path, the alerted guard cannot push past. The alerted guard will essentially wait behind the deaf guard, unable to proceed. Once the player kills the deaf guard and the obstruction is removed, the alerted guards behind him will suddenly have a clear path and converge.
This creates dramatic timing in combat encounters. The player fights through a room, aware that there are more enemies somewhere behind the deaf guards at the far end. When the deaf guards fall, the floodgates open. The pressure escalates precisely when the player may be running low on health or ammo from the preceding fight.
This technique can also be used in reverse - placing deaf guards so that alerted enemies from one area cannot reach a second area where you want the player to have a brief respite before the next encounter. The deaf guard acts as a wall between combat zones, letting you control the pacing of the fight.
6.46 - A Key Mechanic: Alarmed Guards Cannot Pass Unalarmed Ones
This is one of the most important and least-discussed mechanics in Wolf3D level design. When a guard has been alerted and is navigating toward the player, he cannot push past a guard who is not yet alerted. The alerted guard will be blocked by his unalarmed colleague.
This matters enormously for level design. It means that a wave of alerted guards coming through a corridor can be throttled by a single unalarmed guard standing in their way. And it means that if you want alerted guards to flow freely through a level, you need to make sure their routes are not blocked by unalerted guards they cannot pass.
The tactical applications are significant. You can place an unalerted stationary guard - not deaf, just unalerted - at a chokepoint between an alerted zone and a calm zone. The alerted guards pile up behind him, unable to proceed. The player can approach the chokepoint knowing that the unalerted guard will react when he comes into range, but that behind him is a wave of alerted enemies ready to pour through the moment he falls.
This also creates interesting dynamics with patrol paths. A patrolling guard who is not yet alerted will block alerted guards behind him in a narrow corridor, but because he is moving, the blockage shifts over time. Alerted guards will follow behind the unalerted patroller and funnel into the player's area in a drip rather than a flood.
Understanding this mechanic makes it possible to design encounters with genuine rhythmic pacing - controlled releases of enemies rather than overwhelming floods - using only the stock tools of floor codes and guard placement.
6.47 - Dogs: Special Rules and Common Underuse
Dogs are always moving. There is no stationary dog variant. This means every dog on your level needs a patrol path. A dog placed without turning points will walk in the direction it is facing until it hits a wall and stay there, looking stuck. Always give dogs a loop to follow.
Dogs cannot open doors. Keep this in mind when designing patrol paths - a dog cannot pass through a closed door and will simply pace back and forth in front of it. If you want a dog to patrol across multiple rooms, the doors on its path must either be open already or be doors that another guard on the same path will open ahead of it.
Dogs move faster than all human guards. Never put dogs on the same patrol path as any human guard. The dog will catch up, collide, and everyone freezes. This is such a consistent problem that it is worth treating it as a categorical rule rather than something to avoid on a case-by-case basis.
Dogs are probably the most underused enemy type in custom Wolf3D levels. Most designers place them infrequently, if at all. This is a mistake. Dogs serve a specific and irreplaceable tactical function: they waste the player's ammo and distract their aim. A dog after a difficult firefight - when the player is low on ammo, has their chaingun out, and is trying to collect themselves - is a legitimate threat even though it barely damages the player. The player reflexively fires at the fast-moving target, often missing, and the ammo expenditure during a moment of vulnerability can be genuinely punishing.
Using dogs at the end of a climactic battle - after the player has expended most of their resources and thinks the fight is over - is a classic technique that Ringman particularly recommends. The tactical wisdom is sound. A pack of dogs pouring out of a side room just as the player thinks the area is clear is a memorable moment that costs you very little in terms of difficulty design but creates a lot of gameplay surprise.
6.48 - Guard Collision and Path Freezing
When two moving entities occupy the same tile or attempt to move through each other, both will freeze in place. One of them may exhibit a walking animation while standing still, like a toy robot running against a wall. Any guards behind the frozen pair on the same path will also eventually pile up and freeze as they reach the blockage.
This is the most common visual bug in poorly designed patrol paths. It looks terrible and it is entirely preventable with proper path design.
The safest approaches:
Keep dogs entirely off paths that contain human guards and vice versa.
Do not use diagonal turning points on long winding paths - the diagonal movement requires both adjacent squares to be clear simultaneously, which is hard to guarantee when multiple guards are on the same path.
Leave enough spacing between guards on the same path that they never catch up to each other during normal operation. Test every patrol path before finalizing the level design.
Be especially careful with paths that pass through doors. If two guards enter a doorway in close succession the door can close on the second guard or the two can collide just inside. Always leave several squares of spacing between guards navigating through doors.
6.49 - Guards Moving Through Doors and Across Floor Codes
Moving guards can and do open doors - with one exception, dogs cannot. A guard on a patrol path that crosses a door will open that door normally as they pass through it.
This creates a specific risk: a patrolling guard can open a locked door without having a key. If your level has a locked door separating two areas, and a patrolling guard on one side has a path that takes them through that door, they will open it on their patrol cycle and the player can simply follow them through. This invalidates your key and lock design entirely.
The solution is to ensure that no patrol path crosses a locked door unless that is specifically the effect you want. This is one of the reasons to map guard paths carefully with the lock and key structure of the level in mind simultaneously.
When a guard opens a door between two areas with different floor codes while a shot is being fired, the two floor codes become temporarily connected and guards in the newly accessible area may be alerted. This is covered in Section 4.42. As a designer, be aware that patrol paths create dynamic connections between floor code zones that do not exist when the guards are not moving.
6.410 - Advanced Guard Choreography: How Guards Really Move
The single most important thing to understand about guard AI in Wolf3D is that guards have no pathfinding. They do not understand the logic of your map layout. They do not consider the most efficient route to the player. They do not take detours around obstacles.
What they actually do is this: at each step, a guard considers their current position relative to the player's position and tries to move in a straight line directly toward the player, regardless of what is in the way. If a wall is blocking that straight line, the guard will walk against it, grinding along the surface while trying to maintain the ideal vector. If an obstacle is in the way, the guard will try to go around it, but only by following the wall surface - not by planning a route.
This behavior is predictable once you understand it, and that predictability is what makes guard choreography possible. If you know where the player will be standing when a fight starts, and you know the guard's position, you can calculate which direction the guard will try to move. You can then use walls, objects, and room geometry to constrain that movement into the direction you want.
Consider a simple example. A guard in a small room off a main corridor has a position such that his ideal straight-line vector to the player in the corridor takes him directly into the doorframe rather than through the door. He will grind against the doorframe and not come out cleanly. Shifting the guard's starting position by a tile or two changes his vector enough that his straight-line path now aligns with the door opening, and he comes through cleanly and aggressively.
This kind of adjustment - small positional shifts that dramatically affect behavior - is what separates a level with satisfying enemy encounters from one where guards get confused and wander into walls. It requires testing and iteration. Place a guard, run the level, observe what the guard does, adjust the placement, repeat. Over time you develop an intuition for how guard positions translate into behavior.
6.411 - Using Geometry to Herd and Control Guards
Once you understand how guards navigate, you can use room geometry to direct them. Partition walls, corners, and narrow corridors all influence where guards will end up relative to the player during a fight.
A narrow corridor between the guard's starting room and the player's position creates a funnel. Guards must pass through it one at a time, which means the player can deal with them sequentially rather than being rushed by a crowd simultaneously. This is fairer and often more interesting than a wide-open room where all guards converge at once.
A partition wall in a large room that does not fully separate the two halves creates a situation where guards from one half must navigate around the partition to reach the player. This takes time, and during that time the player may be fighting guards from the other half. The partition controls the sequence of the encounter.
Deaf guards positioned at strategic points can block alerted guards from entering certain areas until the deaf guards are dealt with, as described in Section 6.45. Combined with floor code design, this allows you to create multi-phase encounters where the difficulty increases in controlled steps.
The principle underlying all of this is that you are designing not just a static layout but a dynamic system. The guards are agents in that system, and your job is to set up initial conditions - positions, floor codes, patrol paths, room geometry - that will produce interesting and fair encounters when the system runs.
6.412 - The Drip-Feed Technique: Controlling the Rate of Guard Arrival
One of the most useful combat design techniques in Wolf3D is controlling the rate at which enemies arrive at the player's position, rather than sending them all at once.
When a large number of guards are alerted simultaneously - say, through a single floor code covering the entire level - they all converge on the player at the same time. This is overwhelming rather than challenging, and it tends to collapse into chaos where the player simply holds a doorway and picks them off as they funnel through. It is not particularly interesting gameplay.
The drip-feed approach staggers enemy arrival through a combination of floor codes, patrol path timing, room geometry, and deaf guard placement. Some guards are on the same floor code as the player and react immediately. Others are on a different floor code and only react when an alerted guard opens a door into their zone. Still others are deaf and only react when the player physically reaches them. The partition walls and corridor layouts control how fast alerted guards can navigate toward the player.
The result is that the player faces waves rather than a flood - manageable pressure that escalates over time rather than an instant wall of enemies. This produces encounters that feel challenging throughout rather than only at the start, and it makes the level feel larger and more alive because threats are arriving from different directions at different times.
A specific application of this technique involves using a long patrol path that crosses multiple rooms to create a natural drip. A guard patrolling from a far room toward the player's area will arrive later than guards in the immediate vicinity, providing a secondary threat just as the player thinks the immediate fight is under control.
6.413 - Patrolling Guards on Level Loops
One of the most effective uses of patrolling guards is placing them on patrol paths that traverse the entire level - or a substantial portion of it - rather than confining them to a single room. A guard who patrols from one end of the level to the other, opening doors along the way, creates genuine uncertainty in the player. They clear a room, move on, and when they come back through that area later the patrolling guard may be there, or may not be, depending on timing.
This works especially well when the level has a loop structure - corridors that connect back to where the player has already been. A guard on a looping path will appear in areas the player has already cleared, which subverts the expectation that cleared areas are safe. This is not cheap; it is a legitimate tactical challenge because the player knows the guard is out there somewhere and must remain alert.
A few rules for level-wide patrol paths. Do not use them in rooms or areas that exist in dead ends - a guard patrolling in a dead end room accomplishes nothing except pacing back and forth. Reserve level-wide patrols for main corridors and hubs where the guard's unpredictable position genuinely affects the player's approach to the level. Be careful that a level-wide patrolling guard does not open locked doors the player has not yet found keys for. And avoid using SS guards on very long patrol paths because they are expensive to kill in high numbers and a level where SS guards appear everywhere eats ammo extremely fast.
6.5 - Difficulty Settings
6.51 - The Four Difficulty Levels Explained
Wolf3D has four difficulty levels: Can I Play Daddy (1), Don't Hurt Me (2), Bring 'Em On (3), and I Am Death Incarnate (4). In the editor, enemies placed as difficulty 1 appear on all four settings. Enemies placed as difficulty 3 appear only on Bring 'Em On and Death Incarnate. Enemies placed as difficulty 4 appear only on Death Incarnate.
There is no difficulty 2 enemy placement. The second difficulty level does not introduce additional enemies compared to the first - it only affects the damage the player receives. This means that for the purposes of enemy placement design, you are really working with three settings: easy (1), medium-hard (3), and hardest (4).
Do not skip difficulty settings. Placing only difficulty 4 enemies means no enemies will appear on the lower settings - the player will run through a completely empty level. Placing only difficulty 1 enemies means the difficulty never changes regardless of what skill the player chooses. Neither of these makes for good design.
6.52 - Three Core Difficulty Tools: Ammo, Health, and Mutants
Beyond enemy placement, there are three fundamental tools for affecting how difficult a level feels regardless of skill setting.
Ammo restriction makes the player conserve shots, switch to the knife more often, and feel pressure throughout the level. A level with limited ammo forces the player to engage carefully rather than blast carelessly. Pairing ammo restriction with mutants - who react extremely quickly - is particularly brutal because the player cannot afford to miss.
Health restriction creates sustained tension. When health is scarce, every hit matters and every fight feels consequential. Too little health can become frustrating rather than challenging, particularly on the lower difficulty settings where players have less combat experience. Use health restriction deliberately and ensure the level is still completable on Death Incarnate starting with a pistol and eight bullets.
Mutant placement is the single most powerful tool for instant difficulty escalation. Mutants react faster than any other guard, fire more quickly, and move silently. A mutant in a confined space with limited ammo is a genuine threat to an experienced player. Placing mutants at chokepoints, near the start of a level when the player is weakest, or in combination with dogs or officers creates intense difficulty without requiring a large number of enemies.
These three tools are independent of the skill-level enemy placement system, so they affect all players equally. Use them consciously and in combination with your skill-level design rather than as substitutes for it.
6.53 - A Practical Formula for Difficulty Scaling
A useful framework for structuring enemy placement across the four difficulty levels:
Difficulty 1 and 2: Place deaf guards and patrolling guards. Deaf guards stay in position regardless of difficulty level - they will be present on all skills. Patrolling guards also make sense here because their turning point markers take up object slots whether or not the guards appear on a given difficulty, so you may as well have them active from the easiest setting. These are your baseline encounters.
Difficulty 3: Add stationary, non-deaf guards in strategic positions - places where they can hear the player, where they create interesting combat situations, where they can appear at doors or around corners as surprises. These guards will also be present on difficulty 4, so place them with the most demanding players in mind.
Difficulty 4: Add additional stationary, non-deaf guards to flesh out the harder fights. These are supplementary encounters that increase the pressure on Death Incarnate without fundamentally changing the structure of the level.
Test the level at each difficulty setting after placing each layer. This tells you how the encounter feels at each stage before you add the next layer on top of it. The formula should be treated as a starting framework, not a rigid prescription - adjust it to fit the specific needs of each level.
6.54 - The 50/20/30 Rule
A useful rule of thumb for overall enemy composition on a level: aim for roughly 50 percent easy enemies, 20 percent medium enemies, and 30 percent hard enemies. This ratio ensures that the lower difficulty settings are meaningfully easier than the higher ones, while still providing challenge at every level.
Easy enemies in this context are tan guards. Medium enemies are SS guards. Hard enemies are officers, mutants, and on appropriate levels, bosses. This is a rough guideline rather than a precise formula - the specific mix will vary considerably depending on the level's theme, position in the episode, and intended difficulty. Early levels in a set should weight toward easy enemies. Later levels should weight progressively toward harder ones.
The id Software approach is useful as a reference point: their levels generally have roughly 2 to 2.5 times more enemies on Death Incarnate than on Can I Play Daddy. Using this as a calibration target gives you a sense of how far the skill levels should diverge from each other.
6.55 - Using Guard Types and Dogs to Self-Balance Difficulty Across Skills
There is a clever technique for using enemy type to create self-balancing difficulty without relying entirely on the placement number system.
SS guards drop machine guns when killed. On lower difficulty settings where there are fewer SS guards, machine guns are scarcer and the player spends more time with a pistol. On higher settings where more SS guards appear, machine guns become available earlier and more frequently, which compensates slightly for the increased enemy count.
Dogs present a different kind of self-balancing mechanic. Placing a dog on a patrol path in an area where, on easier difficulties, the player would simply walk through without fighting creates pressure on harder difficulties. On easier settings the dog may not be there. On harder settings the dog is there, alerted to the player, and its erratic movement and speed drain ammo and create chaos at exactly the moment the player is dealing with other threats.
Normal guards used as deaf guards on easier settings represent another option. A deaf guard on a difficulty 1 placement facing away from the player will be present on all skill levels but will only react when the player enters their line of sight. On harder difficulties, additional non-deaf guards on difficulty 3 or 4 placements will be added around the deaf guard. The deaf guard's presence across all difficulties means the area always has something in it, but its behavior ensures the encounter scales with skill level.
6.56 - Weapon Distribution as a Difficulty Tool
How you distribute weapons across a level - and across an episode - affects difficulty in ways that go beyond simply how many enemies you place.
There are four broad approaches to weapon availability, and each creates a different playing experience.
The first is to give the player a chaingun near the start. This is generous and fun - it removes resource anxiety early and lets the player focus on the combat itself. It works well for levels that are complex in design and where you do not want weapon scarcity to add to the challenge.
The second is to give the player a machine gun near the start. This is the safest approach for balance. A machine gun is a significant upgrade over the pistol but does not feel like a cheat. It gives the player the tools they need without making the level trivially easy.
The third is to make the player earn the machine gun - hiding it in a secret area, placing it in a difficult location, or giving it to an SS guard near the start that the player must dispatch with their pistol to obtain it. This adds tension and reward. The player who finds or earns the machine gun feels accomplished. The player who misses it faces a harder experience.
The fourth is to leave the player with their pistol for as long as possible. This is legitimate but demanding - it requires the level to be designed specifically around the pistol's limitations and should not be attempted without careful balance testing.
Do not give the player all their weapons on the first level of an episode. Let weapon availability scale naturally with the episode's progression. The chaingun in particular should be genuinely rare in the early levels - finding one should feel like a significant reward, not a routine item.
Regardless of approach, always ensure there is a machine gun somewhere near the start of every level. If the player dies and restarts with a pistol and eight bullets, they need a reasonable path to a better weapon without having to fight the entire level underarmed.
6.6 - Enemy Placement: Design and Tactics
6.61 - Preventing Player Camping
One of the most common problems in Wolf3D level design is allowing the player to camp - to stand outside a door and pick off enemies as they file through one at a time. When guards are confined to a single room with a single entrance, the player has no incentive to enter. They can simply wait at the door and shoot everything that comes to them without ever putting themselves at risk.
The first solution is multiple entrances. If a room has two or three doors, the player cannot cover all of them from one position. They have to move, which creates risk and makes the encounter genuinely dynamic.
The second solution is static objects. Barrels, columns, and tables placed near doors force enemies to navigate around them, which breaks up the single-file stream that allows easy camping. The same objects can force the player to move rather than standing in a doorway.
The third solution is a secondary room with the same floor code as the main fight room, positioned somewhere the player has already passed through or will pass through after the fight. When the main fight starts, guards in the secondary room are alerted simultaneously and begin navigating toward the player from a completely different direction. The player cannot camp the front door when enemies are also coming from behind.
These three techniques can be combined. A well-designed fight room has multiple entry points, objects that break up movement, and alerted guards arriving from secondary positions. The player is forced to manage space and make decisions rather than simply holding a chokepoint.
6.62 - Ambushes, Traps, and Surprise Encounters
The most memorable moments in Wolf3D are ambushes - moments where the player feels genuinely surprised and threatened despite their experience and skill. Designing these moments well requires understanding what creates the feeling of surprise and what merely creates frustration.
A good ambush has three components: a plausible setup, a reasonable survival option, and a genuine surprise. The setup is the situation in which the player finds themselves - a room that looks clear, a corridor that seems safe, a door that appears to lead somewhere unremarkable. The survival option is whatever the player can do to get through the ambush if they react correctly - a retreat path, cover, the fact that the player has enough ammo and health to fight their way out. The surprise is the element that disrupts the player's expectations.
The most effective ambush positions exploit the player's learned habits. Players learn that cleared rooms are safe. They learn that long corridors with nothing at the end are straightforward. They learn that small empty rooms are unimportant. The best ambushes violate these expectations - a guard who appears in a room the player already cleared because a patrolling guard's path brought him there, enemies pouring out of a corridor the player walked through thirty seconds ago, a quiet small room that turns out to be connected to a flood of enemies.
One specific technique worth highlighting: place guards so they see the player only when the player has already committed to entering a room - past the doorframe, with no easy retreat. A guard positioned at the back of a room, facing the door, will see the player the moment they enter. But a guard positioned to one side of the room, facing away from the door, won't see the player until they have moved further in. The ambush fires later, when retreat is less clean, which is more dramatic than a guard who sees the player immediately from across the room.
6.63 - The Machine Gun Bait Trick
A simple and effective ambush technique is to place a machine gun in a visible location in an otherwise empty-looking area, then hide guards in the vicinity who will spring into action when the player moves toward the weapon.
The machine gun is visible from a distance. The player sees it and wants it - particularly early in a level when weapon resources are scarce. They move toward it, focused on the reward. The guards who were hidden become active, either because the player entered their line of sight or because the player fired a shot that alerted the floor code. The player is suddenly in a fight they did not anticipate, in a position they chose for the reward rather than the tactical advantage.
This works because it leverages the player's desire rather than their caution. A player who is being appropriately cautious will check corners and identify guard positions before moving in. But the promise of a machine gun pulls the player's attention toward the reward and away from the defensive assessment. The bait exploits precisely the moment when the player's guard drops.
Use this technique sparingly. Once players know you use it, they will approach every visible weapon with suspicion, which makes the technique self-defeating if used too frequently. Save it for moments when the reward is genuinely desirable and the surprise will be meaningful.
6.64 - Making Enemies Attack From Awkward Positions
Beyond standard face-to-face encounters, you can create much more demanding situations by placing enemies so that the player cannot engage them cleanly.
Mutants positioned behind barrels or other blocking objects require the player to move to get a clean line of fire, which exposes them to return fire in the process. Multiple enemies positioned at different heights of the screen - one at the far end of a room, one close and to the side - force the player to track multiple attack vectors simultaneously. Enemies positioned in narrow side alcoves can shoot at the player from angles that are hard to address without stepping into the line of fire from the main group.
A specific effective configuration: have the player enter a room from the south. Position two mutants at the northwest and northeast corners, each with a clear line of fire to the entry point but both partially obscured by columns. The player enters and is immediately under fire from two directions they cannot simultaneously face, with cover available but requiring movement to reach. This is demanding without being unfair.
The original Episode 1, Level 1 demonstrates this principle with the classic starting sequence - a guard in a doorway, a second guard around a corner. Neither encounter is individually difficult, but they establish the rhythm of controlled threat that makes the whole episode work.
6.65 - Forcing Player Movement Through Ammo Restriction
Another way to prevent camping and enforce dynamic movement is to design the ammo distribution so the player cannot afford to hold a static position for long.
If the player is fighting guards at a doorway and running low on ammo, they will be forced to push into the room to collect ammo dropped by fallen enemies rather than staying safely at the threshold. This is a design pressure technique - the player is not explicitly prevented from camping, but the resource economy makes it non-viable.
You can reinforce this by placing ammo caches deep inside rooms rather than near the entrance. A player who wants to resupply must commit to the room fully rather than partially. This creates movement and engagement by necessity rather than by the level's geometry alone.
The key balance requirement is that the overall ammo supply must still be sufficient for the player to complete the level. Ammo restriction as a design pressure tool becomes ammo restriction as frustration if the player simply runs out and has to complete the level with a knife.
6.66 - Using Floor Codes for Unconnected-Room Ambushes
As described in Section 4.43, assigning the same floor code to two spatially separated areas of the level creates a direct alert link between them. When a shot is fired in one area, guards in the other area are immediately alerted regardless of how many walls and doors separate them.
This is one of the most powerful tools for creating surprises. Assign the same floor code to the starting area of the level and to a heavily guarded room deep in the level. When the player fires their first shot at the entrance, the guards in the distant room are alerted and begin navigating toward the player through every corridor and door in their path.
The player does not know this has happened. They fight the guards near the entrance, clear the area, and move deeper into the level. At some point they encounter guards coming from the direction they have already traveled - guards who were alerted by the opening shot and have been navigating toward the player ever since. The level feels alive in a way that purely static enemy placement never achieves.
A variation on this technique: assign the same floor code to the area near a key and to the rooms behind a locked door in a completely different part of the level. When the player fights the guards protecting the key, the guards behind the locked door are alerted simultaneously. By the time the player finds and uses the key to open those locked doors, the guards behind them are already in attack mode rather than standing around passively. The locked door opens onto active combat rather than a static arrangement.
6.67 - The Wired Doors Technique
This is a specific and highly effective application of the floor code linkage principle, named after its characteristic visual cue.
Design a locked door that the player can see but cannot open - the key is somewhere else on the level. Place guards behind that locked door and assign them a floor code that matches the area where the key is located. When the player fights the guards protecting the key and fires a shot, the guards behind the distant locked door are alerted. They open the locked door - remember that guards can open locked doors without a key - and begin moving through the level toward the player.
By the time the player collects the key and navigates back toward the locked door, the guards that were behind it are no longer there. They have dispersed into the level and may appear from unexpected directions. The once-locked area is now open but also unpredictably populated with enemies that the player has not yet encountered.
The technique has several effects. It breaks up the monotony of backtracking through cleared areas - territory the player has already seen is no longer empty. It rewards the player who pays attention to floor code design and plans accordingly. And it creates genuinely unpredictable encounters because the exact positions of the alerted guards depend on the timing of the player's actions.
The wired doors technique also works particularly well in boss encounters. Assign the boss room the same floor code as several locked side rooms. When the player engages the boss, guards in those locked rooms are alerted and open their locked doors, emerging to attack the player from behind while the boss fight is in progress. The player who was focusing entirely on the boss is suddenly flanked. Provide health and ammo in those side rooms so the player has a way to recover after the trap.
6.68 - Dogs at the End of Climactic Battles
Dogs are most effective not at the start of a fight but at the end of one. After the player has spent their heavy ammo reserves dealing with SS guards or mutants, survived a difficult encounter, and is in the process of collecting resources from fallen enemies - that is when dogs are maximally disruptive.
A pack of dogs pouring out of a side room at this moment creates a specific kind of chaos. The player reflexively fires at the fast-moving targets, probably with their remaining machine gun or chaingun, and the erratic movement of dogs means they will miss frequently. The ammo expenditure at a moment of low resources is punishing. And switching to the knife - the smart move against dogs - requires the player to think quickly rather than act reflexively.
This is described as either cruel or challenging depending on how you look at it. The practical distinction is whether the player has a reasonable way out. If the player has enough room to back up and manage the dogs, it is challenging. If the dogs emerge from a dead end where there is no retreat and the player has no ammo left, it is cruel.
Use dogs after difficult fights, not instead of them. They are a finishing challenge rather than a primary one.
6.69 - The Lunch Line: A Creative Guard Arrangement
A simple but visually distinctive arrangement: place a row of guards standing in a line, with a row of tables separating them from a single guard on the other side, as if one guard is serving meals to a line of waiting colleagues.
This works well in kitchen or canteen areas as a piece of environmental storytelling. The player enters and finds an arrangement that communicates a social scenario rather than just a group of enemies standing around. The tables create a partial barrier between the two sides that affects the combat - the player can engage the line guards without immediately triggering the server guard on the other side, or the server guard first to create chaos in the line.
It is a small thing, but it is the kind of small thing that makes a level feel designed rather than generated.
6.610 - Guard Balance Across Skill Levels
When balancing guard placement across difficulty settings, a few additional principles beyond the formula in Section 6.53 are worth keeping in mind.
Your default or core guards should be placed at difficulty 1 so they are present on every setting. These are the guards that define the basic shape of each encounter - the guard behind the door, the guard at the key room, the guard on the patrol route. Every player, regardless of skill level, should encounter these guards.
Higher-difficulty additions should supplement the core encounters without changing their fundamental character. Adding three more SS guards to a room that already has four tan guards makes the room harder in a linear way. Adding a mutant to the same room changes the encounter's character - the mutant's speed and fire rate create a qualitatively different threat rather than just a quantitative one. Think about whether you want harder encounters to be more of the same or different in kind.
Keeping a sufficient number of difficulty 1 guards active on all settings ensures that even the most casual player will find something in every area. A level that is completely empty on Can I Play Daddy because all the guards are difficulty 3 or 4 is a failure of design. Every skill level should provide a complete experience, not just the one you found most interesting to design around.
6.611 - Enemy Placement as Emotional Design
The finest Wolf3D levels treat enemy placement not primarily as a difficulty system but as a narrative and emotional tool. Where you put guards, what they are doing before the player arrives, how they react to the player's presence - all of this communicates something about the world of the level.
A guard patrolling a circuit that suggests a routine rounds schedule feels like a real soldier doing a real job. A deaf guard sitting perfectly still behind a door, positioned so he sees the player the moment they enter, feels like a deliberate ambush - someone knew the player was coming. A mutant alone in a room with blood on the walls and no other guards around it feels like something has gone very wrong in this place.
The best approach is to think about where each guard would logically be given the function of the room and the narrative situation of the level. A kitchen worker does not stand at attention in the middle of a corridor. A guard who is supposed to look like an ambush should be positioned like an ambush, not like a random enemy dropped into space.
This is not about perfect realism. It is about the player's perception. A level where the enemy placement feels considered - where the guards are where you would expect to find guards given what kind of place this is - creates immersion and investment. A level where guards seem to have been placed by throwing darts at the map does not.
6.7 - Bosses
6.71 - Boss Behavior, Orientation, and the Frozen Boss Problem
Bosses in Wolf3D are always stationary at the start - they do not patrol. They will move toward the player aggressively once alerted, however, so they are not simply a fixed target once combat begins.
On DOS Wolf3D, each boss has a fixed initial facing direction. Fake Hitler, Gretel Grosse, and Otto Giftmacher face north initially. All other bosses face south. Because a boss will not notice the player until the player enters their field of view, a player approaching from behind an unalerted boss may be able to enter the room without triggering the fight. This is a genuine behavioral property that was used in level design by id Software and by the community, and it can be exploited in both directions - to give the player a tactical advantage, or to create a situation where the player does not realize a boss is present until they turn around. This does not apply in SDL or ECWolf, where boss orientation is not significant.
Some bosses on DOS will exhibit a frozen state if certain conditions are met during level loading - they will not move or react until the player actually touches them or shoots them directly. This is an engine bug rather than intended behavior. If you encounter it, try adjusting the boss's position on the map. Moving them by a tile or two often resolves it. If the problem persists, it may be caused by having too many actors on the level approaching the limit.
6.72 - Designing the Boss Arena
The boss arena is one of the most important rooms in a level. A poorly designed boss arena makes even a well-designed level feel anticlimactic. A great one makes the entire level feel like it was building to this moment.
The most effective boss arenas balance challenge with fairness. The boss must have enough space to be genuinely threatening - a boss in a tiny closet is trivially easy to defeat using the shoot-and-strafe method. But the arena must also give the player a viable combat strategy rather than simply standing in the open taking damage.
Cover works well in boss arenas. Columns, barrels, and alcoves that the player can duck behind force the boss to adjust its trajectory and give the player moments to regroup and resupply. Multiple smaller obstacles distributed throughout a large room are more interesting than one large piece of cover in one corner.
An alternative that removes the reliance on cover is a confined arena - a relatively small room where the player cannot maintain distance and must engage closely. This forces the player to manage timing and positioning carefully rather than relying on the classic shoot-and-strafe at range.
Ammo and health should be available in the boss arena, but accessible only at some risk - placed in positions that require the player to expose themselves to attack to collect them. A pile of ammo in the exact center of the room, surrounded by the boss's patrol range, forces the player to time their dash carefully. This is more interesting than ammo neatly stacked in a corner the player can collect without exposure.
6.73 - Bodyguards and Boss Level Structure
An unescorted boss in a large room is, in most cases, not particularly difficult for an experienced player. The shoot-and-strafe method - firing a burst at the boss, strafing to the side, firing another burst, and so on - defeats most bosses reliably even without cover. For the boss to be a genuine challenge, the player's attention needs to be divided.
Bodyguards are the most direct solution. Guards placed to emerge during or after the boss fight force the player to manage multiple threats simultaneously. The most effective bodyguard arrangements are those where the guards do not all appear at once - they emerge from side rooms, come through doors that were previously locked, or are alerted by the same floor code as the boss room from different areas of the level.
A specific technique: place the boss room on a floor code that is shared with several locked side rooms distributed around the boss arena. When the player fires the first shot at the boss, the guards in those locked rooms are alerted. They open their locked doors and pour into the arena from multiple directions. The player who was focusing on the boss is suddenly flanked from three sides. Health and ammo in those side rooms give the player an out if they can fight their way there.
Boss levels as a whole tend to work best when they are elaborate rather than simple - a full level with key hunting, secrets, and interesting combat preceding a climactic boss room, rather than simply walking directly to the boss. The buildup makes the boss encounter feel earned. But the boss room itself should be the visual and tactical climax of the level: the nicest textures in the set, the most impressive decoration, the highest-stakes combat. The player should feel when they enter the boss room that they have arrived somewhere significant.
6.74 - Episode Endings: Key-Drop Bosses vs. Death-Cam Bosses
In Wolf3D, bosses end the game or the episode in one of two ways depending on which boss they are.
Hans Grosse and Gretel Grosse, upon death, drop a gold key. The player must collect this key and use it to open a door leading to a room where endgame trigger objects must be placed. B.J. must walk over these triggers for the episode to end. This means you need to design a room beyond the boss room for this purpose, and the trigger room needs to be designed correctly - enough space for the camera animation to complete, triggers oriented so B.J. runs north, and at least six empty tiles beyond the triggers before any wall.
All other bosses - Dr. Schabbs, Hitler, Otto Giftmacher, and General Fettgesicht - trigger a death-cam scene immediately upon their death, ending the game without requiring the player to do anything further. These bosses do not drop keys.
In Spear of Destiny, each mid-game super boss (Trans Grosse, Barnacle Wilhelm, the Ubermutant, and the Death Knight) drops a gold key that the player uses to access the elevator to the next level. The final boss, the Angel of Death, must be killed to complete the game - there is no elevator sequence.
6.75 - The Pac-Man Ghost and Invincible Guards
Wolf3D includes an invincible ghost enemy - the Pac-Man ghost - that cannot be killed. Any shot fired at it passes through or has no effect. On any level except the final boss level, including this enemy counts toward the enemy tally but cannot be killed, making 100% kills impossible on any level where it appears.
The ghost is genuinely threatening in groups because it cannot be eliminated. The player must avoid or outmaneuver it rather than simply shooting it. In a level where the player expects to be able to fight their way through everything, a ghost creates a completely different kind of pressure.
The ghost also behaves differently from regular Wolfenstein enemies in that it starts moving toward the player when it notices them but does not appear to be able to open doors. The Spear of Destiny version (the Spear ghost) can temporarily be made to vanish but will reappear on the same spot after a short time.
Use invincible guards sparingly and deliberately. In small numbers they create tension and pressure. In large numbers they become a nuisance. And be aware that when used in a regular level, the 100% kills bonus is unachievable - which may or may not matter to you, but will matter to completionist players.
6.76 - No More Than One Boss Per Level: The Rule and Its Exceptions
As a general rule, do not place more than one boss on a single level. Bosses are the peak of the threat hierarchy - they are meant to be the culmination of a level, a singular challenge that the level has been building toward. Multiple bosses on the same level dilutes this effect and can create serious gameplay balance problems.
The specific exception is Mecha Hitler. His two-phase fight - first the mechanical suit, then the revealed Hitler - means he already counts as two enemies in the actor tally. The suit phase and the real Hitler are technically two separate bosses, both on the same level. This is the canonical exception and the only standard scenario where two bosses on one level makes narrative sense.
Other exceptions exist but should be approached carefully. An Episode 6 Level 10 tribute - where the joke is that the level uses multiple Hans Grosses - is acceptable because it is explicitly referencing and building on a known convention. A boss-rush level where previously defeated bosses appear again can work as a finale if the level set has been building to it. Outside of these specific scenarios, one boss per level is the right call.
6.8 - Ammo and Weapons
6.81 - Weapon Distribution Styles
There are four broad approaches to weapon availability in a level, each creating a distinct play experience.
The first is to give the player a chaingun near the start. This is generous and removes resource anxiety early. It works well for levels that are complex in design or late in an episode where the player is expected to be well-armed.
The second is to give the player a machine gun near the start. This is the most balanced approach. The machine gun is a meaningful upgrade over the pistol without being overwhelming, and it ensures the player has functional combat capability throughout the level.
The third is to make the player earn the weapon - hiding it in a secret, placing it in a difficult spot, or giving an SS guard near the start whose machine gun the player must obtain by defeating him with the pistol first. This adds tension and makes weapon acquisition feel rewarding.
The fourth is to leave the player with the pistol as long as possible. This is legitimate and can create genuine challenge, but it requires the level to be specifically designed around the pistol's limitations. Mutants, fast officers, and large groups of guards are all significantly more dangerous when faced with a pistol. Do not leave the player pistol-only through a level designed for machine gun players.
Never put more than one new weapon in a single room. A room full of chainguns is not fun - it is either absurd or insulting, depending on whether the player needs them. Place weapons individually, somewhere slightly tricky to obtain, ideally in a location the player might miss and return to rather than immediately spot.
6.82 - Weapon Pacing Across an Episode
Do not give the player all their weapons on the first level of an episode. Let weapon availability scale naturally with progression.
The pistol should be the only weapon on the first level or early levels, except for machine guns that can be obtained from SS guards or in a specific starting cache. The machine gun should become freely available by the mid-episode levels. The chaingun should be genuinely rare in early levels - hidden in secrets, located in hard-to-reach areas - and should not become commonly available until the later levels of the episode.
This progression mirrors what id Software did in the original game and creates a satisfying sense of escalation. The player feels progressively more powerful as the episode advances, which compensates for the fact that the levels themselves are becoming more dangerous.
6.83 - Ammo Placement: Clusters, Scarcity, and Challenge
Ammo should generally be placed in clusters rather than scattered as individual clips throughout a level. A cluster of ammo in a specific location - near a major fight room, in a secret area, at a guard post - is easier for the player to find and collect than clips distributed singly across a large area. Small amounts scattered far and wide are both frustrating to collect and do not provide a meaningful resource at any one point.
The frequency of ammo placement is a design choice that determines the overall tone of the level. Generous ammo creates a power-fantasy experience where the player can chaingun their way through everything without anxiety. Scarce ammo creates a survival experience where every shot counts. Both are valid but demand different level designs. A level with scarce ammo needs to be designed so that the player can complete it without wasting shots - generous enemy spacing, good cover opportunities, and the knife available as a fallback.
Gary Ragland's observation is worth repeating: the challenge of being low on health and bullets and having to use speed and wits to stay alive is genuinely fun for some players. Not all ammo scarcity is bad design. Sometimes intentional scarcity creates the best moments in a level. The key is that the player must always have a viable path to completion, even with minimal resources.
6.84 - Timing: Large Ammo Before the Fight, Health After
This is a specific and important rule that many designers get backwards.
Large ammo caches should be placed before major fights, not after them. The player needs ammunition to conduct the fight. If the ammo is on the other side of the fight, the player may run out and have to complete a difficult encounter with a knife, which is not an experience most players enjoy.
Large health caches, conversely, are more valuable after a difficult fight than before one. A player who enters a fight at full health and emerges damaged needs healing. A player who enters a fight at full health and finds a pile of medkits in front of them has no use for them at that moment. Place significant health rewards as recovery resources after the player has taken damage, not as preparation resources before they might.
This is not an absolute rule - a small amount of health before a major fight is reasonable, particularly if the player has been in combat just before and may be carrying wounds into it. The principle is about where the primary caches go.
6.85 - Chaingun Rarity as a Design Choice
The chaingun is the most powerful weapon in the game. Treating its availability as a significant design decision rather than a standard pickup creates a different relationship between the player and the weapon.
If the chaingun is rare - appearing only in well-hidden secrets, never in plain sight, not available until mid-episode at the earliest - finding one is a genuine discovery. The player who finds the chaingun secret feels rewarded. The player who finishes the episode without finding it has a reason to replay.
If the chaingun appears routinely from the first level onward, it loses its significance. It becomes just a gun rather than a prize.
The approach of placing chainguns only in secrets throughout the early episodes, not making non-secret chainguns available until the later levels, creates a satisfying arc of weapon discovery that parallels the arc of escalating difficulty. The game gets harder as it progresses, and so does obtaining the most powerful weapon - which, when finally freely available, feels appropriate to the level of challenge the player is now facing.
6.9 - Food and Health Packets
6.91 - Placement by Context: Kitchens, Dog Areas, and Secret Caches
Health items should be placed where they make contextual sense as well as where they serve the gameplay.
Chicken dinners belong in kitchens, canteens, and mess halls. Placing chicken meals scattered in hallways looks ridiculous - the Nazis may be idiots, but would they just leave dinner on the floor in a castle corridor? Make a kitchen or a mess hall area with tables, utensils, and counters, and leave the food there.
Dog food belongs near dogs. If you have kennels or areas where dogs patrol, dog food dishes near those areas make sense. Dog food in the officer's club does not.
First aid kits are the most context-neutral health item and can be placed almost anywhere. They work best in secret areas as a reward for exploration, in guard post areas suggesting the station has medical supplies, or in storage rooms. Placing first aid kits in obvious open locations throughout the level is generous to the player but reduces the tension that comes from uncertain health.
A useful placement technique is to concentrate a significant cache of healing in one relatively obscure area of the level and make the player keep returning to it from all corners of the map. This creates a home base feeling - the player learns where their safety net is and factors it into their approach to the rest of the level. It makes the level feel larger because the player has a reason to backtrack.
6.92 - Health Balance: How Much Is Too Much?
Overdoing health is considerably more damaging to a level than overdoing ammo. If the player has access to near-infinite health throughout the level, they can play carelessly - blasting through fights without strategy, taking hits without consequence, ignoring tactical positioning. The level becomes a shooting gallery rather than a challenge.
A useful guideline: the total health available outside of secrets should be enough for a careful player to complete the level, but not enough for a careless one. Secrets should provide additional health as a reward for exploration - perhaps up to 150 to 200 percent of the player's base health in total across all secrets, with no single secret providing more than 75 percent.
Boss levels are an exception to this rule. Boss encounters genuinely require significant health reserves, and it is acceptable to be more generous with health placement around boss rooms than in regular levels.
The principle underlying all health placement is that the player should feel the consequences of bad decision-making. If every mistake can be undone by collecting a first aid kit around the next corner, the mistakes do not matter, and a game where decisions do not matter is not interesting.
6.93 - Health Starvation as a Design Tool
Deliberate health scarcity - not accidentally leaving out health items, but intentionally restricting them - creates a specific kind of sustained tension that generous health placement cannot. When the player is running low on health and knows that finding the next medkit is a priority, every fight has additional stakes.
This works best in short, intense sections rather than across an entire level. A sequence of rooms with no health items forces the player to fight carefully and conservatively. When health finally appears at the end of that sequence - earned through good play - it feels like a genuine reward.
A level that is health-scarce throughout its entire length runs the risk of becoming frustrating rather than tense, particularly for less experienced players. Balance health starvation sections with recovery periods. The rhythm of scarcity and relief is more interesting than unrelenting scarcity, which eventually just creates a mood of grinding despair rather than genuine challenge.
6.10 - Treasure
6.101 - Where to Place What: Crowns, Chests, and Crosses
The five treasure types in Wolf3D have very different point values: crosses at 100 points, chalices at 500, treasure chests at 1,000, crowns at 5,000, and 1-ups at zero points but with significant practical value.
This hierarchy should inform where you place each type. Crosses can be distributed relatively freely throughout the level - they are low-value and their presence everywhere does not unbalance the treasure ratio. Chalices should be placed in moderate quantities, perhaps one or two per area. Treasure chests and crowns should be reserved for secret areas or hard-to-reach locations, as genuine rewards for thoroughness. Placing a crown in plain sight in an open corridor both devalues the item and makes 100 percent treasure ratio too easily achievable.
1-ups are treasure items for ratio purposes but practical survival items in function. They restore health to 100 percent and add 25 bullets in addition to the extra life. Place them in secret areas - they are one of the most powerful items in the game and should not be handed to the player routinely.
Officer areas, marble rooms, and prestigious spaces are natural locations for higher-value treasure. A prison block or a sewer should have crosses at most. A general's quarters might have a crown hidden somewhere. The contextual logic of treasure placement reinforces the environmental storytelling of the level.
6.102 - Treasure Behind Columns: Enticing the Player
Placing a piece of treasure just visible behind a column - in the gap between the column and a wall - is one of the most effective techniques for hinting at a nearby secret without making it obvious. The player can see that something is there. They cannot reach it from where they are standing. The natural inference is that a pushwall or hidden door somewhere nearby opens a passage to it.
This technique works because it gives the player something to want and something to look for. It converts passive exploration - pressing every wall hoping for something - into active investigation driven by a specific goal. The player who spots the treasure behind the column becomes a detective rather than a button-presser.
The same principle applies to showing the player inaccessible areas through gaps in static object arrangements. If the player can see an area they cannot reach, their curiosity will motivate them to find the way in. This is always more engaging than simply hiding a secret with no hint of its existence.
6.103 - Showing the Player What They Can't Reach Yet
One of the best motivational tools in level design is showing the player something desirable that they cannot immediately access. An area full of treasure visible through a gap in columns. A weapon or 1-up behind a closed locked door whose key is elsewhere. A room full of health items visible from a corridor but only accessible through a pushwall.
Seeing what is there creates desire. Desire creates motivation. Motivated players explore more thoroughly, pay more attention, and engage more deeply with the level's design.
The key requirement is that the inaccessible thing must be genuinely reachable. Showing the player something they can see but can never actually obtain - treasure in a room with no entrance, health items behind a wall with no pushwall marker - is just cruelty. The promise must be real.
6.104 - Limiting the Number of Secrets to Avoid Fatigue
Too many secrets in a level creates a specific problem: players who want to find everything will spend an exhausting amount of time pressing walls, and players who are not interested in secrets feel burdened by the knowledge that they are missing things. There is no universally correct number, but two to three well-designed secrets per level is generally more satisfying than ten shallow ones.
The quality of the secret is more important than the quantity. A single secret that leads to a genuinely impressive room - unique textures, significant rewards, a memorable design - is worth more than five secrets that each contain a single cross and a barrel. Reward the player for finding secrets. Make them feel like the secret was worth seeking.
Also keep in mind that if a secret is necessary to access something essential for completing the level - a key, for instance - you are no longer designing a secret but a required path. Essential paths should never be fully hidden without significant signaling. Accidental softlocking - making a level impossible to complete because the player missed a pushwall they had no reason to check - is one of the most egregious design failures in Wolf3D level design.
6.11 - Keys
6.111 - The Four Key Placement Strategies
The four approaches to key placement are covered in Section 4.53. To briefly restate them: no keys at all; one key; one key gates the other; both keys equally difficult with the elevator behind both key doors.
The third approach - silver key gates the gold key room, gold key gates the elevator - is the most widely used and the most narratively satisfying. It creates a clear sense of escalating access. The player feels like they are working their way through layers of security.
The important practical principle for any key placement is: never put the key near the door it opens. If the key and its door are in the same area, the player simply finds both and the lock serves no purpose. Separate them meaningfully - different sections of the level, different floor code zones, on opposite sides of the map. The key is the goal of an expedition; the door is the reward for completing it.
6.112 - Keys and Secret Passages: The Shortcut Approach
An interesting advanced technique is to pair key discovery with a nearby secret passage. After the player finds a key, a pushwall in the immediate vicinity opens a shortcut back toward the locked door the key opens. The player discovers the key, discovers the pushwall, and can navigate the level more efficiently - but the shortcut has its own locked door inside it that requires the second key to pass through, and perhaps its own hidden rewards for the exploratory player.
This creates a layered discovery experience. The player finds the silver key, finds the pushwall shortcut, and feels clever. They use the shortcut to get to the gold key room faster. Inside the shortcut they find additional secrets and rewards. The level rewards both the player who finds the key efficiently and the player who explores thoroughly, giving each type of player something specific to appreciate.
6.113 - If the Key Is Behind a Pushwall, the Door Should Be Too
If a key is only accessible by pushing a wall - that is, there is no other way to reach it - then the locked door that the key opens should also be behind a pushwall or similarly signaled as requiring non-obvious action to reach. A player who is not prone to checking every wall will miss the key, and if the level is uncompletable as a result, they will be stuck with no understanding of why.
The principle is consistency of logic. If finding the key requires a non-obvious action, the game should communicate that non-obvious actions are required in this level. Doing so once suggests the convention; doing so for both the key and the relevant door establishes it clearly.
6.12 - Other Objects: Turning Points, Start Positions, Endgame Triggers
Turning points, start positions, and endgame triggers are the invisible infrastructure of a Wolf3D level. They do not appear in the game but control critical behavior.
Turning points direct the paths of moving guards. They need to be placed where you want a guard to change direction, not at every tile of the path. Review Section 6.42 for the rules governing their use.
Start position markers determine where and at what angle B.J. begins the level. Place exactly one per level. Place it somewhere that makes spatial sense - in front of the level entrance wall, inside a dead elevator, in a starting room. If you forget the start position marker entirely, the player will be placed at coordinates 0,0, which is inside a wall, and the level will run at quarter speed and be unplayable. Always place the start position before testing.
A note on levels 19 and 20 in Spear of Destiny and level 10 in Wolf3D - these secret and boss levels should also have start positions for the case where the player dies and must restart.
Endgame triggers are used in Episodes 1 and 5 of Wolf3D to produce the victory camera sequence after Hans Grosse or Gretel Grosse is defeated. The player must walk over these triggers from the south side - B.J. always runs north when the sequence fires, so if the triggers are oriented any other way, the camera will show a brick wall rather than the intended outdoor view.
Place endgame triggers at least six tiles from any wall or other object in the north direction to give the camera animation enough room to complete without backing into a wall. Place them so the player will naturally cross them after collecting the gold key dropped by the boss and opening the door to the trigger room.
6.121 - Actor Limits in Full: Guards, Dead Guards, Bosses, Hitler, Projectiles, and the 148/149 Rule
The 149 actor limit on DOS covers more than just living guards. The following all count toward this limit:
Living guards of all types - tan, SS, officers, mutants, dogs. Each counts as one actor.
Initially dead guards placed in the editor count as one actor each. They are present in the level from the start and cannot be spawned in above the limit.
Bosses count as one actor each, with one critical exception.
Fake Hitler counts as two actors. His mechanical suit and his revealed form are two separate entities, both present in the actor count from the start of the level.
The endgame running hero - the actor spawned when B.J. runs off at the end of Episodes 1 and 5 - counts as one actor. If you are using an endgame trigger on a level that is close to the 149 actor limit, the initial count must be 148 or lower to leave room for the running hero to spawn. If the limit is already at 149 when the trigger fires, the level will crash.
Projectiles also count as actors during gameplay. Enemies that fire projectiles - Fake Hitler's flames, Otto Giftmacher's rockets - spawn additional actor entries in the pool each time they fire. If the actor pool is near capacity and a projectile-firing boss is in a long open corridor, repeated projectile spawning can push the actor count over the limit and crash the game. If you are using projectile-firing bosses, keep the living actor count comfortably below 149 - not just one or two below, but with meaningful headroom.
6.122 - Endgame Trigger Placement and the Near-Limit Crash Risk
As noted above, if you use an endgame trigger and the initial actor count is at 149, the running hero cannot spawn and the level will crash. Keep the initial count at 148 or lower on any level that uses an endgame trigger.
Endgame triggers must be placed so the player crosses them from the south. The camera always moves to face south when the sequence fires. If the player crosses the trigger from any other direction, the camera will face an unintended direction and the sequence will look wrong.
Leave at least six empty tiles north of the trigger row for the camera animation to travel through. If there is a wall within six tiles in the northward direction, the camera will back into it and the display will be corrupted.
Place the triggers in a row spanning the room so the player cannot avoid crossing them regardless of exactly where they walk. A single trigger tile in a wide room may be missable.
The techniques in this section are not part of the standard design toolkit. They use engine behaviors - some of them bugs - in ways that go beyond the intended mechanics of the map editor. Some of them are powerful and worth using deliberately. Others are double-edged and should be approached with care. A few are simply interesting to know about even if you never use them.
One general principle applies to all of them: if you use an engine trick in your level, make it obvious to the player that it is intentional. A wall the player can walk through that they were not expecting to walk through looks like a bug. A wall the player can walk through because the design clearly communicates that something unusual is happening here reads as a feature. The difference is entirely in how you frame it.
7.1 - Holo-Walls: How They Work and Their Limitations
A holo-wall is a wall tile that the player can walk through. It is created by placing a guard object inside a wall tile in the editor. The guard causes the wall to become transparent and penetrable to both the player and other guards.
The guard inside the wall will still spot and attack the player normally. He can see out through the wall. The player, however, cannot see the guard inside the wall - only the wall texture - until they step through it and enter whatever space is beyond.
Holo-walls are not added to the secret area count at the end of the level. Unlike pushwalls, walking through a holo-wall does not register as finding a secret.
There are several known problems with holo-walls that you should understand before using them.
If guards stand on both sides of a holo-wall simultaneously, the player can become stuck inside the wall with no way out. The player cannot shoot the guards from inside the wall - the fire does not register correctly from that position. This is a soft-lock and forces a restart.
When the player fires a weapon while standing inside a holo-wall, the shot is heard by every guard on the level regardless of floor code - the standard sound propagation system does not apply correctly from inside a wall tile.
Guards killed inside a holo-wall may not drop ammo.
Guards standing inside a holo-wall may occasionally hear events from completely unrelated areas of the level.
Creating a holo-wall requires placing a guard in a wall tile. In Mapedit version 7.2 and older, objects can be placed in walls and walls placed on objects. In Mapedit version 8.4, you must place the guard first and then place the wall on top of it. A walking guard inside a wall will penetrate one square deep, but no further.
Given these limitations, holo-walls should be used sparingly and with the player's experience in mind. The most interesting application is creating an area that looks solid but can be walked into - a section of wall that conceals a room beyond - used as a surprise rather than a required path.
7.2 - The Guard-in-Wall Ambush Trick
The guard-in-wall ambush is a straightforward application of the holo-wall mechanic for combat purposes.
Place a guard inside a wall tile facing outward into the room where the player will be. The wall looks like an ordinary solid wall. The guard inside can see the player when they enter the room and will begin attacking. The player hears a guard sound off but cannot see anyone in the room with them. They then receive fire from a wall.
When the player pushes against the wall - or when the combat triggers the wall becoming transparent - they discover the space beyond. The wall through which the guard was shooting becomes a holo-wall, and both the player and other guards can pass through it.
The main bugs to be aware of: the wall the guard is in becomes permanently penetrable to the player, which may expose areas you did not intend to be accessible. Guards surrounding the holo-wall on both sides can trap the player inside it. And the guard inside the wall cannot be used on boss levels because an unkillable boss inside a wall - which the player cannot kill because the fighting-from-inside-a-wall limitation applies both ways - means the level can never be completed.
This technique was used in a number of early community levels and is most effective as a one-time surprise rather than a recurring element.
7.3 - Penetrable Objects via Moving Guards
A moving guard who walks through a blocking static object - a barrel, a pillar, a table - causes that object to become transparent and penetrable to the player and to other guards. Once the guard has passed through an object, the object can be walked through freely for the rest of the level.
This creates a specific design opportunity. A barrier of barrels that appears to block a passage can be made secretly penetrable by routing a moving guard through it on their patrol path. The player may not realize the barrier is penetrable until they accidentally walk into it - or until they observe the patrolling guard pass through it and draw the correct inference.
You can make this subtle: have the patrolling guard's path take them through an object in the middle of a room full of other guards on similar paths, so the special guard is inconspicuous. When the player later tries to navigate the room, they discover that what they thought was a solid barrier has a gap. Used well this creates a sense of hidden depth in the level - the environment rewards attentive observation.
The same principle applies to walls. A moving guard directed into a wall tile will make that wall a holo-wall, as described in Section 7.1. For the guard-in-wall ambush, the guard can be stationary. For the penetrable object trick, the guard must be moving.
7.4 - The Elevator Ambush: Fake Elevator with a Pushwall Behind It
This trick takes the standard end-of-level elevator and subverts it for dramatic effect.
Design an area that looks exactly like a level exit - the correct wall textures, the correct layout, the familiar visual cues that signal the elevator. But instead of a real elevator, place a fake elevator wall. Then put a pushwall directly behind where the elevator would be.
When the player reaches this area, they believe they have found the exit. They operate what appears to be the elevator switch - and instead of ending the level, nothing happens, or the switch does not respond because it is fake. At this point the player realizes something is wrong. The real exit is elsewhere, and this false exit has introduced an entirely new section of the level.
The area behind the fake elevator pushwall can contain anything - a large boss fight, a maze of enemies, a series of locked doors, or even another false exit if you are feeling particularly cruel. The key design consideration is that the deception should feel like a genuine surprise rather than an arbitrary trick. The player who falls for it should react with something like: I cannot believe I did not see that coming.
A variation: make the fake elevator the more obvious choice and hide the real elevator behind a genuinely inconspicuous pushwall. The player who rushes to the obvious exit is trapped; the player who explores carefully finds the real way out.
7.5 - The Wax Figure / Disguised Guard Trick
This trick requires access to graphics editing tools in addition to the map editor, so it goes beyond pure level design into the broader modding space. It is worth knowing about because it represents one of the most creative uses of Wolf3D's visual system.
Modify a static decorative object's graphics so it displays the idle frame of a specific guard type - effectively making a decoration that looks exactly like a motionless guard. Populate a room with a mixture of these fake guard decorations and real guards of the same type. Some of the apparent guards are decorations that cannot attack; others are real guards who will respond when the player enters their range.
For maximum effect, make some of the real guards deaf so they do not react immediately upon the player entering the room. The deaf guards stand perfectly still just like the decorations. The player cannot distinguish between the genuine and the fake until the real guards suddenly spring into action.
The immediate reveal - guards who appeared to be statues suddenly opening fire - creates a moment of genuine shock. The player's model of what is threatening and what is safe in the room is suddenly invalidated.
A few requirements for this to work correctly. The guard sprites should be facing forward in all idle frames - otherwise a guard who is standing sideways while the decoration faces front will be an obvious giveaway. Make sure the real guards are distributed among the fakes in a way that is not immediately obvious from the entry point of the room.
7.6 - The Armed Wall / Gauntlet Trick
A specific variant of the guard-in-wall technique involves surrounding a wall-embedded guard with block static objects - barrels, columns, or other non-penetrable statics - so that the guard cannot escape and cannot be killed.
The result is a fixed threat source that fires at the player from a wall regardless of what the player does. The guard cannot be eliminated, cannot move, and cannot be reached. If you place a mutant in this configuration, the player will not hear a guard vocalization upon entering the room - as mutants do not call out upon being alerted - making the source of the incoming fire even more disorienting.
This can be used as a gauntlet mechanism: a corridor or room where the player must move through a space while taking fire from an unkillable source. Because the guard in the wall cannot be killed, the player must focus entirely on speed and movement rather than combat. It changes the character of the encounter from a fight to a navigation challenge.
The most important caveat: do not use a boss in this configuration on a level that requires killing all actors to achieve a completion bonus, or on any level where the endgame depends on the boss being killed. An unkillable boss in a wall means the level can never end. Use only regular guards and ensure the level can be completed without killing the wall-embedded enemy.
7.7 - The All-Night Wall Texture Trick
This is a purely graphical technique that requires modifying wall textures using an external graphics editing tool.
The landscape wall in Wolf3D shows daytime sky on its north and south faces and nighttime sky on its east and west faces. If you want a wall that shows nighttime sky from all four directions - or daytime from all four - this requires a texture edit.
The method: export the nighttime sky texture from the VSWAP file. Import it onto the daytime-sky-facing sides of the landscape wall texture. For the other direction, use the dead elevator wall's blank faces - which are dark gray by default and have no existing texture on those sides - to carry the alternate version.
This gives you access to a wall that is visually consistent regardless of orientation, which eliminates the day-night inconsistency problem described in Section 5.12 and gives you full freedom to orient landscape walls any direction without creating visual mismatches.
It requires a graphics editor and some familiarity with the VSWAP structure, but for a modder who is already working with custom graphics it is a straightforward operation.
7.8 - Déjà-Vu Levels
A déjà-vu level is one designed to make the player believe they are in a place they have already been - creating a disorienting, uncanny sensation of repetition. When executed well it is one of the most memorable experiences Wolf3D level design can produce. When executed poorly it is simply confusing and annoying.
The technique requires several elements working together.
Symmetry. The rooms used for the déjà-vu effect should be symmetrical or near-symmetrical. Symmetrical spaces are easier to replicate convincingly, and the player's brain processes them as repeating more readily than irregular spaces.
Identical details. Every detail that the player is likely to notice must be matched between the two rooms. Furniture at the same positions, the same wall decorations, the same door locations. The illusion depends on the player not finding a discrepancy that breaks it.
Guard placement as the uncanny detail. The most effective déjà-vu technique is to place a live guard in the first room and the same guard's body in the second room - or vice versa. The player kills a guard, moves on, and then encounters what appears to be the same guard's corpse in a place they have not yet been. This creates a moment of genuine cognitive dissonance. Something is wrong here in a way the player cannot immediately explain.
If your mod includes teleporters, the déjà-vu level takes on additional dimensions. A teleporter in one room deposits the player in an apparently identical room. The player may not realize they have moved at all. The payoff comes when something is different enough - more enemies, a blocked exit, a structural variation - that the player realizes they have been transported without knowing it.
The most important rule for déjà-vu levels is to give the player a way out. A level that loops infinitely with no exit is not clever - it is a softlock. Always include a path to completion, even if it requires the player to look very carefully at what appears to be an identical space for the difference that allows progress.
7.9 - Making Secrets Interesting and Challenging
7.91 - Giving the Player Cues
The baseline approach to Wolf3D secrets - press every wall until something moves - is tedious and unrewarding. Good secret design gives the player information without giving everything away. The player should feel like they discovered the secret through observation and inference rather than through systematic wall-pressing.
Cues can be environmental, structural, or tactical.
Environmental cues: A grimy wall with one clean section suggests the clean wall has been recently moved. A laid-out skeleton appears to be pointing at a wall. A small room at the end of a single long passage suggests there is something worth finding, since why else would this passage exist. A wall with a distinctive decoration in a room of plain walls draws the eye.
Structural cues: A room that seems architecturally too small for its position - that has more surrounding wall than a room of that size should need - hints that something is hidden in the excess space. A gap between two static objects at exactly the right width suggests a passage. A lit area visible through a column gap that seems inaccessible hints at a pushwall somewhere nearby.
Treasure as a cue: Treasure visible behind a column, or through a gap that the player cannot currently navigate, is one of the most effective cues of all. The player sees something they want and cannot reach. They understand that a way in exists somewhere. They will look for it.
Warning markers: Concentrations of skeletons, blood, or bones near an area hint that the area is dangerous or that something significant happened there. Players who see this kind of environmental detail in front of a wall will check the wall.
In the original Wolf3D levels, secrets were very often marked in subtle ways - a ceiling light in a corner near a pushwall, barrels arranged to indicate a path, a decoration on the pushable wall itself that stood out from the surrounding walls. Study the original levels and observe these cues before designing your own.
7.92 - Pushwalls That Punish: Consequences for Wrong Choices
Standard Wolf3D pushwalls are entirely benign - the worst that can happen from pushing the wrong wall is nothing. This means the player has no reason not to push every wall they see. Secrets become a systematic process rather than an act of investigation.
One way to make secret-finding more interesting is to give some pushwalls consequences. A pushwall that, when pushed from the wrong side, slides to block access to a critical path. A pushwall that, when pushed incorrectly, blocks a key or covers a door. A wall that, when pushed, locks the player into a room they cannot leave without finding a second pushwall.
None of these require the player to suffer irreversible failure. The consequences should be navigable - the player can undo the mistake by finding the alternate path, or the blocked route has an alternative. But the existence of consequences changes the player's relationship with the search. They must now think rather than simply press.
The dead guard trick, described in Section 4.612, is the primary tool for creating one-way pushwall commitments. A dead guard on the entry side of a pushwall prevents the player from pushing the wall back after moving through it. Combined with thoughtful room design, this can create areas where the player deliberately commits - moving deeper into a trap or a challenge from which they cannot easily retreat.
7.93 - The Pushwall Sequence Puzzle
This is the most complex pushwall design technique available within the stock Wolf3D engine and requires significant planning to execute correctly.
The idea is to create a grid of small rooms connected by pushwalls where the correct order of movement through the grid matters. Pushing through the rooms in the correct sequence reaches the goal. Pushing through any single room out of sequence - even if the player can reach the goal room - results in the goal being blocked by a wall that was pushed incorrectly earlier in the sequence.
Designing this requires working backward from the goal. Determine the correct sequence first. Then, for every incorrect path through the grid, ensure that following that path results in a pushwall ending up on the goal tile or blocking the critical path to it. This requires careful layout planning on paper before touching the editor.
For the puzzle to be fair, the player needs feedback about whether they are on the correct path. One reliable technique: every room entered correctly reveals a specific visual marker - a distinct decoration, a pile of bones, a particular floor object. If the player ever pushes into a room without the marker, they know they have deviated from the correct sequence. This converts what would otherwise be pure trial and error into a solvable observational puzzle.
7.10 - Rearranging Level Order Without Changing the EXE
This is a technique for creating non-standard episode structures using only map editor tools and the existing floor code system.
In standard Wolf3D, each episode is ten levels: nine regular floors and one secret floor accessible from a specific regular floor. The secret floor always returns the player to the same floor it came from. This structure is hardcoded and cannot be changed without modifying the EXE.
However, it is possible to create an alternate level progression that subverts the player's expectations without any code changes.
Making the boss level the tenth regular level: Instead of having a secret level, make level 10 a standard boss level. The player progresses straight through from 1 to 10. The secret elevator is never placed, so there is no secret level detour.
Making level 9 the secret level: Place the secret elevator on level 8 but give it a standard floor code rather than the 006b secret code. This causes level 8's elevator to take the player to level 9 rather than skipping it. Level 9 then has the actual secret floor code (006b) in its elevator, which takes the player to level 10 - the boss level. Meanwhile, level 9 is designed as the secret level, and players who miss the secret elevator on level 8 skip directly to level 10 without seeing it.
The boss-in-secret-level approach: Place the secret elevator on the correct floor as normal, but also place a boss on that same floor. If the player finds the secret elevator, they go to the secret level and have a bonus experience. If they do not find it, the boss triggers the episode ending on the regular floor and the game ends there. The player who finds the secret level gets extra content; the player who does not still gets a complete experience.
These techniques play with the player's expectations about level structure in ways that can make an episode feel surprising and non-linear even though the underlying system is the same as always.
8.0 - Other Tips and Strategies
This section covers a collection of additional design principles and practical considerations that do not fit neatly into the MAP mode or OBJECT mode sections but are important enough to address directly. Think of it as the accumulated wisdom that does not belong in any one technical category but that experienced designers keep returning to.
8.1 - Number of Objects in View
It is important to remember not to put too many static objects in one room. On DOS Wolf3D, if you get approximately 56 to 64 or more objects - including guards - simultaneously in the player's field of view, the screen cannot refresh fast enough and some of those objects will start disappearing or becoming invisible. This can happen in a room stuffed with vines, a room with a barrel maze, or any large space where you have been generous with decoration and enemy placement.
The most dangerous version of this problem is when guards become invisible while shooting at the player. The player is taking damage from a source they cannot see, which is alarming and unfair. This problem exists in the original Wolfenstein maps - Episode 4, Levels 8 and 10 both exhibit it - so you are not alone in having to deal with it, but that does not mean you should let it persist in your own work.
The solutions are straightforward. Use walls to partition large rooms into smaller visual zones so the player never has the full contents of a large room in view simultaneously. Use smaller rooms rather than one large one if you want high object density. If you have a boss encounter with a lot of health and ammo distributed around the arena, be aware that backing up far enough to see all of it at once may cause the boss to start flickering.
Dead guards also count toward the visible object limit. A room that starts within safe parameters can exceed the limit as guards are killed and their bodies accumulate on the floor. In rooms with many enemies, consider whether the late-fight situation - multiple corpses on the ground plus any remaining live guards - might push the view count over the threshold.
On SDL the visibility limit does not apply in the same way, though the principle of not over-stuffing rooms remains good design practice regardless of platform.
8.2 - Narrow vs. Wide Passages
Creating narrow passages - one tile wide - slows any player who wants to rush from entrance to exit as fast as possible. In a one-tile corridor, the player cannot dodge and cannot easily maneuver around enemies or objects. Any enemy hidden in a niche off a narrow hallway cannot be bypassed without engaging them directly.
This is a legitimate design tool for controlling pacing, but it comes with trade-offs worth considering.
A narrow passage forces engagement. An enemy in a niche at least two squares deep off a narrow hallway will impede movement simply by being there. The player cannot rush past without dealing with them. If you want to slow the player down and create mandatory encounters in specific locations, narrow passages combined with well-placed guards accomplish this more efficiently than wide corridors where the player can run past guards without engaging.
However, one-tile-wide corridors used excessively create claustrophobia rather than tension. A level that is mostly narrow passages feels oppressive and tiring to navigate. Use them for specific effect - a tight approach corridor to a major room, a service tunnel between two areas, a section that contrasts with the open space before and after it - rather than as a structural default.
The minimum viable tactical space for most encounters is two tiles wide. This gives both the player and guards enough room to move laterally without becoming jammed against walls.
8.3 - Avoiding Over-Design
There is a limit on the number of static objects that can be placed on one level - 399 on DOS. But the practical threshold for over-design is considerably lower than the hard limit.
If you try to place too many objects in one room or area, the game will suffer from screen background clutter as described in Section 8.1. Actors in a room with too many other objects will literally become invisible depending on the player's angle of view. This is also true if too many guards stream out of a room simultaneously - some of them will vanish from the screen as the display cannot refresh quickly enough to render all of them.
There is a particular tendency among designers to load up rooms near a super boss with ammo and health so the player has a reasonable chance of surviving. As long as these objects are kept mostly to the player's back during the fight, there is usually no problem. But if the player backs up far enough that all those objects come between them and the boss, the boss may start flickering on and off the screen. Not good.
A room filled with barrels placed as an intricate maze is another common culprit. Many of the barrels will disappear from the player's view depending on their angle. As the player turns and moves, barrels will pop in and out of visibility, and any guards on the other side of the barrel maze will be invisible until the player gets close enough. This is not the intended experience.
The solution when you find you have over-designed a room is to redesign it with limits in mind. Use walls to partition off parts of the room. Use smaller rooms instead of one large one. Eliminate some objects by distributing them elsewhere if you believe they are all necessary. The game engine has real constraints, and working within them is part of the craft.
8.4 - Make Every Room Unique: Navigation and Orientation
A level where every room and corridor looks identical is a level in which the player will constantly lose their sense of where they are. This is particularly damaging in larger levels with non-linear connectivity - when every area looks the same, backtracking through cleared territory becomes genuinely disorienting.
Every room should have at least one distinguishing feature that allows the player to recognize it on a return visit. This can be a distinctive wall decoration, an unusual object arrangement, a unique combination of textures, a specific guard corpse from a previous fight, or simply a room shape that is different from the rooms around it.
Corners and dead ends deserve particular attention. The ends of corridors, junction points, and the corners of large rooms are the navigation landmarks the player uses to orient themselves. If every corridor end looks the same - same texture, same ceiling light, nothing to distinguish one from another - the player will lose track of where they have been. Use dead guards, which persist throughout the level as permanent landmark objects, to mark locations the player has already cleared. A specific decoration in a corner, a barrel that exists in only one place, a wall texture used only in one specific room - these are the navigational anchors of a well-designed level.
Tricob's mapping habit is worth adopting as a rule: after designing each room, check whether you can tell which end of the room you are at from within it. If two ends of the same room are visually identical - same texture, same lighting, same object arrangement - add something to one end that distinguishes it.
8.5 - Level Completability: Can It Be Beaten With a Pistol and 8 Bullets?
Every level you design must be completable on Death Incarnate starting with nothing but a pistol and eight bullets. If you cannot beat your own level under those conditions - without cheating, without godmode - it is not ready for release.
This is not a hypothetical constraint. When a player dies and restarts, they start exactly this way: pistol, eight bullets, no other weapons, whatever health they had when they died reset to baseline. If your level is designed in a way that makes this impossible - a mandatory fight against multiple mutants with no accessible weapon upgrade nearby, a locked room where the only key is guarded by officers with no cover - then every player who dies partway through the level is stuck.
The test is simple. Load the level in debug mode, use the start position, turn off god mode, set the difficulty to Death Incarnate, and play it from scratch with only your starting equipment. Find every unavoidable obstacle and verify that each one is survivable. If any sequence is impossible with starting equipment, redesign it.
A useful related principle: make sure the level can be completed without finding any secrets. Secrets are bonuses - treasure, extra lives, hidden weapons. They should enrich the experience for exploratory players without being required for the experience to be possible. A key hidden behind a pushwall with no non-secret alternative path is a design error. A chaingun in a secret area that makes a difficult fight much easier is a design reward.
8.6 - Every Level Must Have at Least One Enemy, One Secret, and One Treasure
For the end-of-level statistics to be meaningful, every level must contain at least one of each category. A level with no enemies will display 0% kills. A level with no treasure will display 0% treasure. A level with no secrets will display 0% secrets.
In versions prior to 1.4 there was a concern that certain zero-ratio categories might cause errors. In version 1.4 this is not the case - the ratios simply display as 0% rather than generating an error. But a level that a player can achieve 100% on all three categories is a more satisfying experience than one that locks 100% off by design, and having at least something in each category is the baseline requirement for a complete-feeling level.
There is also a specific consequence for secrets: if a player in a large non-linear level wanders around long enough without finding the exit, they may accidentally kill every guard on the level and be awarded 100% kills without having found the secret areas. Hiding at least one difficulty 1 enemy behind a pushwall - as Tricob recommends - prevents this by making 100% kills contingent on finding the secret. The player who wants full completion must explore.
A boss level and a secret level do not display end-of-level ratios. On these levels, the standard completion metrics do not apply and you are freed from the requirement to think about ratio balance.
8.7 - What Makes a Map a Masterpiece?
This is a question worth sitting with, because the answer is not as obvious as it might seem. Technical correctness is necessary but not sufficient. A level can have perfect floor codes, well-balanced guard placement, appropriate difficulty scaling, and thoughtful decoration and still feel unremarkable. The technical requirements are the floor, not the ceiling.
What separates a good level from a masterpiece is harder to define but not impossible to describe. The sets and levels that the community returns to repeatedly - Totengraeber, Assassinate Hitler, Schabbs 2000, Conflict in the Fatherland, Spear: Resurrection - all share certain qualities that go beyond technical execution.
Every room is memorable. Not necessarily elaborate or dramatic - sometimes memorable means a small, simply decorated room where a single well-placed guard created a tense moment. But every room left some impression. No room is purely transitional, purely forgettable. Each space has its own character.
The strategy feels right everywhere. This is difficult to articulate and almost impossible to achieve deliberately - it comes from extensive playtesting and the kind of iterative refinement that takes time. But when a level has it, every fight feels like it was designed to be exactly as difficult as it is, in exactly this room, with exactly these tools available. Nothing feels arbitrary.
It flows. The player is guided through the level without feeling pushed. The sequence of discoveries, challenges, and rewards has a natural rhythm. Difficult fights are followed by moments of relative safety. Exploration is rewarded consistently. The pacing never drags and never rushes.
It recreates the feeling of the original game. For Wolf3D specifically, this is the hardest quality to define and the most important to achieve. The original levels by Tom Hall and John Romero have a particular atmosphere - an almost architectural authority, a sense that the spaces were designed by people who knew what they were doing and why. Custom levels that capture this feeling are rare and immediately recognizable.
The best practical advice for pursuing this quality is: design levels that you yourself want to play. Not levels that demonstrate your technical mastery, not levels that are difficult because you made them hard, not levels that are impressive when viewed in the editor. Levels that you find genuinely fun and interesting to play from start to finish, as if you were encountering them for the first time. If you would enjoy playing your own level, there is a reasonable chance others will too. If you would not, that is the most honest feedback you can get.
Walk away from a level after finishing it. Come back to it after a day or two and play it fresh, as if someone else had made it. Be your own harshest critic. Look for the places where it drags, where the guard placement feels wrong, where the decoration is inconsistent, where the fight is unfair or trivially easy. Fix those things. Do it again. The level that emerges from this process is a better level than the one that came out of the editor on the first pass.
And keep in mind that a masterpiece does not have to be complex. Some of the most beloved Wolf3D levels are relatively simple in layout. What makes them masterpieces is not the number of rooms or the quantity of enemies or the elaborateness of the secrets - it is the sense that every decision in the level was made with care and intent. That quality is available to anyone willing to put in the work.
9.1 - Why and How to Playtest
The final and most important step in creating a Wolfenstein level is playtesting it. Not glancing at it in the editor and deciding it looks right. Not running through it once in god mode to check that the doors open. Actually playing it, on Death Incarnate, without cheats, from start to finish, as a player who does not already know every guard position and every secret location.
Why Death Incarnate specifically? Because if the level is beatable on the hardest setting, it is beatable on all of them. If it is only tested on the easier settings, you will not discover the balance problems that emerge when guards deal full damage and the player cannot afford to take hits carelessly.
The goal of playtesting is threefold: to verify that the level is technically functional - no crashes, no invisible doors, no stuck pushwalls, no inaccessible areas - to verify that it is beatable under the conditions described in Section 8.5, and to verify that it is actually enjoyable to play. The third goal is the hardest to assess objectively because you know the level too well. This is why external playtesting matters.
Test while building, not only after. Work up about a quarter of the level, test what you have, fix whatever is broken, and then continue. Testing incrementally means you cover less ground per session, which reduces the chance of missing problem areas because they are not on the path to the exit. It also means you catch errors early, before they become entangled with everything that comes after them.
Get someone else to test it. A friend who has never seen the level will find problems you have become blind to. They will get lost in places you find obvious. They will die in places you considered trivial. They will miss secrets you considered well-hinted. Their experience of the level is far closer to a stranger's experience than yours will ever be, and that is the experience you are designing for. It is very helpful if that friend can test on a different computer as well - problems that are invisible on your machine sometimes emerge on hardware with slightly different configurations.
Playtest after every significant change. If you add a new section, adjust guard placement, or modify the health and ammo distribution, test again. Changes interact with each other in ways that are not always predictable. A guard placement adjustment that fixes one problem can create another. A new room that adds visual interest can push the static object count over a threshold you had managed carefully.
9.2 - Using Debug Mode and Cheat Codes
Debug mode and the associated cheat codes are not just for casual play - they are essential tools for the level designer. Use them throughout the design process, not just when something appears to be broken.
To enter debug mode, use one of the following command line parameters depending on the game and version:
- Wolf3D version 1.1 and later: -goobers
- Spear of Destiny, all versions: -debugmode
Launch the game with the appropriate parameter, begin or restore a game, and then press and hold Left Shift + Alt + Backspace simultaneously. A message will confirm that debug keys are now available.
To use a debug function, hold Tab and press the corresponding key:
| Key | Function |
| B | Changes border color |
| C | Displays statistics - object counts, kill counts |
| E | Ends the current game |
| F | Displays B.J.'s current coordinates (X, Y) |
| G | God mode - invincibility |
| H | Hurts yourself (-16% health) |
| I | Free items - full health, ammo, score increase, next weapon |
| M | Displays memory usage |
| N | Toggles no-clip / clipping on and off (Spear of Destiny only) |
| P | Pauses the game |
| Q | Quits directly to DOS |
| S | Toggles slow motion on and off |
| T | Displays graphics and sounds. Press Escape to exit |
| W | Warps to any level |
The coordinates display (Tab+F) is particularly useful when you need to know exactly where in the map you are for floor code debugging or when guard behavior is unexpected and you need to correlate the position with the map layout.
The statistics display (Tab+C) shows you object counts and other data that helps verify you are within the DOS limits.
God mode (Tab+G) is useful for exploring the level to verify completability and check all areas without dying, but never use it as your sole playtest. You need to experience the level under normal conditions as well.
To create a cheat executable that launches the game in debug mode automatically without having to type the parameter each time, create a plain text file in your game directory containing the following:
[game exe name] --[parameter]
Save it with a .bat extension - for example, cheat.bat. Double-clicking it will launch the game in debug mode directly.
Alternatively, right-click the game executable, select Create Shortcut, right-click the shortcut, go to the Shortcut tab, and add a space followed by the parameter after the closing quotation mark in the Target field.
9.3 - Command Line Parameters
In addition to the debug mode parameters, Wolf3D and Spear support a number of command line parameters that are useful during development.
| Parameter | Effect |
| NOWAIT | Automatically skips several screens at game start - saves time during repeated testing |
| BABY | Starts the game at skill level 1 (Can I Play Daddy) |
| EASY | Starts the game at skill level 2 (Don't Hurt Me) |
| NORMAL | Starts the game at skill level 3 (Bring 'Em On) |
| HARD | Starts the game at skill level 4 (I Am Death Incarnate) |
| TEDLEVEL nn | Warps to a specific episode and level at startup |
The TEDLEVEL parameter is the most useful for targeted testing. The value nn is the episode and level number minus 1. Some examples:
- Episode 1, Level 1 of Wolf3D: -tedlevel 0
- Episode 1, Level 9 of Wolf3D: -tedlevel 8
- Episode 2, Level 5 of Wolf3D: -tedlevel 14
- Level 13 of Spear of Destiny: -tedlevel 12
For Spear of Destiny there is only one episode, so double-digit numbers refer only to the level number. Note that if you enter -tedlevel 20 to reach Level 21 of Spear (Angel of Death), the floor number displayed in the game will show 18 because Level 21 is technically an extension of Level 18 internally.
By default, unless you specify a skill level parameter, the game starts at skill level 2. When testing for Death Incarnate balance, always add HARD explicitly.
Combining NOWAIT with TEDLEVEL and HARD lets you jump directly to any level at maximum difficulty without sitting through intro screens - which is extremely useful when you are doing repeated test runs of the same level.
9.4 - Using No-Clip to Check Guard Paths
The no-clip cheat (Tab+N, Spear of Destiny only in vanilla; re-enabled in recompiled Wolf3D source builds) allows you to pass through walls and move freely throughout the level without collision. This is one of the most powerful tools for checking guard path behavior because you can observe guards from positions the player would never normally occupy.
To use no-clip for guard path verification, enter a room or area without being seen by the guards. In no-clip mode, dogs present a specific challenge - they sense your presence much more readily than other guards and will quickly become alerted even if you have not entered their line of sight. To observe dogs without triggering them, inch through a double-thick wall very carefully and stop the moment you can see the interior of the room. If you go even slightly too far, dogs will detect you and alert the entire floor.
Other guard types will generally not notice you in no-clip mode as long as a door has not been opened anywhere in the level and you have not fired any shots. Be aware that shooting while no-clip is active will alert every guard on the level except deaf ones.
One critical limitation: you cannot pass through the two layers of wall that comprise the level's perimeter. The perimeter walls are impassable even in no-clip mode, preventing you from wandering outside the level boundary.
No-clip is invaluable for verifying that patrol paths work correctly - that guards are following their turning points as intended, that they are not getting stuck, that they are not colliding with each other in unexpected places. Run the level in no-clip, find a position where you can observe a patrol route without being detected, and watch the full cycle of the patrol before making any adjustments.
9.5 - Common Problems and Solutions
These are the problems you are most likely to encounter during testing, along with their causes and fixes.
Guards not responding to gunfire or sight of the player. Almost always a floor code problem. The guard is on a floor code that does not match the area, or the room has mixed floor codes. Press F in Mapedit to view floor codes and verify consistency throughout the problem area. See Section 4.4 for the full floor code rules.
Invisible door. Almost always caused by the deaf guard floor code (006a) placed adjacent to or directly on a door tile. Remove the deaf guard code from any tile that is adjacent to a door. See Section 4.44.
Flashing screen border after player dies. Two possible causes. First, the perimeter wall of the level is only one tile thick at some point - make it two tiles thick throughout. Second, the level is very large and complex; smaller levels tend not to exhibit this problem. The player can fix it mid-game by pressing F5 and resetting the screen size, but you should try to prevent it by checking the perimeter.
Pushwall does not open or stops partway. A guard or corpse is in the pushwall's travel path. Find and remove or reposition the obstruction. If the pushwall is in a secret room with guards, ensure the guards are deaf or behind a regular door so they cannot reach the pushwall's path. If no obstruction is present, verify the pushwall has the correct object code placed on the correct wall tile.
Secret doors jam up or move too far, blocking the passage beyond. You have relied on the pushwall moving a specific distance and it moved the other. See Section 4.61. Redesign the secret area so the player can navigate it whether the pushwall moves two squares or three.
Moving guards freeze or bunch up in a corner. Patrol path collision. Usually caused by dogs on the same path as human guards, intersecting paths, or guards starting too close together. Review the patrol path design and add spacing between guards. Test every patrol path individually with no-clip before considering it complete.
Guards are paralyzed - present but unresponsive until directly attacked. Either they are on the wrong floor code, they are deaf guards clustered too closely together, or they are in a secret room on a different floor code from the entrance room. Check all three possibilities.
Player starts inside a wall and cannot move. Missing start position marker, or the start position marker is placed on a wall tile rather than a floor tile. Place exactly one start position marker on an open floor tile.
Screen is reduced and has a flickering border after restart. See flashing screen border above.
Walls spontaneously changing to gray stone during play. A memory issue where the game runs out of memory for storing multiple wall types and temporarily overwrites them with the default gray stone. Save, quit, and restart the game - this is not stored in save files and will clear when the game is reloaded. If it happens constantly, try reducing the number of distinct wall types used in the level.
Vertical ripple lines appearing on screen during movement. Multiple possible causes. One common trigger is opening a door that has no floor code - only a wall - on the other side. Some causes are merely visual annoyances; others can corrupt save files. If you identify the specific trigger, address it in the level design. Otherwise treat it as a DOS engine quirk and move on.
Game crashes with a Call Apogee message. Too many static objects, too many guards, or too many doors. Check the counts using Tab+C in debug mode and reduce whichever category is over the limit.
Level crashes or hangs with graphical garbage. Usually caused by exceeding one of the hard limits - guards, objects, or doors - or by a malformed level boundary. Verify the perimeter wall is complete and that no limit has been exceeded. If the crash is intermittent and related to a boss, consider the projectile actor limit described in Section 6.121.
Guard peeking around a corner that does not exist. A deaf guard has spotted the player through the corner gap between two wall tiles that meet only at their corners. This is intended deaf guard behavior, not a bug. If you did not intend this effect, move the deaf guard away from any diagonal wall junction.
9.51 - Keeping Unused Levels Functional
If your level set does not use all available level slots - a common situation when making a partial episode replacement - do not leave unused slots completely empty. An entirely empty level with no wall borders and no start position marker will cause any demo that happens to start on that level to crash the game or hang.
The minimum maintenance for an unused level slot is: a complete perimeter wall at least one tile thick and a start position marker inside it. You do not need floor codes, objects, or any interior content. Just the border walls and the start position. This ensures that if the game ever tries to use that level slot for a demo or for any other reason, it will not crash.
If your set runs from, say, level 1 through level 20 and does not use levels 21 through 60, go through each unused slot and place the minimum required elements in each one before distributing your work.
10.0 - Mappers' Block: Staying Creative
10.1 - When You're Stuck: Strategies to Get Going Again
Every mapper hits a wall eventually. You open the editor, stare at an unfinished level or a blank grid, and nothing comes. The ideas that seemed clear a week ago have evaporated. The room you have deleted and rebuilt ten times still does not feel right. You have been staring at the same corridor for an hour and it looks exactly as wrong as it did when you started.
This is normal. It happens to everyone who makes levels seriously and invests in making them good rather than just finished. The very fact that you can see that something is wrong - that it does not feel right yet - means your critical judgment is working. The block is not an absence of ability; it is an absence of the specific inspiration needed for this specific problem at this specific moment.
The practical approaches that work vary by person, but several consistently help.
Take a break and come back fresh. Walk away from the level entirely for a day or two. Do not think about it if you can help it. When you return, play it as if you are encountering someone else's work for the first time, and be ready to identify things you could not see before precisely because you were too close to them. This is the most reliable method for gaining critical distance. Levels you thought were finished often reveal obvious problems after a break. Levels that felt stuck often suggest their own solutions when approached fresh.
Play other people's levels. Spending time with well-made community add-ons - Totengraeber, Spear: Resurrection, Assassinate Hitler, anything by Ack or AReyeP - often shakes something loose. The ideas you get from playing other levels are usually not derivative imitations of what you saw. They tend to be new ideas that the experience of playing somehow enabled, connections your brain made between what you observed and problems you were already thinking about.
Change your approach to the stuck area. If a room is not working after several attempts, consider that the problem may not be in the room itself but in your initial concept for it. What if the room were larger? Smaller? Oriented differently? What if it were two rooms instead of one? What if it did not exist at all and you replaced it with a corridor that connected two other areas more directly? Sometimes the room that is not working is not fixable - it needs to be reconceived from a different starting point.
10.2 - Using Music, Maps, Shapes, and Other Games as Inspiration
Inspiration for level design comes from unexpected places, and experienced designers develop habits for finding it.
Music. Some designers find it effective to start a level by loading it in the game, letting the music play, and before the game fades in, closing their eyes and picturing what kind of environment the music suggests. Then they build that environment. The music becomes a design brief - a mood and atmosphere to match rather than a blank creative question to answer. One room at a time, guided by what would make sense given the previous room and the overall feel of the music, the level grows organically.
Real maps. Road maps, building floor plans, shopping mall layouts, the floorplan of a building you know well - these are all valid starting points for level geometry. The organic complexity of real spatial structures produces map layouts that feel authentically architectural rather than synthetically game-like. Aerial photography and online mapping tools are an especially rich source of non-obvious spatial ideas.
Geometric shapes. Starting from a specific shape - a circle, an hourglass, a tic-tac-toe grid, a figure eight - and designing a level whose overall layout traces that shape produces structures with internal geometric coherence that purely freeform design often lacks. The constraint of the shape forces interesting decisions about how to make the geometry navigable and interesting.
Other games and other Wolf3D levels. Not to copy, but to observe and understand. What is it about a specific level in another game that made it memorable? What was the structural logic behind it? What could you take from that logic and apply in a completely different context? The insight gained from studying other people's work - in the editor or just in play - is one of the most reliable sources of design ideas.
Write down every idea, immediately. Inspiration is unreliable and memory is worse. Carry a notebook, keep a folder of notes, use your phone - whatever works for you. When an idea comes, write it down before it disappears. A scrap of paper that says "room where player enters from top instead of side, guards face wrong direction" is worth more than a vivid mental image that evaporates by morning. Experienced designers often have folders or notebooks full of fragments - partial room ideas, guard placement thoughts, texture combinations, level concepts - that they draw on when the well runs dry.
10.3 - Walking Away and Coming Back Fresh
This is important enough to address as its own section rather than just as a bullet point under 10.1.
The most common mistake in the later stages of designing a level is failing to step back far enough to see it clearly. When you have been working on the same level for weeks, you know it too well. You know where every guard is. You know the solutions to every puzzle. You know the intended path through every section. You cannot experience the level the way a stranger will, and that gap in perspective is where most of the remaining design problems hide.
The technique is simple: finish the level to the best of your current ability, save it, and then do not touch it or think about it for at least a day. Two days is better. A week is better still for a large or complex level. During that time, play other games or make other things. Let the specific knowledge of the level's layout fade as much as possible.
When you return, play the level on Death Incarnate with no cheats from the very beginning. Approach it as a critic rather than a creator. Write down every moment where something felt wrong - a fight that was too easy or too hard, a room that was confusing to navigate, a secret that felt either too obvious or too hidden, a stretch of level that felt boring or repetitive. Do not try to fix anything during this playtest. Just observe and record.
Then fix everything on the list. Then do it again.
The level that emerges from two or three cycles of this process is a fundamentally better level than the one that came out of the initial design phase. The problems you cannot see when you are close to the work become obvious when you are far from it. This process is not optional - it is the second half of designing a level.
10.4 - Building One Room at a Time
For mappers who find the blank grid overwhelming, or who have tried top-down planning and found that the resulting levels feel schematic and lifeless, the room-by-room approach is worth trying.
Start the level in the editor. Load the game. Let the music play. Before the screen fades in, close your eyes and imagine one room - just the first one. What does it look like? What is it for? What kind of space is it? When you have a clear picture, open the editor and build exactly that room. Put in the floor codes, the decorations, the guard or guards that belong there. Test it. Does it feel right? Adjust it until it does.
Now imagine what comes next. Not the whole level - just the next room. What would logically follow from the space you just created? If the first room is a guard post near an entrance, the next room might be a corridor heading deeper into the building. If the first room is a storage area, the next room might be the utility corridor that connects it to the main installation.
Build the next room. Test both rooms together. Fix whatever is wrong. Then imagine the room after that.
The level grows one room at a time, each one emerging from what came before. This approach produces levels with a natural spatial logic that is very difficult to achieve through top-down planning, because the decisions are always being made in the context of what already exists rather than in the abstract. The level tells you what it needs to be rather than you imposing a predetermined structure on it.
The drawback is that levels built this way can meander or become structurally incoherent if you are not deliberate about overall shape and connectivity. Check periodically that the level has a coherent navigational structure - that there are clear paths to the key rooms, that the elevator is accessible, that the secret areas are reasonably distributed. If it starts to sprawl in ways that do not make sense, step back and do a structural review before continuing.
The inspiration comes from within the work itself. One room suggests the next. The level builds its own logic. For many designers this is the approach that produces the most interesting and organic results precisely because it leaves room for the unexpected.
11.0 - Graphics, Sound, and Code: Things You Should Know
Editing Wolfenstein's levels is not the only way to modify the game. Using tools beyond the map editor, you can change Wolfenstein's graphics, sounds, and - for those willing to go deeper - its source code behavior. This section covers the basics of each area and the most important things a level designer should know before attempting them.
A word of caution before anything else: always make a backup copy of Wolfenstein's VSWAP file before making any changes to graphics or sounds. The VSWAP contains the game's walls, sprites, and sound effects, and a mistake during editing can corrupt it in ways that are not easily reversed. Back it up first, every time, without exception.
11.1 - Graphics Editing
Wolfenstein's graphics - walls, doors, guard and boss sprites, decorative objects, and the weapon graphics B.J. holds - are all stored in the VSWAP file. Two tools have traditionally been used to access and edit them.
WolfEdit 2.1, by Bill Kirby, is the primary graphics editing tool for Wolfenstein. It allows you to change walls, doors, actors, decorative objects, and the gun graphics. You can change Wolfenstein so radically that B.J. carries a laser weapon and moves through a spaceship shooting aliens - yes, someone actually did that. With WolfEdit you extract graphics as GIF files, edit them in a paint program, and reimport them.
FloEdit also handles graphics editing natively alongside level editing, making it a more integrated solution for designers who want to do both.
For paint work you need a program capable of saving GIF files at Wolfenstein's color depth. Programs like Paint Shop Pro and Photoshop are significantly easier to work in than WolfEdit's own interface and produce better results for complex edits.
Several important constraints apply to Wolf3D graphics:
Size limits. None of the graphics can be larger than their original dimensions. When you import a modified graphic, it must be the same size or smaller than the original. WolfEdit 2.1 shows you a ratio of how large your image is relative to the maximum allowed - pay attention to this before importing.
The restoration problem. Once you change a sprite or actor graphic and the original sprite was significantly smaller than the replacement, you sometimes cannot restore it to its original condition by reimporting the original GIF you saved out earlier. This is a known limitation - the original's smaller pixel footprint gets overwritten in a way that makes clean reversal difficult. This is another reason to back up the VSWAP before making any changes.
Color palette. Wolfenstein uses a fixed 256-color palette. Any graphics you create or import must use only colors from this palette, or colors will shift unexpectedly when imported. Always work within the Wolfenstein palette when creating new graphics.
Sprite borders. When editing guard or actor sprites, always leave the left and right border of the image empty - one column of transparent pixels on each side. If you fill these borders with content, the game engine will hang when it tries to render the sprite. This is a consistent and predictable crash cause that is easy to avoid once you know about it.
Wall textures. Wolf3D wall textures have slightly different appearances on their horizontal (east/west) and vertical (north/south) sides. The north/south version is slightly darker, giving the impression of depth and directional lighting. When creating custom wall textures, account for both versions. Many editors allow you to set them independently; others mirror one from the other automatically.
Adding new wall types to Spear of Destiny is possible through FloEdit, which can add additional slots to the VSWAP. This significantly expands the visual palette available for level design and is worth exploring for any serious total conversion project.
11.2 - Sound Editing
Sound editing is one of the most entertaining modifications you can make to Wolfenstein, and it can dramatically change the atmosphere of the game. Replacing the standard sounds with custom audio - different guard vocals, different weapon sounds, ambient effects - transforms the experience more immediately than almost any other single change.
The primary tool for Wolfenstein sound editing is WolfSnd 1.0 by Doctor Data, used in conjunction with a digital audio editor. Cool Edit (now Adobe Audition) is widely recommended as the best companion program - it can save in Sound Blaster VOC format at the exact frequency Wolf3D requires and has a clean, capable interface.
Several constraints apply to Wolf3D sound:
All sound effects in Wolfenstein were recorded in 8-bit mono at 6,896 Hz. This is a specific and unusual sample rate. Your replacement sounds must match this frequency. Cool Edit can convert audio from any frequency to exactly 6,896 Hz, which is the reliable method - do not rely on WolfSnd's internal conversion if the source audio is significantly different from the target frequency, as the conversion quality degrades noticeably when the gap is large.
Length limits. You cannot make a sound effect longer than its original length. If your replacement sound is longer than the original, it will simply be cut short when played in the game. The audio ends abruptly rather than fading, which sounds wrong and unprofessional.
Silence at the end. If your replacement sound is shorter than the original, you will hear an audible pop when the sound finishes - the audio buffer is not fully filled and the leftover space produces a click. The solution is to add silence to the end of your sound file to pad it to the same length as or slightly longer than the original. A few frames of silence at the end prevents the pop without any audible consequence.
Wolf3D only, not Spear. Sound editing using the standard WolfSnd tool works for Wolfenstein 3D but not for Spear of Destiny due to differences in how the two games store their audio data.
The most impactful sounds to replace are the guard vocalization sounds - the shout when a guard spots B.J., the pain sounds, the death sounds - and the weapon firing sounds. These are heard constantly during play and replacing them completely changes how the game feels. Ambient or contextual sounds are less frequently heard and have less impact per replacement, though they contribute to atmosphere.
11.3 - Balancing Code and Graphics Mods with Level Design
At some point in your modding development, you will probably consider going beyond pure level and graphics changes into source code modification - custom enemies, new weapons, altered game mechanics, expanded limits. The Wolf3D community has produced an enormous amount of coding work over the years, and modern resources make source code changes more accessible than they have ever been.
The most important thing to understand about code modifications is that they are a multiplier on the underlying level design, not a substitute for it. A mod with extraordinary code work - new enemy types, a custom HUD, expanded weapons, altered physics - built on mediocre level design will be a mediocre experience. Players will engage with the code novelty for a short time and then find themselves in the same poorly designed rooms they would have encountered in an unmodded level.
Conversely, a mod with excellent level design and minimal code changes will hold players for far longer than one where the inverse is true. The community has repeatedly demonstrated this preference - classic sets from the late 1990s and early 2000s, made with very limited or no code changes, are still played and praised today. The atmosphere, the level design, the guard placement, the texture choices - these are what people remember.
This does not mean code changes are unimportant. A well-integrated code modification that enhances the atmosphere and gameplay of an already strong level set can elevate the entire experience. New enemy types that genuinely behave differently from the standard roster add variety and challenge. Expanded limits remove constraints that would otherwise force compromises in the level design. The point is that code changes should serve the level design rather than the other way around.
A specific practical consideration: if you are working on a large project that involves both level design and code changes simultaneously, be careful not to let the code work become a reason to delay or neglect the mapping. A common pattern in community modding is a project that accumulates impressive technical features over months or years while the actual levels remain unfinished or underdeveloped. Players do not want to wait years for a technically impressive but level-poor experience. Do the mapping first. Make the levels excellent. Then layer code enhancements on top of a complete, well-designed foundation.
The same principle applies to graphics and sound changes. Custom graphics and sounds can dramatically enhance atmosphere, but they cannot create it from nothing. A level with beautifully designed custom wall textures and atmospheric music still needs good floor code design, thoughtful guard placement, and appropriate difficulty balance to be worth playing. The art direction is the surface; the level design is the structure underneath it. Both matter, but structure comes first.
APPENDIX A - Level Data Quick Reference
A-1 - Wolfenstein Level Limits: Guards, Dead Guards, Bosses, Hitler, Projectiles, Objects, Doors
The following hard limits apply to vanilla DOS Wolf3D and Spear of Destiny. Exceeding any of these will cause the game to crash or produce a fatal error.
Static Objects: 399 Includes all decorative objects, treasure items, health items, weapons, ammo, keys, turning points, start position markers, and endgame triggers. Does not include walls, doors, or guards.
Guards (Actors): 149 This limit is more complex than it first appears. The following all count toward the 149 actor limit:
- Living guards of all types (tan, SS, officers, mutants, dogs)
- Initially dead guards placed in the editor
- All bosses - each counts as one actor
- Fake Hitler counts as two actors - his armored suit and his revealed form are two separate entities
- The endgame running hero spawned by the victory sequence at the end of Episodes 1 and 5 counts as one actor - if the initial count is at 149 when the trigger fires, the game will crash. Keep the initial count at 148 or lower on any level using an endgame trigger
- Projectiles count as actors during gameplay - Fake Hitler's flames and Otto Giftmacher's rockets each spawn additional actor entries when fired. On a level with a projectile-firing boss and an actor count near the limit, repeated projectile spawning can push the total over 149 and crash the game. Leave meaningful headroom below 149 when using projectile-firing bosses
Doors: 63 Not including pushwalls. Any more than 63 will cause Wolf3D to display a fatal error after the Get Psyched screen. Note that stuck doors count toward this limit even if Mapedit does not count them in its display.
Level Grid: 64x64 tiles The playable area is 62x62. The outermost ring of tiles must always be solid wall. Two layers of perimeter wall are recommended for stability.
Objects Visible Simultaneously: approximately 56-64 Not a hard crash limit but a practical performance limit. Beyond this threshold, objects and guards will begin disappearing from the screen.
A-2 - Treasure / Ammo / Health Calculations
Treasure
| Item | Points |
| Cross | 100 |
| Chalice | 500 |
| Treasure Chest | 1,000 |
| Crown | 5,000 |
| 1-Up | 0 points (but counts toward treasure ratio) |
The 1-Up provides no score but does count as a treasure item for the ratio. The player can carry a maximum of 9 lives at one time. An extra life is awarded for every 40,000 points accumulated.
Ammunition
| Item | Bullets |
| Fresh Clip | 8 |
| Used Clip | 4 |
| Weapon pickup | 6 |
Maximum ammo capacity is 99 bullets. The chaingun consumes two bullets per shot and drains the maximum very quickly. The machine gun fires one bullet per shot. The pistol fires one bullet per shot at a slower rate.
Health
| Item | Health Restored |
| Dog Food | 4% |
| Chicken Dinner | 10% |
| First Aid Kit | 25% |
| 1-Up | Restores health to 100% and adds 25 bullets |
Health cannot exceed 100% through normal item collection. The 1-Up is the only item that restores health to full regardless of current health.
A-3 - A Note on Ratios: What Counts and What Doesn't
The end-of-level statistics screen displays three ratios: percentage of enemies killed, percentage of treasure collected, and percentage of secrets found.
What counts toward enemies killed: All living guards of all types, initially dead guards placed in the editor, and bosses. Fake Hitler counts as two kills - one for the suit and one for the revealed form. The endgame running hero does not count as an enemy for ratio purposes.
What counts toward treasure: All treasure items including crosses, chalices, treasure chests, crowns, and 1-ups. Weapons, ammo, and health items do not count toward the treasure ratio.
What counts toward secrets: Each secret area found by the player - specifically, each pushwall activated by the player - counts toward the secret ratio. Holo-walls do not count. Extra hidden door object codes placed without corresponding pushwall markers can inflate the secret total and make 100% secrets unachievable, as described in Section 4.68.
Boss levels and secret levels do not display end-of-level ratios. On these levels the statistics screen does not appear. The player receives 15,000 bonus points for completing a secret level regardless of their performance on that level. The implication for design is that ratio completionism - designing for 100% kills, treasure, and secrets - only matters on regular levels, not on boss or secret levels.
Ratio errors: In Wolf3D version 1.4, a level with no enemies, no treasure, or no secrets will display 0% for the relevant category rather than generating an error. In earlier versions, certain zero-ratio categories could cause problems. If you are targeting compatibility with older versions, include at least one of each.
APPENDIX B - Ceiling Color Reference
B-1 - Wolfenstein Ceiling Color Chart
| Episode and Level | Ceiling Color (palette index) |
| E1L1 – E1L9 | Dark Gray (1d / 29) |
| E1L10 | Purple (bf / 191) |
| E2L1 – E2L3 | Med. Mustard (4e / 78) |
| E2L4 | Dark Gray (1d / 29) |
| E2L5 | Light Blue (8d / 141) |
| E2L6 | Med. Mustard (4e / 78) |
| E2L7 | Dark Gray (1d / 29) |
| E2L8 | Dark Red (2d / 45) |
| E2L9 | Dark Gray (1d / 29) |
| E2L10 | Light Blue (8d / 141) |
| E3L1 – E3L5 | Dark Gray (1d / 29) |
| E3L6 | Dark Red (2d / 45) |
| E3L7 | Dark Brown (dd / 221) |
| E3L8 – E3L9 | Dark Gray (1d / 29) |
| E3L10 | Medium Blue (98 / 152) |
| E4L1 | Dark Gray (1d / 29) |
| E4L2 | Dark Blue (9d / 157) |
| E4L3 | Dark Red (2d / 45) |
| E4L4 – E4L5 | Dark Brown (dd / 221) |
| E4L6 | Dark Blue (9d / 157) |
| E4L7 | Dark Red (2d / 45) |
| E4L8 | Lighter Mustard (4d / 77) |
| E4L9 | Dark Gray (1d / 29) |
| E4L10 | Dark Brown (dd / 221) |
| E5L1 | Cyan (7d / 125) |
| E5L2 | Dark Gray (1d / 29) |
| E5L3 – E5L4 | Dark Red (2d / 45) |
| E5L5 | Dark Brown (dd / 221) |
| E5L6 | Light Brown (d7 / 215) |
| E5L7 – E5L9 | Dark Gray (1d / 29) |
| E5L10 | Dark Red (2d / 45) |
| E6L1 – E6L4 | Dark Gray (1d / 29) |
| E6L5 – E6L6 | Dark Brown (dd / 221) |
| E6L7 | Cyan (7d / 125) |
| E6L8 – E6L10 | Dark Brown (dd / 221) |
B-2 - Spear of Destiny Ceiling Color Chart
| Level Number | Ceiling Color (palette index) |
| 1 | Green (6f / 111) |
| 2 | Dark Olive (4f / 79) |
| 3 | Dark Gray (1d / 29) |
| 4 | Dark Brown (de / 222) |
| 5 | Very Dark Brown (df / 223) |
| 6 | Dark Red (2e / 46) |
| 7 | Dark Cyan (7f / 127) |
| 8 | Dark Blue (9e / 158) |
| 9 | Dark Purplish Blue (ae / 174) |
| 10 | Dark Cyan (7f / 127) |
| 11 | Dark Gray (1d / 29) |
| 12 | Dark Brown (de / 222) |
| 13 | Very Dark Brown (df / 223) |
| 14 | Dark Brown (de / 222) |
| 15 | Very Dark Brown (df / 223) |
| 16 | Dark Brown (de / 222) |
| 17 | Cyan (e1 / 225) |
| 18 | Medium Brown (dc / 220) |
| 19 (Secret 1) | Dark Red (2e / 46) |
| 20 (Secret 2) | Dark Gray (1d / 29) |
| 21 (Angel of Death) | Medium Brown (dc / 220) |
APPENDIX C - Troubleshooting / Strange Effects Reference
PROBLEM: The game dies when the player dies and displays "Out of Memory" but there is plenty of memory for the game.
SOLUTION: This problem was more common with older Wolfenstein versions. For some reason the game crashes either the first or second time the player dies in certain levels. The only remedies are to continually restart Wolf3D or to not die. This problem is essentially gone in version 1.4.
PROBLEM: When the player restarts after dying, the screen is reduced to half-size and the border is flickering between bright red and transparent.
SOLUTION: This is the flashing screen border bug described in Section 9.5. Make the perimeter walls of the level at least two tiles thick throughout. Smaller floor designs tend not to exhibit this problem. At game time the player can press F5 and resize the screen back to maximum to continue playing.
PROBLEM: All kinds of walls spontaneously change to dark gray stone walls for no reason.
SOLUTION: The game is temporarily overwriting wall textures with the default gray stone because it has run out of memory for storing so many distinct wall types. This is not stored in save files. Save the game, quit, and restart - the correct textures will return. If the problem recurs constantly, consider reducing the number of distinct wall types in the level.
PROBLEM: There are vertical ripple lines appearing on screen during movement that should not be there.
SOLUTION: This glitch has many possible causes. One common trigger is opening a door that has no floor code - only a wall - on the other side. Some instances are harmless visual annoyances. Others can corrupt save files or produce random errors. If you can identify and eliminate the specific trigger in the level design, do so. Many instances cannot be fully explained and simply exist as quirks of the DOS engine.
PROBLEM: The player gets stuck in the same square as something else and cannot move.
SOLUTION: This happens when an enemy walks into the player without seeing them - which can only occur with no-clip active - or when the player pushes a secret door and moves into the space it slides to before the wall has fully moved. In either case the player is softlocked and must load a saved game or restart the level. If it happens during normal play without no-clip, check that no pushwall path leads into a space the player will naturally be standing in.
PROBLEM: Guards open locked doors they should not be able to open.
SOLUTION: As described in Section 4.54, guards on the same floor code as the player will open locked doors when alerted, regardless of whether the player has found the key. Assign a unique floor code to the room behind the locked door that is not shared with any area the player will be fighting in before they obtain the key.
PROBLEM: Pushwall only moves two squares when three are needed, or moves three when two would block the path.
SOLUTION: This is the engine bug described in Section 4.61. The pushwall's travel distance is variable and cannot be reliably controlled. Design all secret areas so they are accessible whether the pushwall moves two squares or three. Do not design any passage that requires exactly three squares of clearance if only two might be available.
PROBLEM: A boss appears frozen - present but not reacting to the player.
SOLUTION: This is a DOS-specific engine bug affecting certain boss placements, described in Section 6.71. Try moving the boss one or two tiles in the editor. If the problem persists, it may be caused by the level being near the actor limit. Verify the actor count using Tab+C in debug mode.
PROBLEM: Another problem occurred that is not listed here.
SOLUTION: Some problems appear occasionally, cause confusion, and then stop appearing for no obvious reason. If you encounter a persistent undiagnosed problem, save the level as an individual floor file in Mapedit and have another experienced mapper look at it. A fresh pair of eyes on a problematic level file often identifies things that are invisible to the person who designed it.
APPENDIX D - Mapedit Keyboard Shortcuts Reference
These shortcuts apply specifically to Mapedit. Other editors have their own keyboard interfaces - consult the documentation for your editor of choice.
General
| Key | Function |
| C | Clear the level (prompts confirmation) |
| W | Save the level (prompts for filename) |
| Q | Quit Mapedit |
| O | Toggle static object display on/off |
| F | Toggle floor code display on/off |
Floor Code Operations
| Key | Function |
| Z | Flood-fill the current room with the selected floor code (preserves deaf guard codes) |
| Alt+Z | Flood-fill the current room including deaf guard code tiles |
| Ctrl+Z | Flood-fill the current room and extend into adjacent secret areas |
| Alt+S | Toggle statistics display - shows count of each floor code used |
View Controls
| Key | Function |
| Right Mouse Button | Assign the currently hovered tile type to RMB for quick erasure |
Editor Tips
Always use a floor tile - not the Invalid tile - when deleting walls. Placing the Invalid tile where a floor code should be removes the floor code and leaves a blank space that will cause problems in game.
Assign a floor code tile to the left mouse button before clearing a level with C. If a wall tile is assigned to the LMB when you clear, the level will clear to that wall type rather than open floor, requiring an additional flood-fill step.
The Alt+S statistics display is one of the most useful features in Mapedit for catching accidental duplicate floor codes. Make a habit of opening it at the start of each design session to understand the current state of your floor code assignments.
The ChaosEdit editor has a 3D preview mode that allows you to walk through the level in real time. Use it frequently to check how decoration, guard placement, and room proportions look in the game rather than waiting for a full test run. Note that ChaosEdit has no undo function - save frequently and be careful with flood-fill and other bulk operations.
I made my first Wolf3D mod with B.J. Rowan's guide open beside me, and I have stood by his advice ever since. That was a long time ago - I have been in this community off and on since 1996, as a player, a mapper, a forum lurker, and an occasional contributor. The game has changed in how we run it - DOS has given way to the remarkable SDL ports that carry the engine forward into the modern era - but the standards Rowan set down all those years ago have held up with remarkable stubbornness. Good level design is good level design. The engine changes; the principles do not.
What I always felt was missing was a proper home for everything else. The Die Hard Wolfers forum, over its long life, accumulated an extraordinary body of mapping knowledge - ideas shared freely by people who loved this game and wanted others to make better things with it. That knowledge lived in threads, in replies, in posts that could disappear or become hard to find. It deserved to be honored, compiled, and kept somewhere permanent. So I finally set myself to the task.
B.J. Rowan's tips are the foundation. Warren Buss's document fills in the technical gaps Rowan left open. And the forum contributors - named in full at the start of this guide - bring decades of hard-won community wisdom that neither of those earlier documents could anticipate. Between the three sources, I hope we have built something that serves the old hands and the newcomers equally.
A lot of what you have just read is unapologetically old-school. That is not an accident. The aesthetic we love - the gray stone corridors, the ceiling colors, the deaf guards, the pushwall secrets, the satisfaction of a level that flows - is worth preserving and worth passing on. New tools, new ports, new possibilities, but the same game underneath.
I am no great mapper myself - far from it. But I have loved this game long enough to want to see it keep producing levels worth playing, and I hope something in these pages gives you the push, the tool, or the small piece of knowledge that helps you make something better than you would have made without it. That is all any guide can do. The rest is yours.
Keep on Wolfing.
Tris, 2026
The basis for this guide was written by Brian J. "Blazkowicz" Rowan © Copyright 1994-1999. Expanded and updated 2026 by Tris. With thanks to Warren Buss, Martin Krysiak, JudgeXYZ, Dark_wizzie, Jordan Trudgett, serpens, Ian Franken, Gary Ragland, Brian Lowe, Ringman, Dean, Gerolf, AreyeP, Tricob, Barry Christian, Matthew, Poet, Kuki, Dunkelschwamm, Ella Guro, Executor, Thomas, Military, and one anonymous contributor whose observations on static objects were too good to leave out.