

In "Wolfenstein 3D," players face various enemies that challenge their skills. The main gameplay involves avoiding, surprising, or quickly attacking these foes. Choosing a higher difficulty level increases the number of regular enemies, while the easiest modes, "Baby" and "Easy," have fewer adversaries. Boss enemies always appear facing the player, regardless of the player's approach direction. In contrast, regular enemies face a set direction and won't notice the player if approached from behind.
Regular enemies, except for dogs, can start in either a stationary or moving state. Dogs only appear in a moving state; there are no stationary dogs in the game. Some regular enemies might be set to "Ambush" mode by the game's designers. In this mode, they remain unresponsive to weapon sounds and only attack when they see the player directly. Bosses are always in Ambush mode, waiting for direct visual contact before engaging.
The enemies in "Wolfenstein 3D" range from standard Nazi soldiers and attack dogs to more formidable foes like mutants and high-ranking officers. Each enemy type presents a unique challenge, requiring players to adapt their strategies to progress through the game.
The Enemies of Wolfenstein 3D, Spear of Destiny, and the Mission Packs
From the lowly brown-shirted guard patrolling a dimly lit corridor to the armoured madman at the end of Episode 3, every enemy in the Wolfenstein 3D family of games has a personality, a role, and a set of behaviours that the player must learn to survive. This article covers every enemy across Wolfenstein 3D, Spear of Destiny, and the two Spear of Destiny Mission Packs — regular enemies and bosses alike — with their stats, lore, and tactics.
A quick note on difficulty and health: regular enemies like the guard, SS, dog, and officer have the same hit points on every difficulty setting. Bosses, Fake Hitlers, and mutants scale upward at higher difficulties. Where health changes by difficulty, the values are listed in order: Baby, Easy, Normal, Hard.
Regular Enemies
These are the enemies you will encounter throughout every level. They patrol, stand guard, and react to noise and line of sight. With the exception of dogs, regular enemies can spawn either standing still or actively patrolling. They can also be placed in ambush mode by the level designer, meaning they will not react to gunshots and will only engage when they see the player directly.
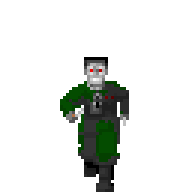
Guard
- Health: 25 on all difficulties
- Points: 100
- Weapon: Pistol
- Drops: Used clip (4 rounds)
- Alert quote: "Achtung!" — In the Mission Packs: "Alarm!"
- Death quote: Various screams
Description:
The guard is the most common enemy in the game and appears in every version of the Wolfenstein 3D family. Dressed in a brown uniform and armed with only a pistol, he represents the bottom rung of the Nazi war machine. He is slow to react, must stop moving to take aim, and goes down easily — sometimes in a single shot. In small numbers he poses almost no threat to a prepared player. The danger of guards lies entirely in their numbers and placement. A single guard in an open corridor is trivially dispatched. A group of guards packed into a tight room, or a guard positioned behind a door that swings open unexpectedly, can drain health quickly if the player is not paying attention.
Tactics:
- Knife isolated guards to conserve pistol ammunition — they go down in one or two stabs
- In groups, switch to the machine gun and take them down before they spread out
- Their 4-round ammo drop makes hunting guards a valid way to replenish ammunition in a pinch
- Watch for guards hidden behind doors — the opening swing can catch the player off guard
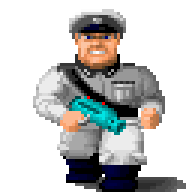
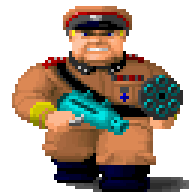
SS
- Health: 100 on all difficulties
- Points: 500
- Weapon: Machine gun (fires in volleys of 4 or more shots)
- Drops: Machine gun or used clip
- Alert quote: "Schutzstaffel!" — In the Mission Packs: "Wer da?" (Who's there?)
- Death quote: "Mein Leben!" — In the Mission Packs: "Tod fürs Vaterland!"
Description:
The SS is the powerhouse of the regular enemy roster. Wearing a bullet-proof vest and carrying a machine gun, the SS fires in rapid bursts that can shred a player's health in moments, making them a priority target in any room where multiple enemy types are present. They are faster than guards and mutants, though not quite as fast as officers. The machine gun the SS carries is one of the most important drops in the game — a player who starts an episode armed only with a pistol can significantly improve their situation by tracking down an SS soldier early.
Tactics:
- Prioritise SS soldiers in mixed groups — their machine gun bursts are the most immediate threat
- Strafe aggressively to break up their volley fire rather than standing and trading shots
- Use doors to isolate individual SS rather than engaging a group in open ground
- Hunt SS early in a level if you need a machine gun upgrade from a starting pistol
- Expect to spend significant ammo on each SS — account for this when planning supply usage
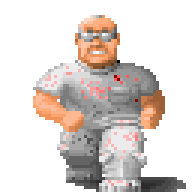
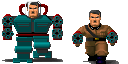
Officer
- Health: 50 on all difficulties
- Points: 400
- Weapon: Pistol (faster draw and reaction than a guard)
- Drops: Used clip
- Alert quote: "Spion!" (Spy!) — In the Mission Packs: "Denkste!" (You thought so!)
- Death quote: "Nein, so was!" — In the Mission Packs: "Heil Hitler!"
Description:
The officer is the fastest human enemy in the game — nearly as quick as a dog — and carries a pistol with a faster reaction time than a standard guard. He wears a light vest and has double the health of a guard, making him a more durable and unpredictable threat. Officers dodge laterally as they approach, making them harder to hit than their health pool suggests. Their speed lets them close distance before the player has time to line up a clean shot, and in groups alongside other enemies they are particularly dangerous.
Tactics:
- Exploit their speed against them — lure an officer into a chase to separate them from slower enemies
- Concentrated machine gun or chaingun fire ends a one-on-one fight quickly
- Avoid clustering too many officers together in a level — their combined speed and fast draw creates unfair situations
- If caught with only a pistol, keep moving and aim carefully; spraying wastes ammo against a dodging target
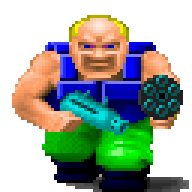
Dog
- Health: 1 on all difficulties
- Points: 200
- Weapon: Bite (melee only, no ranged attack)
- Drops: Nothing
- Alert quote: "Woof!"
- Death quote: "Yelp!"
- Note: Dogs can only spawn in patrol mode — there is no such thing as a stationary dog
Description:
The dog is the fastest enemy in the game and the easiest to kill — a single hit from any weapon finishes the job. In a one-on-one situation dogs are trivial: their bite attack is telegraphed, and stepping backward as they lunge avoids the damage entirely. A single knife stroke finishes the job without spending a bullet. Their real danger is distraction — their speed and erratic movement force the player to deal with them while under fire from human enemies in the same room. They also drop no ammo, so spending bullets on them feels wasteful. In the SNES port, dogs were famously replaced with giant mutant rats to satisfy Nintendo's content policies, a change that remains a running joke in the community.
Tactics:
- Knife dogs whenever possible to save ammunition — one stab is enough
- Use doorways to force dogs into a single-file approach rather than being surrounded
- In a room with mixed enemies, deal with dogs only when they become an immediate threat — they cannot shoot
- In large groups dogs become genuinely dangerous by forcing the player into a bad position while taking ranged fire
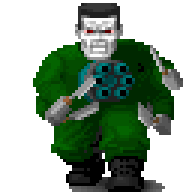
Mutant
- Health: 45 / 55 / 55 / 65
- Points: 700
- Weapon: Rapid double pistol shot; also carries cleavers (though melee damage is not separately coded)
- Drops: Used clip
- Alert quote: None — mutants make no sound when alerted
- Death quote: A gurgling groan
Description:
The mutant is the creation of Doctor Schabbs — a fallen Nazi soldier revived from death using a corposkinetic animation serum, with a third arm surgically grafted into the chest to carry a pistol while the other two carry cleavers. In Wolfenstein 3D mutants appear only in Castle Hollehammer during Episode 2 and in the secret level of Episode 6. In Spear of Destiny they appear in the later maps of Castle Nuremberg. The mutant's greatest danger is its complete silence — unlike guards and officers who shout when alerted, mutants give no warning at all. The player's first indication that a mutant has spotted them is often a burst of rapid gunfire from an unexpected direction.
Tactics:
- Be alert in Episode 2 levels — mutants frequently hide around corners specifically to exploit their silent approach
- Machine gun or chaingun fire ends the fight quickly in a straight exchange
- The double shot the mutant fires deals roughly the same damage as an SS burst — treat them with similar urgency
- Check corners and doorways carefully rather than rushing through — a surprised player will take significant damage before responding
Bat
- Health: 45 / 55 / 55 / 65
- Points: 700
- Weapon: Machine guns (mounted on feet)
- Drops: Used clip
- Alert quote: None
- Death quote: A falling sound
- Appears in: Spear of Destiny Mission Packs only
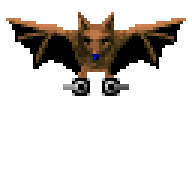
Description:
The bat appears only in the Spear of Destiny Mission Packs as a direct replacement for the mutant. These are giant mutated bats engineered by Professor Quarkblitz with machine guns attached to their feet, designed as soldier-animals for the Third Reich. In terms of gameplay they are mechanically identical to mutants in every respect — same health, same attack pattern, same silent alert. The only difference is the visual.
Tactics:
All mutant tactics apply. Expect the same silent approach, the same rapid double shot, and the same priority level in combat. Machine gun or chaingun fire is the most efficient response.
Ghost
- Health: 5 / 10 / 15 / 25 (regenerates after being shot down)
- Points: 200
- Weapon: Draining touch (melee only)
- Drops: Nothing
- Alert quote: None
- Death quote: None (a sound exists in the files but is never heard due to a coding oversight)
- Appears in: Spear of Destiny final level, and Mission Pack final levels
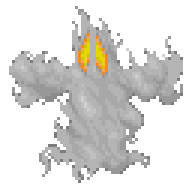
Description:
The Ghost is an unkillable melee enemy that appears exclusively in the final level of Spear of Destiny alongside the Angel of Death boss. Despite their low health values, Ghosts cannot be permanently destroyed — shooting one knocks it out briefly but it regenerates and resumes its pursuit within seconds. They move at moderate speed and have no ranged attack. Their true purpose is to complicate the final boss fight by forcing the player to split attention and ammunition between the Angel and the encroaching spectres.
Tactics:
- Keep moving throughout the level — Ghosts converge from all directions and punish stationary play
- Shoot Ghosts only when they become an immediate threat — ammo spent on Ghosts is ammo not spent on the Angel of Death
- Use the Angel's long post-burst recovery period to thin out surrounding Ghosts
- Accept that some Ghost contact damage is unavoidable and manage health pickups accordingly
- In some versions of the game Ghosts can open doors, so retreating into a side room does not guarantee safety
Radioactive Mist
- Health: 5 / 10 / 15 / 25 (regenerates after being shot down)
- Points: 200
- Weapon: Draining touch (melee only)
- Drops: Nothing
- Appears in: The Ultimate Challenge final level only

Description:
The Radioactive Mist replaces the Ghost in The Ultimate Challenge Mission Pack. It is a drifting cloud of toxic gas described as leftover contamination from earlier battles in the bunker. It behaves in every mechanical respect identically to the Ghost — slow movement, melee drain damage, temporary knockback from gunfire, and immediate regeneration. Like the Ghost, a death sound exists in the game files but is never actually heard during play.
Tactics:
All Ghost tactics apply exactly. Treat the Mist with the same priority and the same ammunition discipline as the Ghost in the Spear of Destiny finale.
Pac-Man Ghosts
- Health: Invincible — cannot be killed
- Points: None
- Weapon: Touch (drains health on contact)
- Drops: Nothing
- Alert: Active from the first moment of the level — they are always hunting the player
- Appears in: Episode 3 secret level (Map 10), and Blinky appears in Episode 6, Map 10

Description:
Blinky, Pinky, Inky, and Clyde — the four ghosts from the arcade game Pac-Man — appear as a nod from the id Software team in the secret level of Episode 3. They cannot be damaged or killed by any means. They drain health rapidly on contact. They are alerted from the moment the level starts. In some versions of the game they can open doors, making retreating into a side room unreliable. There are no points for engaging them and no reason to try.
Tactics:
- There is no combat tactic here — run
- Navigate the level as quickly as possible and exit
- Do not waste ammunition on them under any circumstances
Bosses
Bosses always spawn facing the player regardless of approach angle — they have no blind spot. They do not flinch when hit and will not interrupt their attack animation when damaged. They spawn in ambush mode by default, meaning noise alone will not alert them; they must see the player directly. Unlike regular enemies, most bosses do not drop ammo, making ammunition management before and during boss fights a critical concern. All bosses award 5,000 points on death.
Wolfenstein 3D Bosses
Hans Grösse
- Health: 850 / 950 / 1,050 / 1,200
- Points: 5,000
- Weapon: Dual chainguns
- Drops: Gold key
- Alert quote: "Guten tag!" (Good day!)
- Death quote: "Mutti!" (Mommy!)
- First appearance: Episode 1, Map 9
Description:
Hans Grösse is the first boss of Wolfenstein 3D, guarding the exit of Episode 1: Escape from Castle Wolfenstein. He is the largest member of the Grösse family — a sprawling clan of siblings including Gretel, Trans, Mans, Pans, and Fans — and wields dual chainguns capable of unleashing a devastating burst of fire. He is described in the Official Hint Book as big but not particularly intelligent. His death cry "Mutti!" (Mommy!) is one of the most memorable moments in early FPS history. Hans does not end the episode on death but drops a gold key, meaning multiple Hans Grösses can legally appear in a single level — and they do, in Episode 6, Map 10, where three Grösse brothers named Mans, Pans, and Fans are encountered together. Hans uses the SS's high-accuracy gunfire code, making him the most dangerous of all dual-chaingun bosses.
Tactics:
- Watch for his brief pause before firing — this is your window to duck behind cover
- Maintain distance to reduce the effectiveness of his chaingun burst
- Strafe when he opens fire; return fire during his recovery between bursts
- Do not approach too closely — point-blank chaingun fire is lethal within seconds
- Ensure enough ammo is stocked before the fight — Hans drops none
Doctor Schabbs
- Health: 850 / 950 / 1,550 / 2,400 (highest health of any boss on Death Incarnate difficulty)
- Points: 5,000
- Weapon: Thrown syringes filled with corposkinetic animation serum
- Drops: Nothing — defeating him ends the episode
- Alert quote: "Mwa ha ha ha ha ha ha!" or "Die, Scheißkopf!"
- Death quote: "Ugh! Mein Gott in Himmel!"
- First appearance: Episode 2, Map 9
Description:
Doctor Schabbs is the mastermind behind Operation Eisenfaust and the creator of the mutants. He uses a reanimation serum to resurrect fallen soldiers as the shambling undead that populate Episode 2. He is not a warrior — his weapon is a thrown syringe. If one of these syringes kills the player, the status bar shows BJ transforming into a mutant, implying the serum is lethal to living recipients and immediately strips their free will. On Death Incarnate difficulty Schabbs has the highest hit point total of any boss in the game — double that of Hans or Mecha Hitler — making him uniquely punishing at the top difficulty.
Tactics:
- Strafe to dodge his thrown syringes — they travel through the air and can be avoided
- Be careful not to sidestep into a previously thrown syringe while dodging a new one
- Use solid objects like tables and columns as cover — hitscan weapons can fire through cover while syringes are blocked
- Clear the Mutants accompanying him in Episode 2, Map 9 before alerting Schabbs
- Stock up on ammunition before entering the level — his health pool on harder difficulties is enormous
- Defeating Schabbs ends the episode immediately, so nothing needs to be preserved afterward
Fake Hitler
- Health: 200 / 300 / 400 / 500
- Points: 2,000 (not a full boss)
- Weapon: Flamethrower — fires a stream of eight fireballs in sequence
- Drops: Nothing
- Alert quote: "Tod Hund!" (Dead dog!)
- Death quote: "Ahahahaha!"
- First appearance: Episode 3, Map 9
Description:
The Fake Hitler is not Adolf Hitler but a mannequin in black robes, suspended from the ceiling by wires with a flamethrower mounted in its chest, designed to protect Hitler's inner sanctum. Three of them guard the approaches to the final arena in Episode 3. They behave more like heavily armed mini-bosses than regular enemies — high health, no flinch state, and a fireball stream that deals devastating damage on contact. The fireballs can be blocked by solid impassable objects like tables and columns. On modern hardware the fireballs travel much slower than originally designed due to a CPU-speed bug, which changes the feel of the encounter significantly compared to the original 1992 experience.
Tactics:
- Stay mobile at all times — the Fake Hitler pursues constantly with no flinch or stagger
- Fire from behind solid objects like columns and tables, which block the fireball stream while your shots pass through
- Strafe laterally to avoid the fireball stream when caught in the open
- Remember they drop no ammo — the level must supply enough resources for all three encounters
- Do not mistake slowed fireballs on modern hardware for an easy fight — multiple slow fireballs filling a corridor are still lethal
Mecha Hitler (First Phase)
- Health: 850 / 950 / 1,050 / 1,200
- Points: 5,000
- Weapon: Quad chainguns
- Drops: Nothing — destroying the armour triggers the second phase
- Alert quote: "Die, allied schweinhund!" or "Die Welt ist unser!" or "Guten tag!"
- Death quote: "Scheiße!" (immediately followed by second phase spawn)
- First appearance: Episode 3, Map 9
Description:
The first phase of the Hitler boss fight is the Mecha Hitler — Adolf Hitler piloting a motor-assisted suit of battle armour equipped with four rapid-fire chainguns. Mecha Hitler is the only multi-phase enemy in the entire Wolfenstein 3D family of games. He moves at a similar speed to Gretel Grösse and attacks in the same sustained chaingun pattern as other dual-chaingun bosses, but with four barrels rather than two. The first phase is demanding in its own right, but its most important aspect is what the player carries into the second phase.
Tactics:
- Do not exhaust ammo reserves during this phase — the second phase is more dangerous and faster
- Maintain distance and use cover whenever possible to reduce incoming damage
- Memorise the room layout before engaging — knowing where to retreat is critical when the second phase begins
- Preserve health where possible — entering the second phase critically wounded is a likely death sentence
Adolf Hitler (Second Phase)
- Health: 500 / 700 / 800 / 900
- Points: 5,000
- Weapon: Dual chainguns
- Drops: Nothing — defeating him ends the episode
- Alert quote: "Scheiße!" (spawns already in pursuit)
- Death quote: "Eva, auf wiedersehen!"
Description:
Once the mecha suit is destroyed, Adolf Hitler himself emerges — the fastest boss in the game, wielding dual chainguns and immediately charging the player. Despite having fewer hit points than the armoured first phase, Hitler's speed makes him the more dangerous of the two. He can close the distance between himself and the player faster than any other boss, and his dual chainguns at close range are lethal within moments. He has the fewest starting hit points of any boss in the Wolfenstein 3D family — on easier difficulties he can be finished in two concentrated chaingun bursts.
Tactics:
- Keep moving backwards the moment the second phase begins — he will be on top of you within seconds if you hesitate
- Stay at maximum range at all times and fire continuously
- Use the room layout memorised during the first phase to guide your retreat route
- Do not stop to line up shots — fire while moving and let volume of fire do the work
- Defeating Hitler ends the episode; nothing needs to be saved for afterward
Otto Giftmacher
- Health: 850 / 950 / 1,050 / 1,200
- Points: 5,000
- Weapon: Rocket launcher (sole weapon — the only enemy in the family who uses only rockets)
- Drops: Nothing — defeating him ends the episode
- Alert quote: "Eine kleine Amerikaner!" (A little American!)
- Death quote: "Donnerwetter!" (Good Heavens!)
- First appearance: Episode 4, Map 9
Description:
Otto "The Poison Maker" Giftmacher is the mastermind behind Giftkrieg, the Nazi chemical warfare programme targeting Britain. Despite dying in Episode 4, the chemical operation he set in motion continues into Episodes 5 and 6, giving his defeat genuine narrative weight. He is the only enemy in the entire Wolfenstein 3D family who uses a rocket launcher as his sole and exclusive weapon — no chaingun backup of any kind.
Tactics:
- Strafe continuously to dodge his rockets — they travel through the air and can be avoided
- Use solid objects for cover — hitscan weapons fire through cover while rockets are blocked
- Maintain distance; his rockets deal heavy damage but the dodge window is generous at range
- The fight plays similarly to the Schabbs encounter but with harder-hitting projectiles and a wider strafe window
- Defeating Otto ends Episode 4 — no need to preserve resources beyond the fight
Gretel Grösse
- Health: 850 / 950 / 1,050 / 1,200
- Points: 5,000
- Weapon: Dual chainguns
- Drops: Gold key
- Alert quote: "Kein Durchgang!" (No trespassing!)
- Death quote: "Mein Buße!" (My repentance!)
- First appearance: Episode 5, Map 9
- Note: The only female enemy in the entire Wolfenstein 3D family of games
Description:
Gretel Grösse is the younger sister of Hans and one of the Grösse family's most formidable members. She is described as fiercely competitive with her brother, making up in ferocity what she lacks in his experience. She wields dual chainguns and shares Hans's health pool. One meaningful distinction: Gretel, unlike Hans, uses a slightly less accurate version of the chaingun fire code — she and Trans Grösse, Submarine Willy share a small accuracy reduction compared to Hans's SS-precision attack. In practical terms this is a minor edge in the player's favour during sustained fire exchanges.
Tactics:
- All Hans Grösse tactics apply directly — the fight is functionally identical
- Watch for the attack telegraph pause, take cover, return fire during the recovery window
- Maintain distance and avoid letting her close to point-blank range
- She drops a gold key rather than ending the episode — manage ammo accordingly for what follows
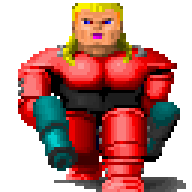
General Fettgesicht
- Health: 850 / 950 / 1,050 / 1,200
- Points: 5,000
- Weapon: One chaingun and one rocket launcher used in combination
- Drops: Nothing — defeating him ends the game
- Alert quote: "Erlauben Sie, bitte!" (Allow me, please!)
- Death quote: "Roseknospe" (Rosebud)
- First appearance: Episode 6, Map 9
Description:
General Fettgesicht — known to fans as Fatface — is the sixth and final boss of Wolfenstein 3D and the conclusion of The Nocturnal Missions. He is the leader of the Giftkrieg chemical warfare operation and carries the most dangerous weapon combination in the original game: one chaingun and one rocket launcher. The chaingun prevents safe hiding behind solid objects because hitscan fire reaches around cover that would stop rockets. The rockets prevent standing at range because they travel far enough to negate distance. The two weapons together leave the player no safe static position.
Tactics:
- Never stop moving — this fight demands constant strafing and repositioning
- Strafe rockets when they are fired; duck behind cover briefly for chaingun bursts
- Clear as many surrounding enemies in the arena as possible before engaging Fettgesicht directly
- Fight him one-on-one where possible — the regular enemies in Episode 6, Map 9 can block strafing lanes and create lethal crossfire
- Defeating Fettgesicht ends the game — no reserves need to be maintained
Spear of Destiny Bosses
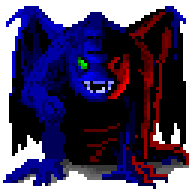
Trans Grösse
- Health: 850 / 950 / 1,050 / 1,200
- Points: 5,000
- Weapon: Dual chainguns
- Drops: Gold key
- Alert quote: "Einer Sprachschnitzer!" or "Guten tag!"
- Death quote: "Es ist schade!" (What a pity!)
- First appearance: Spear of Destiny, Map 5
![]()
Description:
Trans Grösse is the first boss of Spear of Destiny and the final guardian of the Tunnel section. He is another member of the Grösse family, carrying the same dual chainguns as Hans and Gretel. Like Gretel, he uses the slightly less accurate version of the chaingun fire code compared to Hans's SS-precision attack — making him marginally the most forgiving of the dual-chaingun bosses.
Tactics:
- All Hans Grösse tactics apply exactly — the fight is mechanically identical
- Watch the attack telegraph, use cover, return fire during the recovery window
- Maintain distance and avoid point-blank range
- The gold key he drops opens the path forward — ammo management continues to matter after the fight
Barnacle Wilhelm
- Health: 950 / 1,050 / 1,150 / 1,300
- Points: 5,000
- Weapon: Chaingun and rocket launcher
- Drops: Gold key
- Alert quote: "Ach so!" (Oh, I see!)
- Death quote: "Wenn schon!" (So what!)
- First appearance: Spear of Destiny, Map 10
Description:
Barnacle "Bill" Wilhelm is the second boss of Spear of Destiny and the guardian of the Dungeon section. He carries the same chaingun and rocket launcher combination as General Fettgesicht, but is significantly faster — fast enough to close ground quickly if the player fails to maintain retreat momentum. He also has a slight health advantage over Fettgesicht. The Map 10 arena is populated with additional enemies and has an irregular layout that complicates strafing.
Tactics:
- Constant movement is essential — Wilhelm's speed punishes any pause in retreat
- Strafe rockets, duck for chaingun fire, never hold a fixed position
- Clear surrounding enemies before engaging Wilhelm wherever possible
- Unlike some bosses, defeating Wilhelm does not end the level — resources carry forward into Map 11, so manage ammo and health for what follows
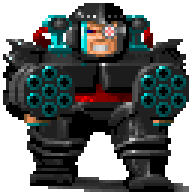
Übermutant
- Health: 1,050 / 1,150 / 1,250 / 1,400
- Points: 5,000
- Weapon: Chest-mounted chaingun and four cleaver-tipped arms for melee
- Drops: Gold key
- Alert quote: None
- Death quote: A loud groaning howl
- First appearance: Spear of Destiny, Map 16
- Note: The fastest boss in the entire Wolfenstein 3D family of games
Description:
The Übermutant is Doctor Schabbs's masterpiece — a monstrous supersoldier left behind to guard the Spear when Schabbs was reassigned to a better-equipped facility. It has four cleaver-tipped arms and a chaingun mounted in its chest. At close range its cleavers deal crushing damage. Its speed — the highest of any boss in the family — means it can close ground faster than the player expects, making distance management the defining skill of the encounter. The Map 16 arena is a large metal containment area surrounded by stone wall cloisters with column gaps that the player should use for cover and retreat routing.
Tactics:
- Prioritise keeping maximum distance at all times — close range is almost certainly fatal
- Memorise the retreat routes through the stone cloisters before engaging
- Break off to cover immediately when the chest-mounted chaingun begins firing
- Do not spend health and ammo as though nothing remains after this fight — the game continues
- The Übermutant drops a gold key rather than ending the game, so manage resources accordingly
Death Knight
- Health: 1,250 / 1,350 / 1,450 / 1,600
- Points: 5,000
- Weapon: Dual chainguns and dual rocket launchers — fires four bullets and two rockets in quick combined volleys
- Drops: Gold key
- Alert quote: "Tod ist mein leben!" (Death is my life!) or "Kommen sie her, schwein!" (Come here, pig!)
- Death quote: "Alles ist verloren!" (All is lost!)
- First appearance: Spear of Destiny, Map 18
- Note: The most heavily armed enemy in the entire Wolfenstein 3D family of games
Description:
The Death Knight guards the chamber containing the Spear of Destiny itself. He carries dual chainguns and dual rocket launchers — fired in combined volleys of four bullets and two rockets simultaneously. This makes his attack pattern the most dangerous in any Wolfenstein 3D family game, as neither cover nor range provides reliable safety. Unlike most bosses who require searching through the level, the Death Knight stands directly in front of the player the moment the relevant room is entered.
Tactics:
- Find cover immediately upon entering — the Death Knight fires without delay
- Run past him into adjacent rooms, clear supporting enemies with chaingun fire, then find nearby health and ammo before returning
- Face him one-on-one if at all possible — additional enemies during this fight are extremely dangerous
- Find cover the instant he begins his attack animation — waiting to see the full volley is too late
- He drops only a gold key and the game does not end here — health and ammo management must continue into the final map
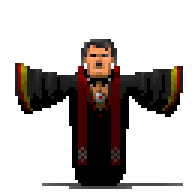
Angel of Death
- Health: 1,450 / 1,550 / 1,650 / 2,000
- Points: 5,000
- Weapon: Magical projectile attack — sometimes fires a rapid burst before a long recovery period
- Drops: Nothing — defeating him ends the game
- Alert quote: "Prove your worth, human!"
- Death quote: "You may wield the Spear."
- First appearance: Spear of Destiny, Map 21

Description:
The Angel of Death is the final boss of Spear of Destiny. According to the lore, Hitler made a blood pact with the Angel, offering the souls of his Nazi soldiers in exchange for the Spear's protection. The Angel fires a powerful magical projectile that can kill in a single hit on harder difficulties. He has a significant structural weakness: after firing a rapid multi-shot burst he enters an extremely long recovery period, standing completely motionless. However, the Ghosts that fill the arena complicate every attempt to exploit this weakness by converging on the player from all sides.
Tactics:
- Keep moving constantly — the Ghosts punish standing still and cannot be ignored indefinitely
- Strafe the Angel's projectile when it is fired individually; the rapid burst requires immediate evasive action
- Use the Angel's long recovery window after a rapid burst to deal sustained damage
- Shoot Ghosts only when their contact drain becomes an immediate threat — ammo spent on Ghosts is ammo not spent on the Angel
- Map 21 is generously stocked with ammunition — the fight is designed to be survivable with proper movement
- Defeating the Angel ends the game immediately; nothing needs to be saved afterward
Spear of Destiny Mission Pack Bosses
The two Spear of Destiny Mission Packs — Return to Danger and The Ultimate Challenge — replace all four Spear of Destiny bosses with new characters at identical map positions. The gameplay is largely the same but the roster and lore are different.
Submarine Willy
- Health: 850 / 950 / 1,050 / 1,200
- Points: 5,000
- Weapon: One chaingun and one machine gun
- Drops: Gold key
- Alert quote: "Was zum Teufel?" (What the hell?)
- Death quote: "Verdammt!" (Damn!)
- First appearance: Return to Danger, Map 5 — The Ultimate Challenge, Map 5
- Replaces: Trans Grösse
Description:
Submarine Willy is the first boss of both Mission Packs. He was formerly a submarine captain who underwent a lobotomy after repeatedly attacking fellow soldiers, after which he was reassigned to guard duty. He is described as permanently confused and angry, shooting at virtually anything that moves. Like Gretel and Trans, his accuracy is slightly reduced compared to Hans's SS-precision fire code.
Tactics:
- All Hans Grösse tactics apply exactly — the fight is mechanically identical to fighting Hans
- Watch the attack telegraph, take cover, return fire during the recovery window
- Maintain distance, avoid point-blank range
- He drops a gold key rather than ending the level — continue managing resources for what follows
Professor Quarkblitz
- Health: 950 / 1,050 / 1,150 / 1,300
- Points: 5,000
- Weapon: Chaingun and rocket launcher
- Drops: Gold key
- Alert quote: "Dein letzter Fehler!" (Your last mistake!)
- Death quote: "Nein! Nicht schon wieder!" (No, not again!)
- First appearance: Return to Danger, Map 10 — The Ultimate Challenge, Map 10
- Replaces: Barnacle Wilhelm

Description:
Professor Quarkblitz is the scientist behind the genetically engineered mutant bats and the creator of the Robot. He is behaviourally identical to Barnacle Wilhelm — fast movement, chaingun and rocket launcher combination, and a health pool above most bosses at this stage of the game. His death means that the bat soldiers and the Robot prototype will never go into full production for the Nazi war effort.
Tactics:
- All Barnacle Wilhelm tactics apply exactly
- Constant movement, strafe the rockets, cover for the chaingun, manage the irregular arena layout
- He drops a gold key rather than ending the level — resources carry forward into the next map
Major Hans "The Axe" Von Schlieffen
- Health: 1,050 / 1,150 / 1,250 / 1,400
- Points: 5,000
- Weapon: Dual chainguns and close-range melee damage (cleavers)
- Drops: Gold key
- Alert quote: "Zeig was du kannst, du feigling!" (Show what you can, you coward!)
- Death quote: "Du bist der stärkste." (You are the strongest.)
- First appearance: Return to Danger, Map 16 — The Ultimate Challenge, Map 16
- Replaces: The Übermutant
- Note: Bleeds purple like the mutants; makes mechanical sounds on death; likely not entirely human
Description:
Major Hans "The Axe" Von Schlieffen is Hitler's most decorated special forces officer, personally responsible for the retrieval of the Spear of Destiny from American custody. Of the twenty-three soldiers who went on that mission, only Von Schlieffen returned. His sprite features glowing lights beneath a skull-shaped mask and he bleeds purple, implying a connection to Schabbs's mutant programme. He is behaviourally identical to the Übermutant.
Tactics:
- All Übermutant tactics apply — maintain maximum distance at all times
- His speed is the most dangerous element; close range is almost certainly fatal
- Use cover in the arena to set up distance before engaging
- Break off to cover immediately when his chaingun fires
- He drops a gold key rather than ending the game — resource management continues
The Robot
- Health: 1,250 / 1,350 / 1,450 / 1,600
- Points: 5,000
- Weapon: Dual chainguns and dual rocket launchers
- Drops: Gold key
- Alert quote: An alarm klaxon
- Death quote: Electrical breakdown and sparking sounds
- First appearance: Return to Danger, Map 18 — The Ultimate Challenge, Map 18
- Replaces: The Death Knight
Description:
The Robot is the creation of Professor Quarkblitz — described as the most sophisticated artificial intelligence the Nazis have produced, capable of adapting and learning rather than following fixed programming. In gameplay it is mechanically identical to the Death Knight in every respect: dual chainguns and dual rocket launchers fired in combined volleys, the same Map 18 layout forcing an immediate confrontation at the entrance, and the same tactical demands.
Tactics:
- All Death Knight tactics apply exactly
- Find cover immediately on entering the room — the Robot engages without delay
- Clear surrounding enemies before facing the Robot directly
- It drops a gold key rather than ending the game — manage health and ammo for the final map
Devil Incarnate
- Health: 1,450 / 1,550 / 1,650 / 2,000
- Points: 5,000
- Weapon: Magical projectile attack — rapid burst followed by long recovery
- Drops: Nothing — defeating him ends the game
- Alert quote: "Zeig was du kannst, du feigling!" (Show what you can, you coward!)
- Death quote: "Du bist der stärkste." (You are the strongest.)
- First appearance: Return to Danger, Map 21 — called "Abigor, demon of darkness" in The Ultimate Challenge
- Replaces: The Angel of Death
Description:
The Devil Incarnate is the final boss of both Mission Packs. In Return to Danger he appears as the Devil Incarnate. In The Ultimate Challenge he is identified as Abigor, demon of darkness. He is accompanied by Ghosts in Return to Danger and by Radioactive Mist in The Ultimate Challenge, which perform the same flanking role as the Ghosts in the Spear of Destiny finale. He is in every mechanical respect identical to the Angel of Death — same health values, same speed, same attack pattern, same long recovery after a rapid-fire burst.
Tactics:
- All Angel of Death tactics apply exactly
- Keep moving to manage the accompanying Ghosts or Radioactive Mist
- Exploit the long recovery window after his rapid burst to deal sustained damage
- Strafe the single projectile when fired; take immediate evasive action during the rapid burst
- Defeating the Devil Incarnate ends the game — nothing needs to be preserved afterward
Enemy Quick Reference
- Guard — 100 points. Pistol. Slowest human enemy. Drops 4 rounds of ammo.
- Dog — 200 points. Bite only. One hit point. No ammo drop. Fastest enemy in the game.
- Officer — 400 points. Pistol. Fastest human enemy. Dodges laterally. Drops used clip.
- Mutant / Bat — 700 points. Rapid double pistol shot. Silent alert. Drops used clip.
- SS — 500 points. Machine gun burst of 4 or more shots. Toughest regular enemy. Drops machine gun or clip.
- Pac-Man Ghosts — 0 points. Invincible. Touch damage only. Run.
- Ghost / Radioactive Mist — 200 points. Unkillable. Touch damage. Regenerates after being shot.
- Hans, Gretel, Trans, Submarine Willy — 5,000 points. Dual chainguns. Drop gold key.
- Doctor Schabbs — 5,000 points. Thrown syringes. Ends episode on death. Highest health on Death Incarnate of any boss.
- Fake Hitler — 2,000 points. Fireball stream of eight projectiles. No ammo drop. Mini-boss, not a full boss.
- Mecha Hitler — 5,000 points. Quad chainguns. Triggers second phase on death.
- Adolf Hitler — 5,000 points. Dual chainguns. Fastest boss in the game. Ends the episode on death.
- Otto Giftmacher — 5,000 points. Rocket launcher only. Only enemy who uses solely rockets. Ends episode on death.
- General Fettgesicht — 5,000 points. Chaingun and rocket launcher. Ends the game on death.
- Übermutant / Hans von Schlieffen — 5,000 points. Chaingun and cleavers. Fastest boss. Drops gold key.
- Death Knight / Robot — 5,000 points. Dual chainguns and dual rocket launchers. Most heavily armed enemy in the game. Drops gold key.
- Barnacle Wilhelm / Professor Quarkblitz — 5,000 points. Chaingun and rocket launcher. Fast movement. Drops gold key.
- Angel of Death / Devil Incarnate — 5,000 points. Magic projectile with rapid-burst mode. Long recovery after burst. Ends the game on death.