
Using SpriteMaker — Tips — by doomjedi
SpriteMaker (by Adam Biser) converts BMPs to 256-color BMPs using palette color matching. It features various scaling, alignment, hue adjustment, and transparency settings. Download it here.
![]()
Tip 1 — Use the "Set All" button
The Set All button lets you set all brightness values to the same value at once, without changing each one manually. Note that the value can be set higher than 100.
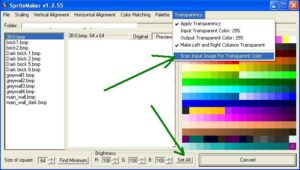
Tip 2 — Fix transparency issues
If an image that should be transparent isn't displaying as transparent, use:
Transparency → Scan Input Image for Transparent Color
Tip 3 — Brightness is not one-size-fits-all
Not all darker wall variants use the same brightness setting. For most cases it's 95% or 90% — but the right value depends on the specific image, palette, color range, and wall material (wood, stone, etc.). Always use the preview window.
The goal is an image that is neither too dark nor too light, while preserving its full color richness. If 95% starts reducing the number of distinct shades of the main color, try 94%, then 93%, and so on — until the result is darker but still as color-rich as the original.
Automatically applying the same brightness percentage to all darker wall variants will cause loss of color richness and poor results.
Tip 4 — Reset brightness after each task
SpriteMaker remembers its brightness values between sessions and even after reloading. Always reset it back to 100 after finishing each task — Set All → 100. A "task" may involve more than one image, but reset when moving on to something new.
Tip 5 — Not every texture needs a darker variant
Some texture types should have their darker variant look identical to the light one — forest textures, trees, and similar natural surfaces, for example. These grow in free, organic formations and don't follow the straight 90-degree shading logic of a flat wall. Applying wall-style shading to them is a common mistake.
The same applies to background textures when no parallaxed sky is used.
Always think about what the particular texture represents before creating a darker variant — don't work on autopilot.
To return to the GFX tutorials, click here.