
Using RecolorBMP — by doomjedi
RecolorBMP (by Adam Biser) is a semi-automatic recoloring tool for 256-color images. "Semi-automatic" means you manually control the recoloring of each color in the palette — giving you the fullest possible control over the recoloring process. The software is written in Visual Basic 6.
Download it here.
Getting started
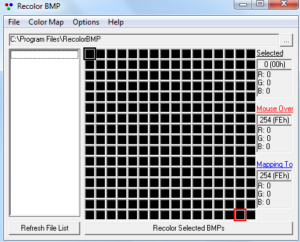
When you open RecolorBMP, select the directory where your sprites are. When you select a sprite, a preview window appears. The left side shows the image before recoloring, and the right side shows the image in its current recolored state.
How the palette table works
When you move your mouse over the left picture, the colors under your cursor are highlighted in the palette table — so you can see exactly which color range is being used. For example, you might notice your image uses greens ranging from light green to dark green, and you want to recolor those to red.
Recoloring step by step
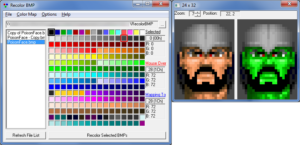
You recolor the image manually using the palette table:
- Left-click a color to select it as the color to be recolored.
- Right-click another color to recolor all pixels of the left-clicked color to that new color.
- Repeat — left-click, right-click, left-click, right-click — color by color, while watching the updated preview in the right window.
Tips and techniques
For clarity, the tips below use red (RED) and blue (BLUE) as example colors throughout.
1. Scan the color range first
Before recoloring, mouseover the REDs in the left picture to identify the brightest and darkest shades actually used in the sprite. Many sprites don't use the full range of a color — only a limited subset. Knowing the exact range helps you map colors accurately, and is especially useful when recoloring to a color that has fewer distinct shades in the palette than the original.
2. Check for unused colors
Not all RED shades may actually appear in a given sprite. Before automatically mapping all REDs to BLUEs, check which shades are genuinely used — unused ones can simply be skipped.
3. Working with selections
By first selecting an area in the left picture with your mouse, only that area will be recolored. There is also an option to invert this behavior, so that only pixels outside the selected area are recolored — find this under Options → Recolor Outside the Selection.
4. Recoloring multiple areas of the same sprite
To recolor distinct areas separately — such as two hands, or a head and a body — select one area, press Recolor, then select the next area and press Recolor again. Each previous recoloring is remembered, so you can work through multiple areas quickly in just a few seconds.
5. Fine-tuning brightness after recoloring
If the recolored result needs to be lighter or darker, you don't have to start over or switch tools. Simply recolor within the same BLUEs — map each BLUE shade to a slightly darker or lighter BLUE a few steps to the left or right in the palette. This gives you per-color control of the final result without leaving RecolorBMP.
6. Saving your recoloring scheme
Save your current recoloring scheme for future use via Color Map → Save As. Give it a clear, descriptive name. Save as often as possible — RecolorBMP can crash occasionally, but in that case you can recover your sprite from the automatic backup folder the program creates.
7. Resetting before a new session
After saving a palette — and before starting any new recoloring session — always reset the color palette first: Color Map → Reset. Do this each time you open RecolorBMP to make sure you're starting from a clean state.
Applying to multiple files
If you have more than one image to recolor, select all the files in the left panel (using Shift + Down Arrow) and press the "Recolor Selected BMPs" button. All images will be recolored instantly. Backups of the originals are automatically saved in a subdirectory, so the process is fully reversible.
To return to the GFX tutorials, click here.